
Scraping a Cast Iron Skillet: Safe Tools, Methods, and Rules
This post contains affiliate links. As an Amazon Associate, we earn from qualifying purchases.
Yes, you can scrape a cast iron skillet, but only with specific tools. The manufacturer, Lodge, explicitly states metal utensils are fine because there is “no chemical coating to damage.” For cleaning, dedicated pan scrapers, wooden spatulas, or stiff nylon brushes are ideal. Steel wool is reserved for rust removal only, not daily scraping, as it can strip the polymerized oil seasoning you’ve built up.
That permission for metal tools is a direct quote from the manual for a specific skillet, the Lodge L8SK3. It flips the old wives’ tale about never using metal on its head. The real question isn’t about permission; it’s about consequence. What you scrape with, and how hard you press, decides whether you’re maintaining the pan or slowly sanding its protective surface away.
This guide breaks down the three categories of scrapers: the daily drivers, the rust-removal specialists, and the tools that belong in the trash. You’ll get the manufacturer specs, the pro-kitchen disagreements, and the physical reason a wooden spatula works when boiling water fails.
Key Takeaways
- Lodge’s official manual for the L8SK3 skillet states “Use any utensils you like, even metal.” The ban on metal is a myth for modern, seasoned cast iron.
- For stuck-on food, use a dedicated Lodge pan scraper, a stiff nylon brush, or a wooden spatula. Steel wool is for rust removal only, not daily cleaning.
- The “boiling water” method often fails on pan sides because you can’t effectively scrape vertical surfaces in a shallow pool of water.
- Scraping removes carbonized food gunk, not the seasoning itself, which is oil polymerized molecularly onto the iron. Aggressive sanding is what strips it.
- Soap is safe and recommended by manufacturers to prevent grease buildup; the old no-soap rule applied to lye-based cleaners, not modern dish detergents.
What Should You Use to Scrape a Cast Iron Skillet?
Head to any hardware store and you’ll find a wall of abrasive pads and scrubbers. Most will ruin your skillet’s finish within a month. The right tool matches the job: removing food, not seasoning.
For 90% of post-cooking cleanup, you need one of three things. A stiff-bristled nylon brush scours without scratching. A dedicated pan scraper, like the ones Lodge makes, has a beveled edge designed to lift carbon without gouging. A simple wooden spatula works on anything that’s slightly stuck after a deglaze. These tools clean the surface of the seasoning, not the seasoning off the surface.
For removing stuck-on food, a Lodge pan scraper or a stiff nylon brush applies focused pressure without the abrasive filaments that tear into the polymerized oil layer. Steel wool’s fine metal strands act like a hundred tiny sandpaper grits, which is why manufacturers restrict it to rust emergencies.
The mechanism here is abrasion level. Seasoning is a hard, baked-on plastic-like coating. A nylon filament or a wooden edge can’t scratch it meaningfully, but they can break the mechanical bond holding burnt food to it. Steel wool, especially on a rough-textured pan, can dig into the microscopic valleys of the casting and lift the seasoning from its anchor points.
Where this goes sideways: Using a “green scrubby” pad or a stainless steel chore boy. These are more abrasive than steel wool on the seasoning. They’ll leave a dull, grey patch where the shiny black coating used to be, and that spot will rust faster because the iron is exposed.
The Right Scrapers and the Wrong Ones
Your goal is to apply force to the food, not the pan. This table splits common tools by their intended target and the specific risk of using them wrong.
| Tool | Best For | Risk If Used Daily |
|---|---|---|
| Nylon Brush | General cleanup, light stuck-on bits | None. The standard for routine care. |
| Lodge Pan Scraper | Focused scraping of baked-on food | Dulling the edge if used on a glass stovetop. |
| Wooden Spatula | Deglazing and scraping while cooking | Can char if left on a hot burner. |
| Kosher Salt | Abrasive paste for stubborn spots (with oil) | Can leave a gritty residue in pan pores if not rinsed thoroughly. |
| Steel Wool | Removing rust spots only | Strips seasoning, leaves the iron bare to rust. |
| Metal Grill Brush | Never. For grill grates only. | Scratches seasoning deeply; wire bristles can snap off and become a hazard. |
Notice steel wool sits in its own category. Lodge says it’s “perfectly fine” for rust but advises against it for daily cleanup. America’s Test Kitchen, however, suggests a “good hard scrub with soap and steel wool” can address issues short of a full strip and re-season. This is the pro disagreement: Lodge protects the factory seasoning above all, while a test kitchen with hundreds of pans views seasoning as a renewable resource. For a home cook, follow Lodge’s rule. Keep steel wool for the rust eraser kit.
Why “Just Boil Water” Doesn’t Always Work
You’ll see this advice everywhere: add water, boil, and the stuck food releases. It’s a good start, but it has a documented flaw. The Kitchn’s testing found the method “only really worked on the bottom of the pan.” Scraping the sides effectively with a wooden spoon in a pan full of boiling water is awkward and unsafe.
The physics work against you. Boiling water loosens food through thermal expansion and hydration. It’s excellent on the flat bottom where the food sits in the water. The vertical sides, however, are only exposed to steam. Steam is less effective at transferring heat and breaking bonds, so the crud on the walls often stays put. You’re left with a clean bottom and a ring of stubborn gunk up top.
So use the boiling water trick for what it is: a pre-soak for the worst of it. After boiling and dumping the water, you’ll still need your scraper or brush to finish the job on the sides. This two-step process, hydrate then mechanically remove, saves your elbows and your pan.
The One Scraping Mistake That Invites Rust

Scraping doesn’t cause rust. Leaving moisture in the microscopic scratches you might have made does. This is the timeline most guides skip.
Cast iron rusts when bare iron meets water and oxygen. Your seasoning is a barrier. If you use a mildly abrasive pad or scrape too aggressively on a thin patch, you can thin that barrier. You won’t see bare iron yet. But the next time you wash the pan, water can seep into those thinned spots and sit against the iron. If you don’t dry the pan thoroughly, and that means heat-drying on the stove, the water lingers.
Common mistake: Assuming a towel-dry is enough after a heavy scrape. Moisture remains in the texture of the iron. That tiny amount of water, trapped against the metal overnight, is all it takes to start oxidation.
You’ll see the first small orange specks within 24 to 48 hours, usually around the rim or the center where scraping pressure is highest. The fix is immediate: hit those spots with steel wool (yes, now it’s allowed), dry the pan completely, and apply a thin layer of oil. The mistake is letting it go, which turns a 5-minute fix into a full rust removal project.
Can Scraping Ruin the Seasoning?
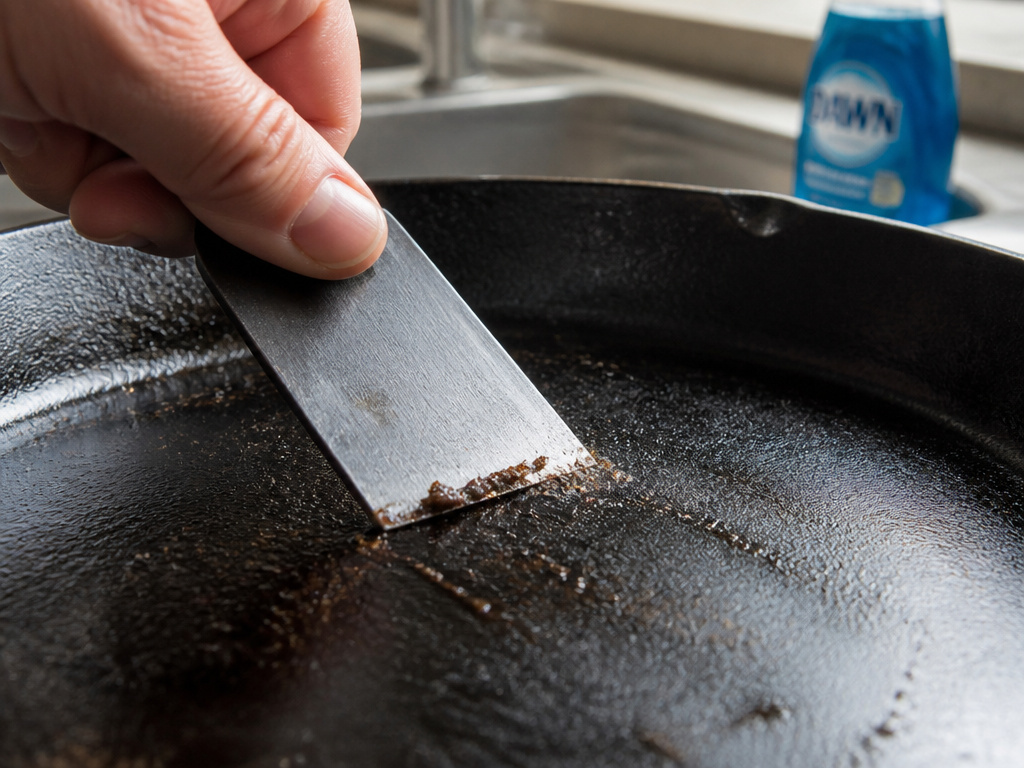
It can, but you have to work at it. Seasoning isn’t a paint that flakes off. It’s a polymer, oil that has been heated to the point where its molecules cross-link into a hard, stable plastic coating bonded to the iron. Scratching it with a metal spatula during cooking doesn’t hurt it. Sanding it with an abrasive pad does.
Think of it like the finish on a wooden table. You can slide a plate across it all day. Take sandpaper to it, and you’ll go through the finish to the raw wood. The same principle applies to your seasoned cast iron skillet. Daily cleaning your skillet with appropriate tools maintains the surface. Attack it with steel wool or a harsh cleanser, and you sand through to the iron.
This is why the proper cleaning ritual ends with a thin coat of oil. You’re not “re-seasoning” every time. You’re topping up the protective layer, filling in any microscopic wear from that day’s use. Over years, this builds a thicker, more resilient coating. It’s how a pan goes from good to non-stick great.
What About Using Soap?
This is the other big myth. Yes, you can use soap. Lodge states plainly: “Soap is totally okay! The soap we use for washing dishes today is no longer strong enough to remove seasoning.” The old rule came from a time when soap contained lye, which would indeed strip seasoning. Modern dish detergents are surfactants that lift grease and food, not chemical strippers.
Using a drop of soap helps prevent the buildup of stale, polymerized grease that can make your pan sticky and gross. It’s a key part of cast iron maintenance. If your pan feels sticky after cleaning a burnt pan, it’s often because of too much oil, not soap.
Step-by-Step: How to Scrape and Clean Your Skillet Safely
Follow this sequence after cooking, while the pan is still warm (not scorching hot). It takes two minutes and prevents burnt-on food from becoming a weekend project.
- Let it cool slightly. A warm pan is easier to clean than a cold one. If food is badly stuck, add a little warm water to the warm pan to loosen it.
- Scrape with your chosen tool. Use a nylon brush, Lodge scraper, or wooden spatula. Apply firm pressure to the food, not frantic scrubbing across the whole pan. Focus on stuck spots.
- Wash with warm water and a drop of dish soap. Scrub the entire interior with a soft sponge or brush. This wash with soap step removes the oily residue that leads to a sticky skillet.
- Rinse and heat-dry immediately. Rinse thoroughly, then place the pan back on a low burner for 2-3 minutes until all moisture evaporates. This is the non-negotiable step to prevent rust.
- Apply a micro-thin coat of oil. Once dry, add 3-4 drops of a neutral oil to the pan. Wipe it around the interior with a paper towel, then use a clean towel to wipe almost all of it back out. The pan should look matte, not shiny.
Skipping step 4 is how you damage your skillet with rust. Skipping step 5 means the pan’s surface stays dry and can start to degrade over many washes, leading to food sticking sooner.
When to Escalate Beyond Scraping
Sometimes, scraping isn’t enough. If you encounter any of these three scenarios, you need a different tactic.
- Thick, Flaky Rust: This is beyond a surface spot. Use steel wool and elbow grease to scour it down to bare, grayish iron. Then, you must fully cure a cast iron skillet to re-establish the seasoning.
- Gummy, Sticky Buildup: This is old, unpolymerized oil. Boiling water won’t cut it. Scrub with soap and a nylon brush under very hot water. If it persists, a paste of kosher salt and a drop of water can act as a gentle abrasive to lift it.
- Thick Carbon Crust: This is years of burnt-on grease that looks like black, rocky deposits. This requires a full strip, often with a lye-based oven cleaner or electrolysis. This is a project, not routine maintenance. For a detailed walkthrough, the Wirecutter cast iron cleaning guide outlines the oven-cleaner method with appropriate safety warnings.
Recognizing when to stop scraping and start a restoration is what separates a maintained pan from a ruin a cast iron skillet story. If your scraper is making no progress and you’re bearing down hard, stop. You’re likely dealing with a problem that needs a chemical or thermal solution, not more force.
Frequently Asked Questions
Can you use a metal spatula on cast iron?
Yes. Lodge’s official position, printed in the L8SK3 skillet manual, is “Use any utensils you like, even metal. There is no chemical coating to damage.” The seasoning is a hardened oil coating bonded to the iron, not a non-stick teflon that chips. A metal spatula might leave light scratches, but it won’t compromise the seasoning’s function.
Does scraping with metal remove the seasoning?
It can thin it over time if you’re excessively aggressive, but it won’t “remove” it in sheets. Seasoning is removed by sustained abrasion (steel wool), chemical action (lye, vinegar soak), or extreme heat (self-cleaning oven). Normal cooking and scraping with metal tools is part of the essential cast iron skillet maintenance that builds a robust surface.
What is the absolute best thing to scrape cast iron with?
For most home cooks, a stiff nylon-bristled brush is the best all-around tool. It provides enough abrasion to clean effectively without any risk to the seasoning. For tougher jobs, a dedicated Lodge pan scraper is designed for the task. The “best” tool is the one that gets the pan clean without making you wonder if you’re causing damage.
Why is my cast iron rough even after scraping?
That’s the natural texture of sand-cast iron. Lodge notes this texture helps the initial seasoning process adhere. Over years of use and many layers of polymerized oil, it will smooth out. Don’t try to sand it smooth yourself; you’ll strip the factory seasoning and create a huge cleaning a burnt cast iron skillet project.
Can you scrape enameled cast iron?
No. Do not use any metal scraper or abrasive pad on an enameled cast iron Dutch oven or skillet. The enamel is a glass coating that will chip and scratch. Use only soft sponges, nylon brushes, and approved enamel cleaners like baking soda paste.
The Bottom Line
Scraping is not the enemy of your cast iron skillet; moisture is. The right scraper, a nylon brush, a wooden tool, or a Lodge-made implement, is a maintenance tool, not a weapon. The manufacturer’s own manual gives you permission to use metal. The real work is in the routine that follows: a quick wash, a thorough heat-dry, and a whisper-thin coat of oil. That sequence, done consistently, turns a pan you can scrape into a pan that never truly needs it. Stop worrying about harming the seasoning with a spatula. Start worrying about the towel you used that left it damp.
