
How Do You Cure a Griddle: The 30-Minute Method for a Non-Stick Film
This post contains affiliate links. As an Amazon Associate, we earn from qualifying purchases.
To cure a griddle, you apply a thick film of cooking oil or fat to a thoroughly cleaned, warm surface and maintain that film at cooking temperature for a full 30 minutes. This polymerizes the oil into a durable, non-stick barrier. The Globe Electric Griddle manual specifies this 30-minute hold, a step most home guides skip, which is why their surfaces carbonize into a gummy mess within weeks.
That 30-minute timer is the minimum time needed for the oil’s molecular chains to break down and re-form into a hard, slick coating. Skip it, and you’re just wiping grease on hot metal.The oil never fully bonds, it stays tacky, and the next round of bacon fat sticks to it instead of the steel.
What follows is the difference between a coating that lasts and one that flakes. We’ll walk through the exact cleaning that must happen first, the tools that won’t void your warranty, the oils that work versus those that smoke out your kitchen, and the one maintenance habit that prevents the whole process from being necessary every month.
Key Takeaways
- Curing requires a thick film of oil held at temperature for 30 minutes, per OEM manuals like Globe’s. Seasoning is a thin, quick coat.
- Never use chlorine, ammonia, iodine, or bromine-based cleaners on any griddle surface, these chemicals deteriorate the steel and void warranties.
- If grease carbonizes into a hard, gummy layer because you skipped curing, you must scour the surface back to bare metal and start over.
- Flaxseed and butter are terrible curing oils. Use a neutral, high-smoke-point oil like grapeseed, soybean, or canola.
- Check your griddle’s feet every 60 days and tighten them. Loose feet cause uneven heating and hotspotting that burns off your cured coating.
The Core Curing Process (Step-by-Step)
Curing is a deliberate bake. The goal is to transform liquid oil into a solid, polymerized layer.Rushing the 30-minute bake time is the most common reason a cure fails.
Before you start: The griddle will be hot for an extended period. Ensure it’s on a stable, level, non-flammable surface with at least 6 inches of clearance on all sides. Unplug electric models before adding oil. Have a fire extinguisher nearby. Never leave the process unattended.
Here is the sequence, grounded in the Globe Electric Griddle GEG series manual which mandates the 30-minute film.
- Clean to Bare, Dry Metal. This is non-negotiable. Any existing grease, carbon, or rust will be sealed under your new cure and will eventually lift it. For a new griddle, wash with warm, soapy water to remove factory oils. For a used one, follow the cleaning your griddle after seasoning process to strip it back. Dry it completely with heat or a towel. Any moisture will cause the oil to spatter and not adhere evenly.
- Heat the Surface Gently. Turn the griddle to a medium setting, around 275°F to 300°F. You want it warm to the touch but not smoking hot. This opens the pores of the metal and helps the oil flow into a thin, even layer. If the metal is cold, the oil will pool.
- Apply a Thick Film of Oil. Here’s where home cooks underdo it. Drizzle a generous amount of high-smoke-point oil (grapeseed, soybean) onto the surface. Using a lint-free cloth held with tongs, spread it into a thick, even film across the entire cooking surface, including the edges. It should look wet, not just glossy.
- Bake for 30 Minutes. Increase the heat to medium-high, between 400°F and 450°F. Let the oil film bake undisturbed. You’ll see it smoke, then the smoking will subside, and the surface will transform from shiny wet to a dry, matte finish. This is polymerization. The Globe manual is explicit: the film must remain for 30 minutes.
- Cool and Repeat. Turn off the heat and let the griddle cool completely. Once cool, touch the surface. It should feel smooth and dry, not tacky. If it’s sticky, the oil didn’t fully polymerize, often due to too-thick an application or too low a heat. Wipe it lightly with a dry cloth and repeat steps 2-4 with a thinner film. For a robust cure, most manuals recommend two to three layers.
| Step | Key Action | What Happens If You Skip It |
|---|---|---|
| 1. Bare Metal Clean | Scour to shiny steel, no residue. | New oil bonds to old grease, not metal; the cure flakes in days. |
| 2. Gentle Warm-Up | Heat to ~300°F before oiling. | Oil pools in cold spots, creating an uneven, sticky coating. |
| 3. Thick Film Application | Apply oil thick enough to look wet. | A thin coat vaporizes, leaving metal exposed and prone to rust. |
| 4. 30-Minute Bake | Maintain 400-450°F for a full half hour. | Oil doesn’t polymerize; it remains a tacky, carbon-attracting layer. |
| 5. Cool & Inspect | Let cool fully, check for dry smoothness. | Tackiness goes unnoticed; next cook bonds food to semi-cured oil. |
The short version: Warm, thick coat, hot bake for 30, cool, check. One round is a start; three rounds is armor.
Curing vs. Seasoning: The Difference That Determines Durability
Most people use these terms interchangeably. They’re not. Confusing them leads to a weak surface that needs constant babysitting.
Curing is the initial, foundational process. It’s what you do to a brand new griddle or one stripped to bare metal. The objective is to build the first few permanent, polymerized layers that protect the steel from oxidation and provide a base for non-stick performance. It’s a multi-step, deliberate ritual involving a thick film and extended heat.
Seasoning is maintenance. It’s the thin coat of oil you apply after cleaning your griddle after seasoning to maintain and reinforce the cured base. A proper seasoning after cooking might take 10 minutes. It’s quick, it’s light, and it assumes a healthy foundation is already there.
Think of it like painting a wall. Curing is the primer and first two coats of paint, necessary, time-consuming, and done once. Seasoning is the touch-up you do every few years to keep it looking fresh. If you try to “touch-up” a wall with no primer, it peels. If you only “season” a bare steel griddle, it rusts.
Where this goes sideways: Using butter or olive oil for the initial cure. Their low smoke points and milk solids burn into a brittle, flaky carbon layer instead of a hard polymer. That carbon then mixes with your food. Use a refined, neutral oil.
The Tools & Materials You Actually Need
 You can’t do this with paper towels and whatever oil is in the cupboard. The wrong tools leave lint, the wrong oils create a weak layer.
The Oil: High Smoke Point & Neutral
The oil’s job is to polymerize, not flavor your food. Its smoke point must exceed your griddle’s max temperature (often 450°F+).
- Best: Grapeseed oil (~420°F smoke point), Soybean oil (~450°F), Safflower oil (~510°F). These are the professional kitchen standards.
- Good: Canola oil (~400°F), Sunflower oil (~440°F).
- Avoid: Flaxseed (unstable, flakes), Butter (burns), Olive Oil (smokes too low), Bacon Grease (contains salt and particles unless meticulously filtered).
The Tools: No Substitutions
- Lint-Free Cloths: Cotton shop towels or dedicated kitchen cloths. Paper towels shred and leave fibers that burn into the surface.
- Griddle Scraper: A sharp, flat metal scraper (not a putty knife) for the initial cleaning. The Presto Slimline manual explicitly warns against metal utensils on its non-stick surface, know your surface type.
- Stiff Bristle Brush (non-metal): For scrubbing during the clean-back phase. Nylon or stiff natural fiber.
- Tongs: For holding the oily cloth safely away from your hands.
- Oven Mitts: The edges and handles get as hot as the surface.
The Critical “Clean Back” Before a Cure
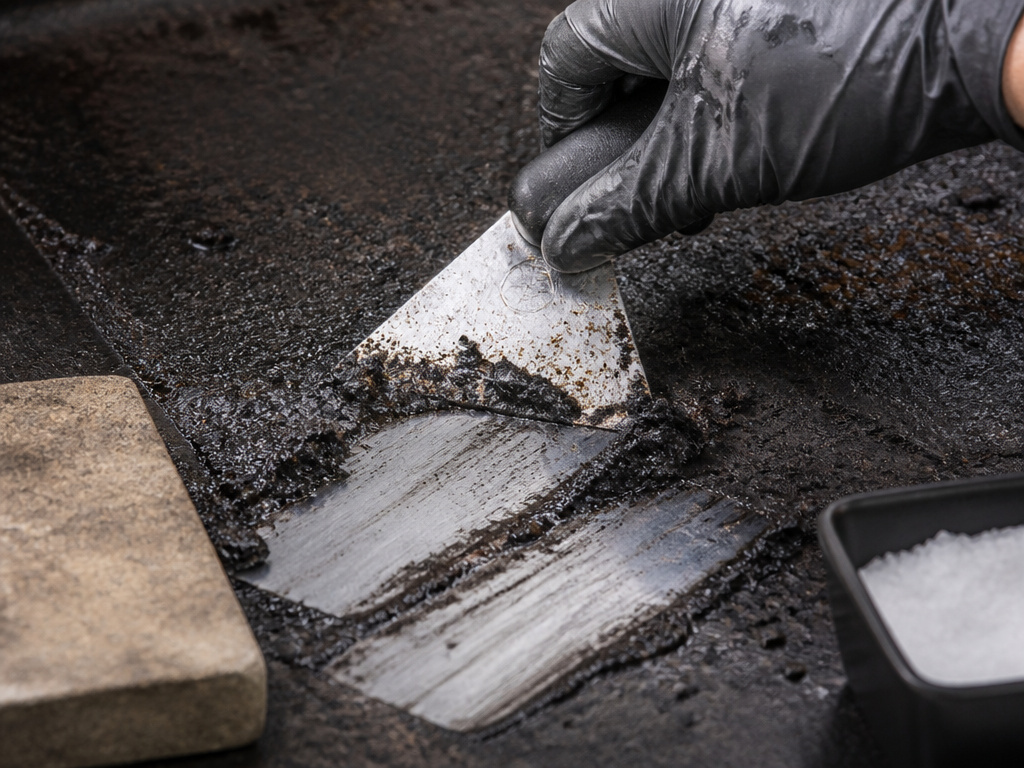 You only cure bare metal. Applying a cure over existing gunk is like varnishing over dirty wood, it looks okay until it all peels off.
The Globe manual states: “If grease is allowed to accumulate, it will form a gummy surface and carbonize into a hard substance that is extremely difficult to remove.” That’s your warning. If your griddle has this black, gummy carbon, you must remove it.
Common mistake: Pouring water on a screaming-hot griddle to “steam clean” it. This can warp thin steel plates. Cool the griddle to the 275-300°F range specified in the Hobart CG manual before introducing water.
The correct clean-back method depends on the severity:
- For Light Carbon: Let the griddle cool to warm. Scrape thoroughly with your metal scraper. Sprinkle kosher salt onto the surface and scrub with a cut potato or a stiff nylon brush, the salt acts as a gentle abrasive. Wipe clean.
- For Gummy, Built-Up Carbon: This requires more aggression. Use a griddle stone or a Scotch-Brite pad (check your manual, some non-stick surfaces forbid this). Apply a small amount of water or a commercial, non-corrosive degreaser at the warm temperature noted above and scrub. You must get down to uniform, shiny metal.
- For Rust: Address this before curing. Follow a dedicated process for removing rust from your griddle, which typically involves a vinegar soak, scrubbing with steel wool (on raw steel only), and immediate drying and curing.
After any clean-back, you must immediately dry the surface with heat and begin the initial seasoning or curing process. Bare steel will flash-rust in humid air.
Chemical Bans & Warranty Killers
Your griddle’s warranty is voided by chemical damage. The manuals are brutally clear on what not to use.
The LiberoPro Griddle manual states: “Avoid using chlorine or ammonia-based products.” The Globe Gas Griddle manual expands this to include iodine and bromine. These chemicals, found in many household cleaners and disinfectants, attack stainless steel and other alloys, causing pitting and permanent deterioration.
What does this mean for you?
- Never use bleach-based sprays, toilet bowl cleaners, or ammonia window cleaners anywhere near your griddle.
- For the exterior, use only warm, soapy water and a soft cloth.
- For the cooking surface, use the approved methods: scrapers, brushes, degreasers labeled safe for food-contact surfaces.
Using a banned chemical doesn’t just risk a spot. It can compromise the structural integrity of the metal around bolts and seams, leading to gas leaks in propane models or electrical shorts in electric ones.
Why Your Griddle’s Location & Setup Matter
Curing creates a protective layer. Your griddle’s environment constantly attacks that layer.
If you store your griddle outdoors or in a humid garage, you’re fighting a losing battle. The Napoleon Freestyle manual notes that stainless steel can stain from chlorides and sulfides in coastal air or around pools, these stains look like rust and eat at your cure. Washing exterior surfaces every 3-4 weeks with warm soapy water is their prescribed defense.
Physical setup is just as critical. The Globe manual instructs users to check and tighten the unit’s leveling feet every 60 days. Loose feet cause the griddle to rock. This creates uneven contact with the heat source, leading to hotspots. A hotspot burns off your carefully cured coating in one concentrated area, which then rusts and spreads.
Easy to miss: The drip tray and grease management system. If the tray overflows or the channel clogs, hot grease runs down the exterior or into the burner/electrical box. This grease then carbonizes on surfaces you can’t clean, becoming a fire hazard and a source of foul, burnt smells every time you heat up.
Frequently Asked Questions
Can I use Crisco to cure my griddle?
Yes, Crisco shortening is a classic choice for seasoning a cast iron griddle and works for steel tops too. It has a high smoke point (~490°F) and is pure fat with no water. The process for seasoning with Crisco is the same: apply a thin, solid layer to warm metal and bake until it stops smoking.
How is curing a Blackstone different?
The process is identical in principle. A Blackstone griddle seasoning also requires building polymerized layers on bare steel. The main difference is scale. Blackstones are larger, so managing an even heat and oil coat takes more patience. Their manuals also emphasize the initial burn-off of factory oils.
Do I need to cure a non-stick electric griddle?
No. Models like the Presto Slimline have a permanent ceramic or PTFE non-stick coating applied at the factory. The manual warns against seasoning a griddle on this surface, as it can damage the coating. Just clean with warm soapy water and non-abrasive pads.
My cured surface is sticky. What went wrong?
Sticky means unpolymerized oil. The cause is usually one of three things: too much oil applied (a thick puddle instead of a film), too low a temperature during the bake, or not enough time. The oil partially hardened but remains a gummy resin. Fix it by heating the griddle back to around 350°F and wiping firmly with a dry cloth to remove the excess, then do another round with a much thinner coat.
How often should I re-cure my griddle?
Properly cured griddle, maintained with regular post-cook seasoning, should not need a full re-cure for years. You only strip and re-cure if the surface becomes heavily rusted, develops flaky patches, or gets coated in carbonized gunk from neglect. It’s a repair, not routine maintenance.
Before You Go
Curing a griddle is a chemical reaction you control: clean metal, the right oil, sustained heat, and that critical 30-minute timer. The difference between a gummy, frustrating surface and a slick, lifetime companion is patience in those 30 minutes.
Remember the chain. A stable, level setup prevents hotspots. Avoiding banned chemicals preserves the metal. A proper cleaning process after each use, followed by a quick oiling before cooking the next time, maintains the cure. Break one link, and you’ll be scrubbing back to bare metal sooner than you think. Get the cure right once, and everything that follows is just simple upkeep.
