
How to Season a Dutch Oven: Removing the Factory Wax First
This post contains affiliate links. As an Amazon Associate, we earn from qualifying purchases.
To season a Dutch oven, you must first remove any factory-applied wax, then bake a microscopically thin layer of high-smoke-point oil onto its bare cast iron surface. The exact temperature and time depend on your oven’s specific model. Lodge calls for 450–500°F for one hour, while Vollrath specifies 350°F. This process, called polymerization, bonds the oil to the iron, creating a protective, non-stick layer that prevents rust.
That temperature gap isn’t a typo. It’s the difference between a manufacturer who seasons with industrial conveyor ovens and one who assumes you’re using a home appliance. Your oven’s manual isn’t a suggestion; it’s the blueprint for the chemical reaction you’re trying to start. Ignore it, and the oil never fully bonds.
What follows is the breakdown of that chemical blueprint: how to prep a new oven, the one tool you absolutely need, the exact steps that work for any brand, and how to tell when you’ve actually succeeded.
Key Takeaways
- Remove the wax first. New cast iron often has a protective wax coating that must be melted off at 400°F for an hour before any seasoning begins.
- “Pre-seasoned” is not “ready-to-use.” Factory seasoning is a base layer; you must apply your own seasoning before cooking to ensure food release and rust protection.
- Temperature is brand-specific. Lodge (450–500°F) and Vollrath (350°F) prescribe different oven temperatures because their factory processes differ, follow your manual.
- Enameled cast iron never gets seasoned. The glass-like coating seals the iron; applying oil to it just creates a sticky, baked-on mess.
- Thin coats win. The oil layer should be so thin it looks dry. Thick oil pools, turns sticky, and can flake off.
Bare Cast Iron vs. Enameled: The Seasoning Rule
You only season bare, uncoated cast iron. The seasoning process relies on the porous surface of raw iron bonding with heated oil.
Enameled cast iron Dutch ovens do not require seasoning, as the enamel coating seals the surface.
If your Dutch oven has a smooth, colored, glass-like interior (like a Le Creuset or Staub), that’s enamel. Washing with soap and water is all it needs. Applying oil and heat to an enameled surface doesn’t polymerize, it just bakes on a gummy residue that attracts dirt and smells. For a coated pot, the seasoning necessity is zero.
The 7-Step Seasoning Process (With the Step Everyone Misses)
This isn’t just about oil and heat. The most common failure point happens before you even open the oil bottle. Many manufacturers ship new ovens with a thin wax coating to prevent rust in storage. If you season over wax, the polymerized layer bonds to the wax, not the iron. It flakes off during the first sear.
What You’ll Need
- Bare cast iron Dutch oven and lid
- High-smoke-point oil (vegetable, canola, grapeseed)
- Lint-free paper towels or cotton cloths (2-3)
- Aluminum foil
- Oven
- Stiff nylon brush or scrubber
- Mild dish soap (optional, for initial wash)
Step-by-Step Instructions
1. Inspect and Remove Factory Wax.
Check for a waxy feel or sheen. If present, place a foil-lined baking sheet on your oven’s bottom rack. Set the oven to 400°F. Place the Dutch oven and lid upside-down on the upper rack. Bake for one hour to melt off the wax. Let cool completely in the oven.
2. Wash Thoroughly.
Scrub the oven inside and out with hot, soapy water and a nylon brush. This removes any residual wax, oils, or dust from the foundry. Rinse and dry immediately, every trace of water must be gone.
3. Apply a Microscopically Thin Oil Coat.
Pour a teaspoon of oil onto a paper towel. Wipe the entire oven, inside and out, including the lid’s underside. Then, take a clean, dry paper towel and buff aggressively. Your goal is to wipe almost all the oil back off. The surface should look barely damp, not glossy.
Common mistake: Applying oil like you’re buttering toast. A visible layer will pool, bake on tacky, and eventually crack. The bond happens at the molecular level; you need molecules, not a puddle.
4. Preheat and Position.
Preheat your oven to the temperature specified by your Dutch oven’s manufacturer. Refer to the manual. If you lack it, 450°F is a safe default for most brands. Place a sheet of aluminum foil on the bottom rack to catch any potential drips. Place the Dutch oven and lid upside-down on the middle rack.
5. Bake and Polymerize.
Bake for one hour. This is when polymerization occurs: the heat breaks the oil’s molecular chains, and they reform into a hard, plastic-like coating chemically bonded to the iron. You may see some smoke, this is normal, but ensure your kitchen is ventilated.
6. Cool Completely in the Oven.
Turn off the oven. Do not open the door. Let the Dutch oven cool all the way down to room temperature inside the shut-off oven. This slow cooling lets the bonded layer set fully and prevents thermal shock.
7. Assess and Repeat.
Your oven should now have a semi-gloss, bronze-to-dark-brown patina. If the finish looks patchy or dry, repeat steps 3 through 6. Two to three thin layers create a far more durable foundation than one thick one.
| Manufacturer | Recommended Seasoning Temp | Key Differentiator |
|---|---|---|
| Lodge | 450–500°F | Assumes home ovens; higher temp ensures polymerization. |
| Vollrath | ~350°F (176°C) | Commercial pre-seasoning; lower temp is a maintenance coat. |
| Genuine Dutch Oven | 200°C (392°F) | Multi-step process: heat to 180°C, oil, then heat to 200°C until smoking stops. |
Choosing and Applying Your Oil
The oil’s job is to transform under heat. You need one with a high smoke point, the temperature at which it starts to break down and smoke. Oils with low smoke points burn before they can properly polymerize, leaving a weak, sticky layer.
Best Options:
- Vegetable/Canola Oil: Readily available, affordable, and reliable. Smoke point around 400-450°F.
- Grapeseed Oil: Excellent high smoke point (approx. 420°F) and neutral flavor.
- Flaxseed Oil: Creates a very hard, durable coat but is expensive and can chip if applied too thickly.
Application is everything. Use the “buff-to-dry” method. After wiping oil on every surface, including the exterior and handle, take a clean towel and rub as if you’re trying to erase a mistake. When you think you’ve removed enough, wipe once more. The iron should feel barely slick.
Why “Pre-Seasoned” Isn’t Enough
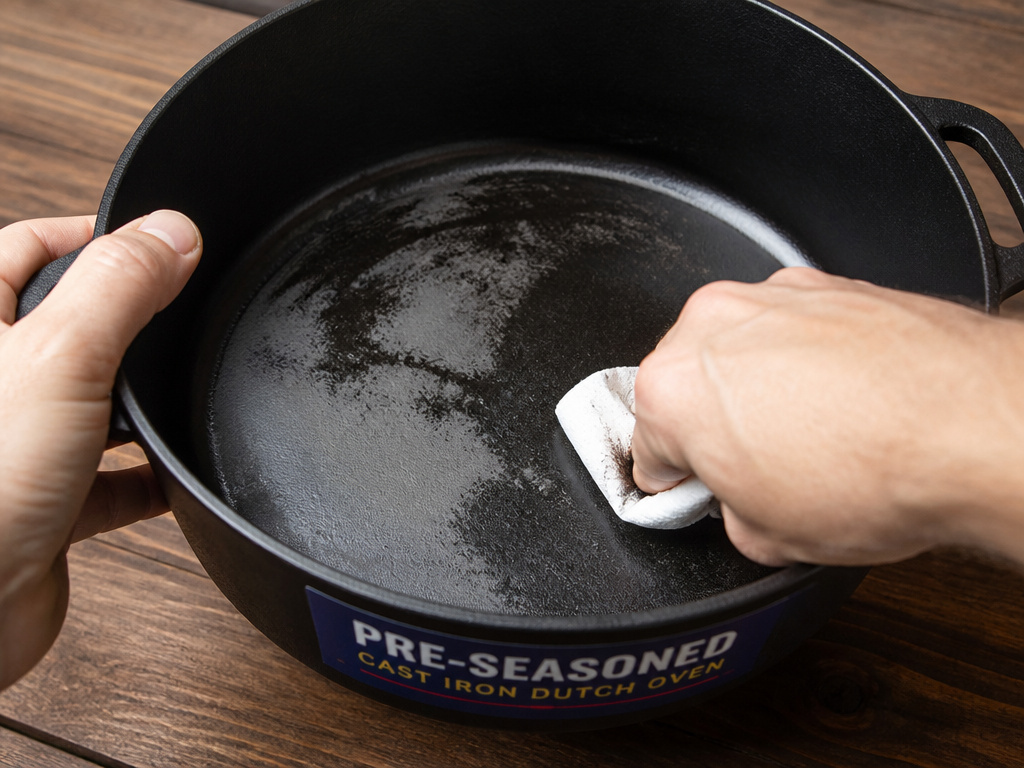 When a brand like Lodge or Vollrath labels a piece “pre-seasoned,” they mean it has one base coat applied at the factory. It’s enough to prevent rust on the shelf, but it’s not a cooking surface.
This pan is pre-seasoned, however before using it must washed and seasoned.
That line from a Vollrath manual says it all. Factory seasoning is thin, applied by machine, and can have bare spots from hanging hooks. Your first round of home seasoning fills in those gaps and builds a layer tailored to your kitchen’s heat. Skipping this is the main reason for sticking food on a brand-new pan.
Troubleshooting Common Seasoning Problems
 A perfect coat isn’t always black and glossy. Here’s what to do when things look off.
Patchy or Sticky Finish
This means too much oil. The sticky patches are oil that pooled and never fully cured. Fix it by scrubbing the sticky spots with coarse salt and a damp cloth to deglaze the surface. Wash, dry thoroughly, and apply a new, ultra-thin coat at the correct temperature.
Flaking or Peeling
Flaking indicates the polymerized layer didn’t bond to the iron, often because of wax residue or a contaminant (like soap not fully rinsed). You must strip it back. Scour the flaking areas with steel wool or a dedicated cast iron cleaner, then re-season from scratch.
Rust Spots
Rust means moisture met bare iron. Immediately scrub the spot with vinegar or a baking soda paste until the rust is gone. Dry the oven completely on the stovetop over low heat, then apply a thin layer of oil to the affected area. For widespread rust, a full strip and re-season is needed.
| Symptom | Likely Cause | Immediate Fix |
|---|---|---|
| Sticky/Tacky Feel | Oil applied too thickly | Scrub with salt, re-season with thinner coat. |
| Flaking Black Layer | Contamination under seasoning | Strip area, clean thoroughly, re-season. |
| Orange Rust Spots | Moisture on bare iron | Scrub off rust, dry completely, oil immediately. |
| Smoke During Use | Burnt food residue or old oil | Clean your Dutch oven thoroughly and re-season. |
Maintaining Your Seasoning
Seasoning isn’t a one-time task. It’s a living surface that improves with correct use and care.
After Every Use:
- Let the oven cool slightly, then clean it with hot water and a stiff nylon brush. For stubborn bits, use a chainmail scrubber or coarse salt.
- Avoid prolonged soaking, as it can damage seasoning by leaching the bonded oils.
- Dry it immediately and completely. Place it on a low burner for 2-3 minutes to evaporate all moisture.
- While still warm, apply a tiny drop of oil and wipe it around the interior with a paper towel. Buff until it looks dry.
This routine reinforces the non-stick layer and protects against rust. It also means you’ll rarely need a full oven re-seasoning session.
What to Avoid:
- Dishwashers: The detergent and prolonged moisture will destroy the seasoning. This is true even for a Lodge Dutch oven, despite its durability.
- Abrasive Cleansers: Steel wool or scouring pads scrape off the polymerized layer.
- Cooking Acidic Foods Early On: Tomatoes, wine, or vinegar can degrade new, thin seasoning. Wait until you have 5-6 solid cooking layers before braising with wine.
- Storing While Damp: This is the fastest path to rust. Always ensure it’s bone-dry.
Frequently Asked Questions
Do you need to season a Dutch oven before first use?
Yes, always. Even “pre-seasoned” ovens require a user-applied seasoning layer before cooking. This ensures a complete, even coating that fills any gaps from the factory process and prevents food from sticking immediately.
Can you season an enameled Dutch oven?
No. Enameled cast iron has a vitreous glass coating that is non-porous. Oil cannot bond to it. Attempting to season an enameled oven will only create a baked-on, sticky film that is difficult to remove and serves no protective purpose.
Why is my seasoned Dutch oven sticky?
Sticky surface means excess oil that did not fully polymerize. This happens when the oil layer is too thick or the oven temperature was too low. To fix it, place the empty oven in a 450°F oven for an hour to harden the oil, or scrub the sticky residue off with coarse salt and re-season properly.
How often should you re-season a Dutch oven?
There’s no set schedule. Re-season only when you notice consistent sticking, rust spots, or a flaking surface. With proper maintenance, cleaning with hot water, drying thoroughly, and applying a micro-coat of oil after each use, a well-seasoned oven can go years without needing a full oven re-seasoning.
Can you use soap on a seasoned Dutch oven?
Yes, modern mild dish soaps are fine. The old rule came from lye-based soaps that would strip seasoning. Today’s gentle soaps won’t break down the polymerized oil bond. The real enemies are prolonged soaking and abrasive scrubbing.
The Bottom Line
Seasoning a Dutch oven is chemistry, not mystery. Remove the factory wax, buff on a vanishingly thin layer of oil, and bake it at your model’s specified temperature. That bond is what keeps rust out and your stew from sticking. The best maintenance is simply using it, each time you sauté onions or sear a roast, you’re adding another layer to a surface that only gets better.
