
How Do You Season a Griddle: The Complete 90-Minute Guide
This post contains affiliate links. As an Amazon Associate, we earn from qualifying purchases.
Seasoning a griddle requires three things: a high-smoke-point oil, a heat source capable of 400-450°F, and the patience to repeat the oil-and-heat cycle multiple times. The goal is to polymerize the oil—bake it onto the metal until it forms a hard, slick, non-stick coating that protects against rust. Skipping cycles leads to a sticky surface that attracts food and grime.
That polymerization is the whole game. It turns a liquid fat into a permanent, protective plastic-like layer. Get it right, and your griddle becomes virtually non-stick and rust-proof. Rush it, and you create a gummy mess that ruins the first meal and requires a full strip-down to fix.
What follows: the exact oil specs that matter, the 5-step method pulled from manufacturer manuals, the two mistakes that guarantee a sticky finish, and how to tell when your seasoning is actually done. This works for Blackstone, cast iron, carbon steel, and stainless steel flat tops.
Key Takeaways
- The smoke point of your oil dictates the success of the seasoning. Oils like canola (400°F) or avocado (520°F) polymerize cleanly; olive oil (375°F) burns and leaves carbon gunk.
- Repeat the oil-and-heat cycle at least 3-4 times, and up to 8 times for a commercial-grade finish. One thin coat is never enough to build a durable layer.
- Never use synthetic paper towels during the process. The Waring Commercial manual explicitly warns they can melt and fuse to the hot surface.
- Seasoning is maintenance. After each use, a quick wipe with a thin oil layer re-hardens the coating and prevents rust between cooks.
- If your new seasoning feels tacky or sticky, it’s under-cured. Heat the griddle again until the oil fully polymerizes and the surface cools dry to the touch.
Why Seasoning Isn’t Just “Oiling” a Hot Pan
Seasoning is a controlled chemical process where heat breaks down the fatty acids in oil, causing them to cross-link and bond to the metal surface, forming a polymerized layer. This layer is hydrophobic, non-stick, and protects the underlying steel from oxidation and rust.
You are not just wiping on grease. You are baking on a coating. The temperature must hit the oil’s smoke point to trigger that polymerization. Too low, and the oil just sits there, eventually turning rancid. Too high, and it burns into flaky carbon soot. The Kamado Joe griddle manual specifies a target range of 400°F – 475°F for this reason.
The difference between a slick black finish and a tacky, discolored mess comes down to that thermal window. This is also why the type of oil is non-negotiable. A thin, even coat of a high-smoke-point oil gives the molecules room to link up evenly. A thick, gluggy pour pools, cooks unevenly, and leaves sticky patches that attract food.
The 5-Step Seasoning Method (And the Two Steps Everyone Skips)
Follow this sequence for any new griddle or when restoring a cast iron surface after rust or heavy stripping. The timeline is longer than you think.
Before you start: The griddle will get extremely hot. Work in a well-ventilated area—this process creates smoke. Use long-handled tongs and heat-resistant gloves. Never leave the heating griddle unattended.
- Scrub the surface clean. For a new griddle, wash off any factory-applied rust preventative (often a waxy mineral oil) with hot, soapy water and a scrub brush. For an older griddle, remove all old food and grease. Dry it thoroughly with a towel—any water left will cause flash rust when heated.
- Apply the first oil coat. Pour a teaspoon of your chosen high-smoke-point oil onto the cold surface. Using a folded cotton rag or a natural fiber paper towel (more on this later), spread the oil into the thinnest, most even layer you can manage. Wipe it like you’re trying to remove it all. The goal is a microscopic sheen, not a visible pool.
- Heat to smoking. Turn on all burners to medium or medium-high. For an oven-based method like the Kamado Joe recommends, preheat to 400°F. Heat the griddle until the oil starts to smoke lightly. This is the polymerization starting. Let it smoke for 5-10 minutes, then turn off the heat.
- Let it cool completely. This is the first skipped step. Walk away. Let the griddle return to room temperature naturally. This cooling period is when the polymer layer fully sets and hardens. Rushing to the next coat while warm creates a weak, laminated finish.
- Repeat the cycle. This is the second skipped step. One coat is a primer, not armor. The Char-Griller manual says to apply a “generous, even coating,” but the real durability comes from layers. The Waring Commercial WGR240X instruction booklet is the most demanding: it directs you to repeat the oiling and heating step eight times, using less oil each pass, to achieve a “smooth, non-tacky surface.”
Choosing the Right Oil: Smoke Point Is Everything
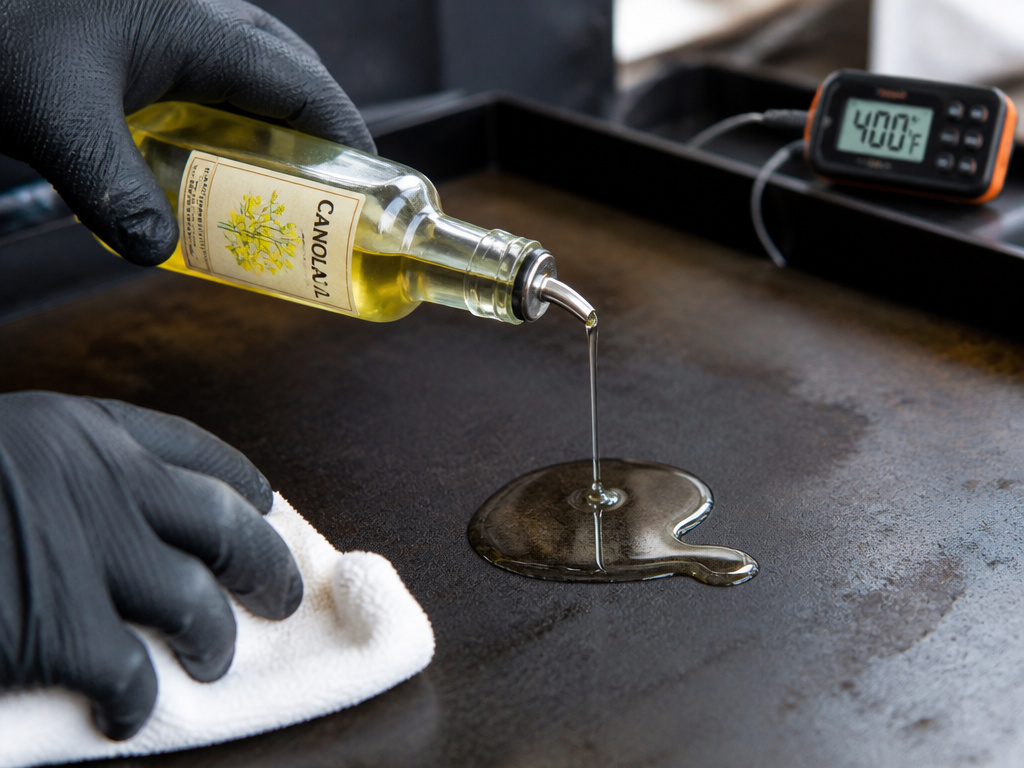
Your oil is the raw material for the polymer coat. Its smoke point is the temperature at which it starts to break down and polymerize. Go too low, and you’re just frying oil onto the metal.
| Oil | Approx. Smoke Point | Good for Seasoning? | Why It Works (Or Doesn’t) |
|---|---|---|---|
| Avocado Oil | 520°F (271°C) | Excellent | Very high smoke point leads to a hard, durable polymer. The Napoleon Freestyle manual recommends it. |
| Canola Oil | 400°F (204°C) | Excellent | Reliable, affordable, and within the ideal 400-475°F range. A default choice. |
| Grapeseed Oil | 420°F (216°C) | Excellent | Clean-burning, neutral flavor. Another top-tier pick. |
| Vegetable/Peanut Oil | 450°F (232°C) | Good | Sub-Zero Wolf recommends these for their high smoke points. Common and effective. |
| Flaxseed Oil | 225°F (107°C) | NO | Often recommended online, but its low smoke point creates a brittle, flaky coating that chips. |
| Olive Oil | 375°F (191°C) | NO | Too low. It burns before fully polymerizing, leaving a carbonized, sticky residue. |
| Butter or Lard | ~300°F (149°C) | NO | Contains milk solids or water that burn and create an uneven, gummy film. |
The best oil for seasoning is one you already have, provided it’s on the top half of that list. Don’t overthink it. Canola or grapeseed oil will build a fantastic layer. The real mistake is reaching for the extra virgin olive oil because it’s “healthier”—it will ruin the process.
Common mistake: Using the wrong cloth. The Waring Commercial WGR240X manual states: “Using a cotton cloth or paper towel (synthetic materials will adhere to the surface).” A polyester blend towel can melt onto your 400°F griddle, embedding plastic into your new seasoning.
Seasoning a New Griddle vs. Restoring an Old One
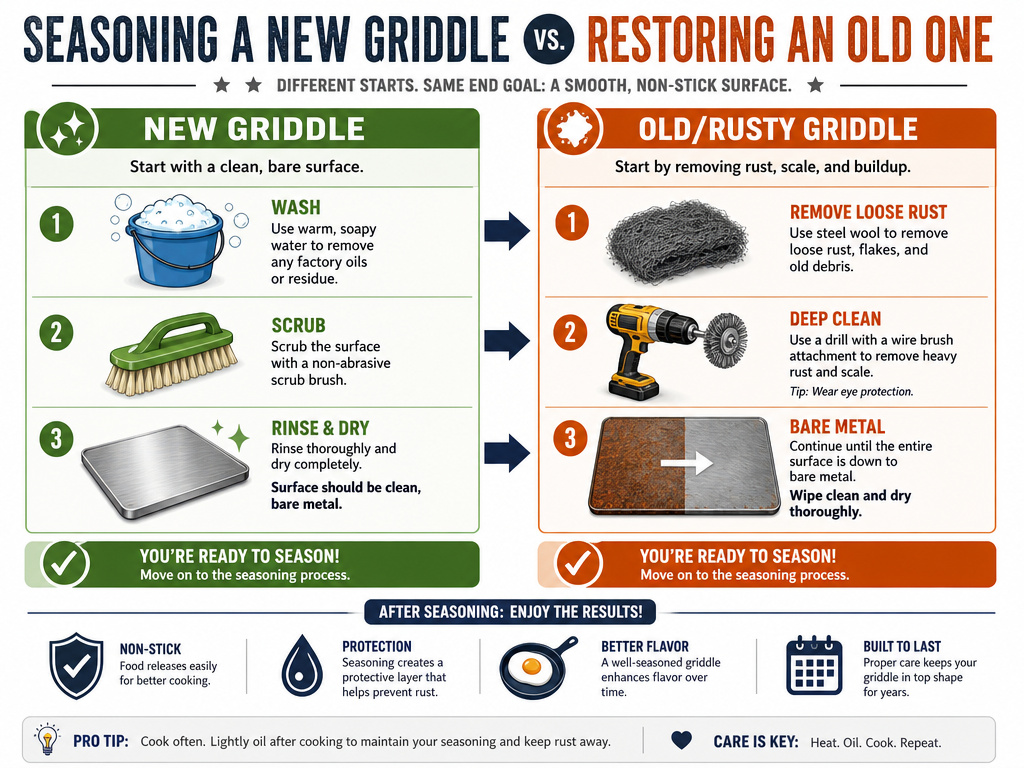
The core process is identical, but the starting point changes your first step dramatically. Confusing the two is how people end up seasoning over rust or old grease.
For a Brand New Griddle:
Your job is to remove the shipping protectant and start fresh. Most new griddles have a thin coat of food-safe mineral oil to prevent rust in the warehouse. It feels slick and clear. – Wash with hot, soapy water and a scrub brush to remove this oil. – Dry immediately and completely. – Proceed directly to the 5-step seasoning method. This is the perfect process for seasoning a new griddle.
For an Old or Rusty Griddle:
You must strip it back to bare metal. Seasoning over rust or old carbon is like painting over rotten wood. – Remove rust: Use steel wool or a wire brush attachment on a drill. Scrub until you see uniform, shiny metal. – Remove old seasoning: If it’s flaky or gummy, use a commercial griddle cleaner or a paste of baking soda and water with heavy scrubbing. For extreme cases, a vinegar soak can help lift it. – Wash and dry: Rinse, dry thoroughly (a hair dryer helps), and get it seasoned within an hour to prevent flash rust. – This is the more involved griddle curing process, focused on restoration.
The Two Most Common Seasoning Mistakes
A failed seasoning job has a distinct look and feel. It’s sticky, discolored (often blotchy orange or brown), and food fuses to it. Here’s what causes it.
- Using Too Much Oil. This is the cardinal sin. A thick pool of oil cannot polymerize evenly. The top fries while the bottom against the metal stays gooey. When you wipe, you should doubt whether you left any oil at all. The Sub-Zero Wolf guide warns: “Avoid using too much oil, it can cause sticking and gummy issues.”
- Not Letting It Cool Between Coats. Polymerization isn’t just a heating event; it’s a heating-and-cooling cycle. The layer solidifies as it cools. Adding fresh oil to a warm surface re-liquefies the semi-set layer beneath, creating a laminated, weak bond. Always let the griddle return to room temperature before adding the next micro-coat.
If your griddle ends up sticky, don’t panic. You haven’t ruined it. You’ve just under-cooked the oil. Heat the griddle again to its smoking point and hold it there for 15-20 minutes. Then let it cool fully. This often bakes off the tackiness. If it persists, you may need to scrub it down with coarse salt and oil and restart.
How Do You Know When the Seasoning Is Done?
You can’t just count cycles. Different oils and heats build at different rates. Look for these physical signs instead of the clock:
- Color: The surface will darken permanently. A new steel griddle will turn golden, then brown, then a deep matte black or dark bronze after many layers.
- Texture: It should feel smooth and dry to the touch, like a ceramic plate. It should not feel oily, greasy, or tacky. Run your fingers over it. If anything transfers to your skin, it needs more heat or time.
- The Water Test: Sprinkle a few drops of water on the cooled surface. On a well-seasoned griddle, the water will bead up and skate around like mercury. On an unseasoned or poorly seasoned surface, it will spread out and soak in.
Once it passes these tests, it’s ready for cooking. Start with fatty foods like bacon or burgers for the first few cooks to help fortify the layer.
Frequently Asked Questions
Can you use olive oil to season a griddle?
No. Its smoke point is too low (around 375°F). It will burn and carbonize before it properly polymerizes, resulting in a sticky, blotchy, and inefficient non-stick coating that flakes off easily.
How many times do you have to season a griddle?
For a basic, functional coat, 3-4 cycles is the minimum most manufacturers like Napoleon recommend. For a commercial-quality, bulletproof finish, the Waring Commercial manual specifies 8 cycles. More layers mean more durability and better non-stick performance.
Do you have to season a griddle after every use?
Not a full re-season. But a quick maintenance coat is essential. After cleaning, while the griddle is still warm (not hot), wipe on a microscopically thin layer of oil. The residual heat will polymerize it, healing minor scratches and maintaining the water-resistant barrier. This is the core of post-cooking seasoning.
What happens if you don’t season a griddle?
The bare metal will rust from exposure to moisture and air. Food will stick tenaciously, making cooking and cleanup difficult. Acids from foods like tomatoes can also pit and etch the metal surface. The consequences of not seasoning are a rusted, sticky, and damaged cooking surface.
Can you season a griddle in the oven?
Yes, and it’s often the best method for smaller, removable griddle plates or carbon steel models. Follow the Kamado Joe method: apply a thin oil coat, place the griddle upside down on the oven rack (to prevent pooling), and bake at 400-450°F for an hour. Let it cool in the oven.
The Bottom Line
Seasoning is simple chemistry, not magic. Apply a whisper-thin coat of a high-smoke-point oil, heat it past the smoke point, and let it cool. Repeat that cycle three to eight times. The result is a tough, naturally non-stick coating that makes cooking easier and protects your investment for years. The most common error is impatience—too much oil, or not enough cycles. If you remember nothing else, remember this: thin coats, high heat, and repeated layers. Your griddle will look after you if you look after it first. Now go cook something.
