
Why Your Crepes Stick to the Pan: Top 4 Causes & The Fixes
This post contains affiliate links. As an Amazon Associate, we earn from qualifying purchases.
Crepes stick to the pan for one of four reasons: incorrect pan temperature, improper batter consistency, insufficient or wrong fat, or an incompatible pan surface. The fix is matching the pan’s heat to your batter’s hydration, using enough butter or oil to create a thermal barrier, and choosing a pan that heats evenly, whether that’s a seasoned cast iron, a true non-stick crepe maker, or a heavy stainless steel skillet.
That temperature mismatch is the silent killer. A pan that’s too cold glues the batter down before it can set; a pan that’s too hot flash-fries the outside and welds it to the metal. Your job is to find the sweet spot where the batter hits the surface, sets instantly into a thin film, and releases on its own.
What follows is a breakdown of each sticking culprit with its specific mechanical fix. We’ll cover manufacturer seasoning specs most guides skip, the real debate between non-stick and stainless steel for browning, and the step-by-step rescue for a pan that’s already causing trouble.
Key Takeaways
- Pan temperature is everything. The Unold 48126 crepe maker runs at 800 W; for electric models, that means a 3-5 minute preheat. On gas, listen for a faint hiss when water droplets skitter.
- Thin your batter with liquid, not hope. If the batter doesn’t coat the back of a spoon in a seamless layer, it’s too thick and will grip the pan. Add water or milk a tablespoon at a time.
- Butter is a lubricant and a coolant. A quick swipe with a cold butter stick creates a micro-layer of fat that vaporizes, lifting the crepe. Oil works, but it doesn’t brown the edges the same way.
- “Non-stick” is a spectrum. A worn ceramic coating or a pan sprayed with aerosol cooking spray will stick. Circulon’s advisory states that aerosol sprays leave a gummy residue that attracts food.
- Seasoning is a baked-on polymer, not just grease. For a traditional Krampouz crepe maker, the OEM process takes 1.5 hours and uses a specific food-contact pad to burn nine thin oil layers onto the plate.
The 4 Reasons Crepes Stick (and How to Fix Each)
Sticking is a failure of one of four conditions. Get all four right, and the crepe releases itself. Miss one, and you’re scraping.
1. Pan Temperature Is Wrong
Heat controls the speed of protein set and starch gelatinization. Too low, and the proteins bond slowly to the metal. Too high, and the sugars caramelize into a sticky cement.
Common mistake: Cranking the heat to “high” to preheat faster. The surface temperature overshoots, the outside of the crepe burns and bonds before the inside hydrates, and you get a torn, stuck mess.
The fix: Preheat your pan slowly and evenly. For an 800 W electric model like the Unold 48126, this takes a solid 5 minutes on the medium setting. For a gas stove, start medium-low and give it 4 minutes. Test with a few drops of water, they should dance and evaporate in 2 seconds, not sit and boil or instantly vanish. This is the “Leidenfrost effect” zone, where a thin layer of steam forms between the batter and the pan.
2. Your Batter Is Too Thick
Batter viscosity determines how thinly and evenly it spreads. A thick batter sits in a glob, cooking unevenly and fusing to the pan where it makes contact longest. The Unold manual explicitly states that thick batter contributes to sticking and suggests thinning it with water or low-fat milk.
The fix: Aim for a consistency between heavy cream and melted ice cream. It should coat the back of a spoon in a smooth, translucent layer. If it’s gloopy, add liquid one tablespoon at a time and whisk. Let the batter rest in the fridge for at least an hour afterward; this allows the flour to fully hydrate and the starch molecules to relax, which makes the batter more fluid and less likely to tear when swirled.
| Batter Symptom | Likely Cause | Immediate Fix |
|---|---|---|
| Tears when swirled in the pan | Too thick, high gluten development | Add 1-2 tbsp milk/water; let rest 30 min |
| Spreads too thin, holes appear | Too thin, over-mixed | Add 1 tbsp flour; whisk minimally |
| Cooks unevenly (dark spots) | Not rested, starch lumps | Strain batter; refrigerate 1+ hour |
| Bland, rubbery texture | Over-mixed, glutenous | Mix until just combined; ignore small lumps |
3. You’re Using the Wrong Fat (or Not Enough)
Fat isn’t just for flavor. It creates a microscopic barrier that momentarily vaporizes when cold batter hits the hot pan, providing lift. The type of fat matters because each has a different “smoke point” and polymerizing behavior.
- Butter: Ideal. Its water content creates steam, and its milk solids promote golden browning. Use a cold stick for control.
- Neutral Oil (canola, vegetable): Reliable. Higher smoke point, but doesn’t contribute to flavor or browning.
- Aerosol Cooking Spray: Risky. Brands like Circulon warn it leaves a gummy residue that causes food to stick, even on non-stick products. This residue builds up over time and becomes a sticky magnet.
Where this goes sideways: Using a spray on a ceramic non-stick pan. The propellants and emulsifiers can bake onto the coating at high heat, creating a rough, sticky surface that no amount of washing removes. The pan is then ruined for delicate foods like crepes.
The fix: For the first crepe, use a generous amount, melt about 1/2 teaspoon of butter and swirl to coat the entire cooking surface. After that, a quick pass with the end of a cold butter stick every 2-3 crepes is enough. The residual fat from the previous crepe maintains the barrier.
4. Your Pan Surface Is the Problem
Not all non-stick is created equal. A worn Teflon coating, a cheap ceramic layer that’s lost its slickness, or even the wrong type of pan for your technique will guarantee sticking.
This is where a real cook’s debate lives. One experienced cook argues that for evenly browned crepes, a heavy-bottomed stainless steel pan beats a non-stick pan every time, stating non-stick surfaces “leave a weird mottled pattern.” The even heat distribution of thick stainless steel allows for consistent browning and, with proper technique, reliable release.
For dedicated crepe makers, the surface is everything. A traditional cast iron or steel plate must be seasoned, a process of baking on thin layers of polymerized oil. A modern non-stick crepe maker like the Unold 48126 relies on its factory coating, which degrades with abrasive cleaning or metal tools.
The fix: Match your pan to your patience. * For a perfect, lacy brown: Use a well-heated, heavy stainless steel skillet and enough butter. It requires more skill but delivers the best color and flavor. * For foolproof release: Use a dedicated non-stick crepe maker. Protect its coating by using only soft utensils and warm, soapy water for cleaning. * For the traditionalist: Commit to seasoning a cast iron crepe plate. It’s a project, but it creates a natural, durable non-stick surface.
Non-Stick vs. Stainless Steel: Which Actually Works Better?
This isn’t an abstract choice. It’s a question of what you’re optimizing for: effortless release or perfect browning. Most home kitchens have both; knowing when to use which saves the meal.
| Factor | Non-Stick Crepe Maker (e.g., Unold 48126) | Heavy Stainless Steel Skillet |
|---|---|---|
| Release Ease | Excellent. Almost guaranteed with minimal fat. | Good. Requires correct heat and adequate butter. |
| Browning | Can be uneven, “mottled.” | Superior, even, lace-like golden brown. |
| Durability | Coating degrades with scratches, high heat, sprays. | Virtually indestructible. Can use metal tools. |
| Skill Required | Low. Forgiving of minor temperature fluctuations. | High. Demands good heat control and timing. |
| Best For | Beginners, quick breakfasts, delicate fillings. | Authentic texture, presentation, experienced cooks. |
The Unold 48126 is a classic home model. Its 800 W power and ceramic non-stick coating are designed for simplicity. You trade some browning control for the confidence that the crepe will flip.
A high-quality stainless steel pan like an All-Clad D3, however, gives you control. You manage the heat, you manage the fat, you get the reward. It’s the difference between a serviceable crepe and a great one.
Bottom line: If you’re battling stickage on a non-stick pan, the coating is likely compromised. If you’re struggling with stainless steel, revisit your heat and fat management, the pan isn’t the problem.
Step-by-Step Crepe-Maker Seasoning (The OEM Way)
If you own a traditional steel or cast iron crepe maker, like those from Krampouz, factory seasoning is mandatory. This isn’t just wiping on oil; it’s a 1 to 1.5-hour process of building a polymerized oil coating that becomes your cooking surface.
Before you start: The plate will reach 250 °C (482 °F). Work in a ventilated area, keep flammable materials away, and use long-handled tools. The oil will smoke, this is the polymerization process.
The Krampouz method is precise. You’ll need a food-contact certified seasoning pad (often supplied with the maker) and vegetable oil.
- Heat the plate. For electric models, set to 250 °C. For thermostatic gas models (0-10 lever), set to position 6. For manual gas models (0-8 lever), preheat at position 8 for 6 minutes, then reduce to position 2 for seasoning.
- Apply the first four layers. Place 1 teaspoon of vegetable oil on the pad. Spread it uniformly over the entire hot plate. Let it dry for 5-10 minutes until smoking stops. Repeat three more times.
- Apply layers five through nine. Reduce oil to 0.5 teaspoon per layer. Spread uniformly and let dry 5-10 minutes each.
- Finish. For the final layer, pass the dry, clean pad over the plate without adding fat. This buffs the surface and removes any loose residue.
The result is a glossy, black, non-stick surface. This process for seasoning a pan creates a durable coating far superior to a quick stovetop seasoning. If food later sticks, a “top-up” is possible: wipe on a tiny amount of oil with a paper towel while the plate is warm, then heat until it smokes and stops.
Troubleshooting a Sticky Pan in Real Time
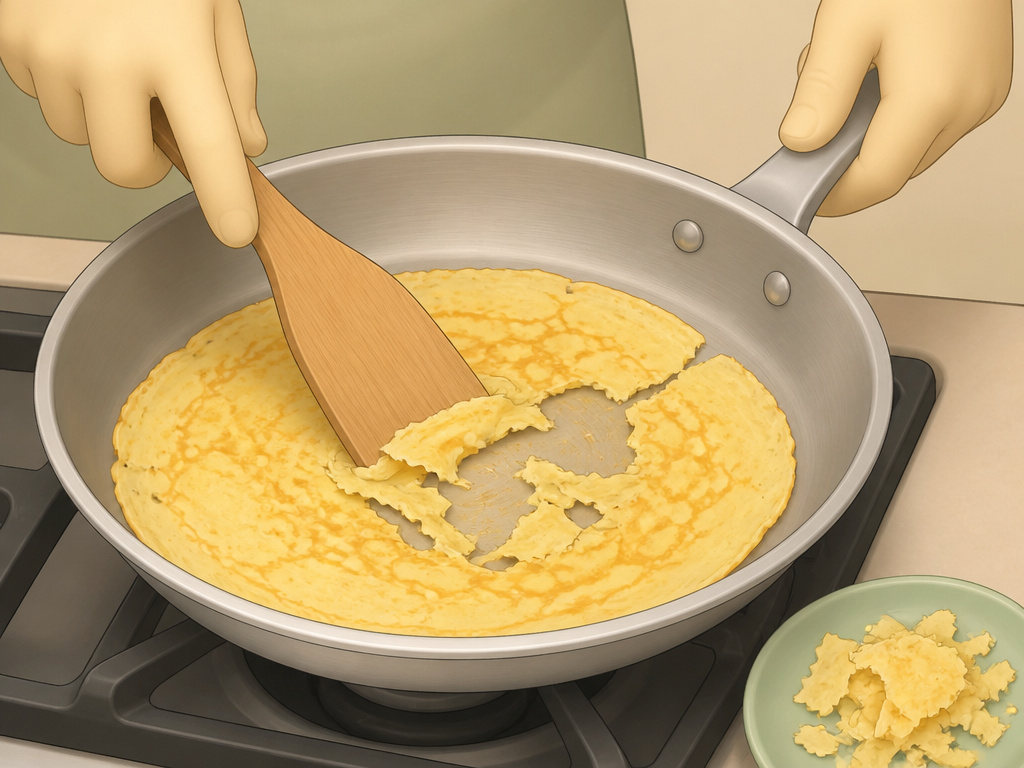 Your crepe is halfway through cooking and clinging for dear life. Do not force it. Forcing tears it and makes the next one stick worse. Here’s the salvage sequence.
If the first crepe sticks:
- Remove the pan from heat. Let it cool for 60 seconds.
- Scrape off any stuck bits gently with a wooden or plastic spatula. Do not scratch the surface.
- Wipe the pan clean with a dry cloth or paper towel.
- Reheat the pan, but at a slightly lower temperature than before.
- Add more butter than you did the first time and swirl it thoroughly.
- Pour your next batter portion. It should release.
This cycle addresses the most common reasons a pan sticks: initial under-heating and insufficient fat. If the second crepe also sticks, your batter is likely the culprit, thin it immediately.
If every crepe sticks:
You have a systemic issue. Diagnose using this flowchart:
- Is the pan hot enough? (Water droplet test). If no, increase heat and wait longer.
- Is the batter the right consistency? (Spoon coat test). If no, thin it.
- Are you using enough fat? (Butter swipe test). If no, be more generous.
- Is the pan surface intact? Inspect for scratches, discoloration, or residue. If damaged, you may need a new non-stick frying pan or to re-season a traditional one.
For ceramic coating issues, the fix is often replacement. Once the microscopic ceramic pores are clogged with burned-on oil or spray residue, the non-stick property is permanently diminished.
Frequently Asked Questions
Can I make crepes without a non-stick pan?
Absolutely. A well-seasoned cast iron skillet or a heavy stainless steel skillet are both excellent choices. They require more precise heat control and adequate butter, but they often produce superior browning and texture compared to a standard non-stick surface.
Why did my crepes stick only after the first few?
This is a classic sign of the pan getting too hot. As you cook, residual heat builds up in the metal. If you don’t lower the heat slightly after the first two crepes, the pan temperature climbs past the ideal range and starts to burn and bond the batter. Get into the habit of reducing the burner dial a notch after crepe number two.
Is a specialized crepe pan necessary?
No. A proper crepe pan has very low, sloped sides to make flipping easier, but any pan with a flat cooking surface and even heat distribution will work. A heavy 10-inch skillet is a perfect substitute. The specialized tool is a convenience, not a requirement.
How do I clean a crepe maker without ruining it?
Always let the appliance cool completely. For non-stick plates, wipe with a damp cloth or soft sponge. Most are not dishwasher safe. For traditional seasoned plates, wipe clean while still warm (not hot) with a dry cloth or paper towel. If needed, use a tiny drop of mild soap on a damp cloth, then dry thoroughly and apply a whisper-thin coat of oil to protect the seasoning.
Why do my crepes stick to my brand new ceramic pan?
New ceramic non-stick coatings can sometimes have a slight texture from the manufacturing process. They also have a lower maximum heat tolerance than PTFE (Teflon). You may be preheating it empty on too high a setting, damaging the coating from the start. Always preheat ceramic on medium-low and use a fat before adding batter.
The Bottom Line
Crepes stick because one of four variables is out of sync. Temperature is the usual suspect, find that sweet spot where the batter sizzles gently on contact. Your batter must be thin enough to flow, not plop. Use real butter, not spray, to build a releasing barrier. And finally, understand your pan: a worn non-stick surface can’t be fixed, but a stainless steel or seasoned cast iron skillet will last a lifetime with the right technique.
For most home cooks, the easiest path is a dedicated electric crepe maker like the Unold 48126. Follow its preheat timing, protect its coating, and you’ll have consistent results. For the pursuit of perfect, lacelike browning, master the heavy stainless steel skillet. It’s less forgiving, but the crepe it yields is worth the effort.
