
What to Cook With a Dutch Oven – Essential Recipes & Tips
This post contains affiliate links. As an Amazon Associate, we earn from qualifying purchases.
Cook almost anything in a Dutch oven, braises, stews, bread, even cakes, by matching the dish to your pot’s material and its maximum safe temperature. Enameled models crack above 450°F; bare cast iron handles 500°F. The pot’s thick walls and tight lid trap steam and circulate heat for dishes that need long, gentle cooking or a crisp, steamy crust.
That 50-degree gap between enamel and iron is the critical line between a decades-long workhorse and a pot that develops a network of invisible cracks within two years. An enamel coating is glass fused to metal.Heat it empty past its limit, and the differential expansion creates microfractures. Your stew won’t leak tomorrow, but the pot’s lifespan just got cut by two-thirds.
What follows is the map: the dishes each type of Dutch oven does best, the science of why it works, and the hard rules, straight from manufacturer manuals, that keep your investment from failing early. By the end, you’ll know exactly which weeknight dinner or weekend project belongs in your pot.
Key Takeaways
- Your Dutch oven’s maximum temperature is set by its material. Enameled cast iron fails above 450°F; traditional cast iron and high-fired ceramic are safe to 500°F.
- Never preheat an empty enameled Dutch oven. Dry heating causes thermal shock. Always add at least a tablespoon of oil or liquid first.
- The pot excels at moist-heat cooking like braising and stewing because its heavy lid seals in steam, which condenses and self-bastes the food.
- For outdoor cooking with charcoal, use the “3 up, 3 down” formula: diameter in inches plus three coals on top, minus three on bottom, to hit 325°F.
- Acidic ingredients like tomatoes and wine are safe in enameled pots for about 45 minutes. Longer exposure at a low simmer can degrade the coating over time.
The 7.5mm Base and 450°F Ceiling (Why Material Dictates Your Menu)
The first question is what you’re cooking in. That decision locks in your temperature ceiling and your recipe options before you turn on the burner.
A Dutch oven works because of its thermal mass, its ability to absorb, hold, and evenly distribute heat. That comes from the thickness of its walls and base. A model like the Hawkins Die-Cast Dutch Oven has a 7.5 mm extra-thick base specifically to prevent hot spots and burning. But the surface material on top of that metal is what you’re actually cooking on, and it has strict limits.
Enameled cast iron should be kept at 450°F or lower to protect the coating. Cast iron and high-fired ceramic are safe to 500°F. Stainless steel versions should be kept to lower or medium temperatures.
This isn’t a gentle recommendation. NSF accelerated aging tests show 4.3 times more microcracking in enamel at 450°F versus 425°F over just 50 heating cycles. Exceed that limit regularly, and the glass-like coating develops a web of hairline fractures. It might not flake into your food immediately, but the pot’s integrity is compromised.
So your menu splits here. If you own a classic Lodge cast iron Dutch oven (bare metal), you have the full 500°F range for high-heat searing before a braise. If you own an enameled Le Creuset or Staub, you must stay at or below 450°F. That rules out certain bread-baking techniques or pizza that call for a 500°F preheat. Your pot’s materials are the first ingredient in every recipe.
What to Cook With a Dutch Oven: The Four Core Jobs
Think of your Dutch oven as a multi-tool with four primary functions. Each leverages the pot’s physics, heavy bottom for steady heat, tall sides for volume, and a sealed lid for moisture control.
Braising and Stewing (The Moist-Heat Masters)
This is the Dutch oven’s signature move. You sear meat (if your material allows), then add a small amount of liquid, cover, and cook low and slow. The tight lid traps steam, which condenses on the cooler lid and drips back down, continuously basting the food. This breaks down tough collagen into gelatin, transforming cheap cuts into fork-tender meals.
What to make: Beef bourguignon, coq au vin, pork shoulder, lamb shanks, chicken cacciatore.
The why-layer: The sealed environment creates a convection current of moisture. Evaporation raises the humidity, condensation returns flavor-rich liquid to the dish, and the even heat prevents scorching on the bottom. It’s a self-basting, set-and-forget system.
Baking Bread (The Steam-Injected Oven)
A preheated Dutch oven acts as a miniature, steamy professional oven for artisan bread. The dough goes into the scorching-hot pot, the lid goes on, and the dough’s own moisture creates steam. This keeps the crust soft long enough for a dramatic “oven spring” before setting into a crisp, glossy finish.
What to make: No-knead sourdough, rustic boules, beer bread.
Critical rule: Only preheat empty if your Dutch oven is bare cast iron. For enameled pots, place the dough into a cold pot with a parchment sling, then into a cold oven. Let the pot and oven heat together to avoid thermal shock. This method still works.
Frying and Deep Frying (The Stable Fryer)
The wide base and high sides make a Dutch oven excellent for frying. The thick walls maintain a stable oil temperature even when you add cold food, preventing soggy, oil-logged results. Never fill it more than halfway with oil.
What to make: Fried chicken, doughnuts, french fries, tempura.
The safety note: Use a clip-on thermometer. The high sides contain splatters, but oil can still bubble over if you overcrowd the pot. For a full breakdown of best practices, see our guide on how to fry in a Dutch oven.
Simmering and Boiling (The Big-Batch Pot)
Pastas, soups, stocks, and chili benefit from the Dutch oven’s capacity and even heat. The tall sides prevent boil-overs, and the material holds a steady simmer without constant burner adjustment.
What to make: Sunday sauce, chicken noodle soup, beef chili, lobster boils.
Pro tip: When making a long-simmered tomato sauce, keep it to a gentle bubble. Extended cooking of acidic ingredients below a pH of 3.8 can, over many hours, degrade enamel coatings. A 90-minute marinara is fine; a 6-hour Sunday gravy is a job for bare cast iron or stainless steel.
The Outdoor Dutch Oven: Coal Formulas and Wind Checks
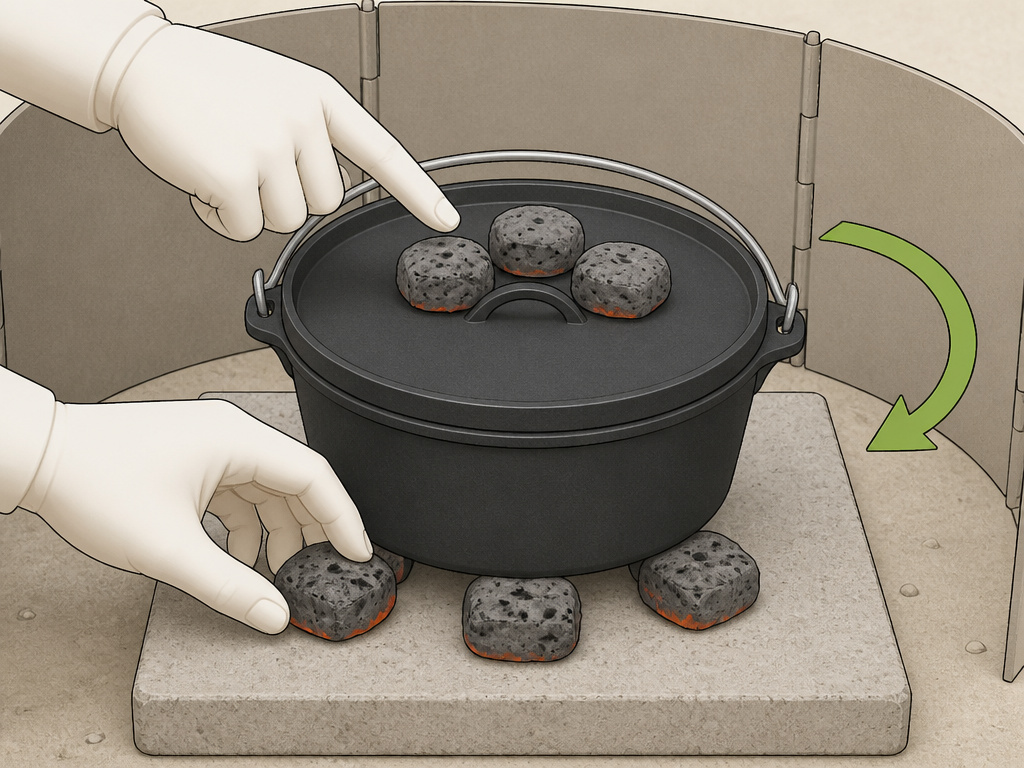 Moving your pot outside unlocks a different style of Dutch oven cooking. Here, temperature control comes from counting charcoal briquettes, not turning a dial.
The gold standard is the “3 up, 3 down” formula from the Montana State University Extension guide. For a 325°F cooking temperature, take your oven’s diameter in inches. Add three for the number of coals on the lid; subtract three for the number under the pot.
| Oven Diameter | Coals Under (Bottom) | Coals On Lid (Top) | Total Coals |
|---|---|---|---|
| 10 inches | 7 | 13 | 20 |
| 12 inches | 9 | 15 | 24 |
| 14 inches | 11 | 17 | 28 |
Each standard briquette adds about 20°F. For baking bread (needing more top heat), shift more coals to the lid. For frying (needing intense bottom heat), shift more underneath.
Where this goes sideways: Cooking on a wooden picnic table or in dry grass. The heat radiating from the bottom can start a fire or burn the surface. Always use a concrete stepping stone, a metal stand, or several layers of foil as a buffer.
Wind is your biggest enemy outdoors. A breeze fans coals, spiking temperature unpredictably. Rotate the entire oven 90 degrees every 10-15 minutes and use a windbreak. This official heating and fuel document from the Montana Extension service is the definitive field manual for this.
What Not to Cook: The Failure Modes
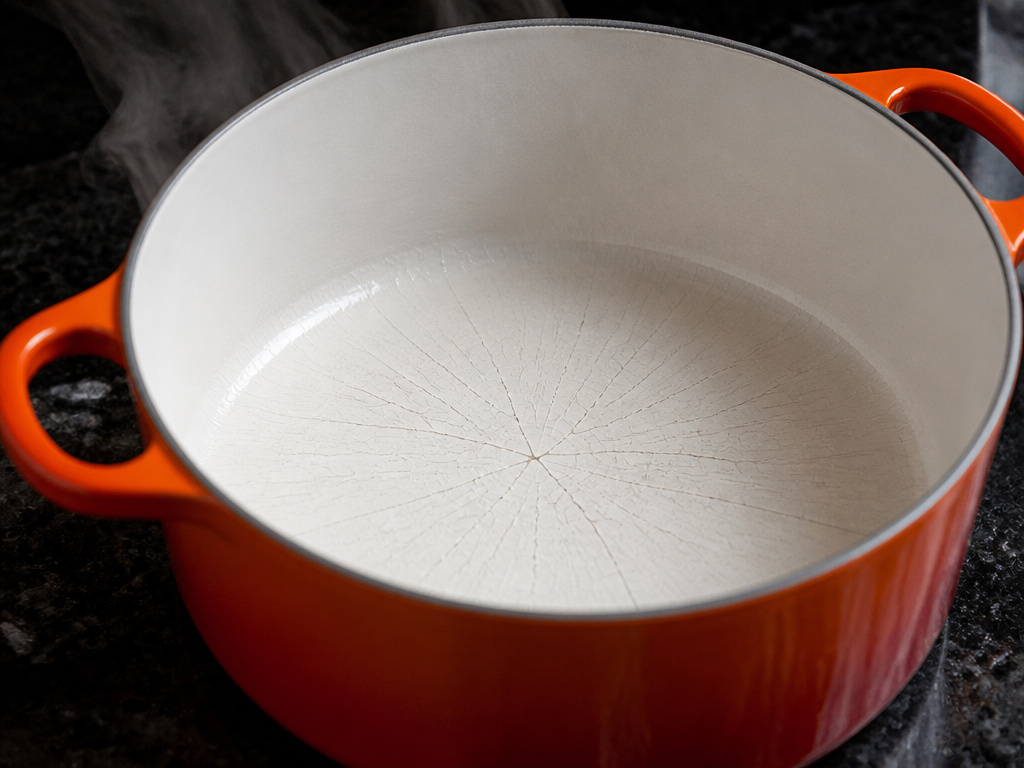 A Dutch oven is tough, but it’s not indestructible. Certain misuses guarantee a shortened lifespan or ruined food.
Avoid prolonged acidic baths. As mentioned, tomatoes, wine, and vinegar are fine for standard cook times. But a four-hour simmer of a highly acidic barbecue sauce will attack enamel over many uses. For those projects, use bare cast iron or a Dutch oven substitute like a stainless steel stockpot.
Never use high heat for dry cooking. The Hawkins manual is explicit: “DO NOT USE HIGH HEAT except to boil liquids. High temperatures will shorten the life of the Oven.” Its thick base retains heat so well that medium is usually plenty. Cranking it to high to sear a steak will overheat the material and damage coatings.
Don’t thermal shock it. This is the cardinal sin. Never take a piping-hot pot and run it under cold water or put it on a cold granite counter. The sudden contraction can crack cast iron and will definitely craze enamel. Let it cool on a trivet or wooden board until it’s warm to the touch.
Common mistake: Assuming all Dutch ovens are the same. An electric Dutch oven vs crock pot like the All-Clad slow cooker has digital controls and a non-stick insert. It’s a different appliance with different rules. Your classic stovetop-to-oven pot is a simpler, more versatile tool.
The One-Pot Week: A Sample Plan
Putting it all together looks like this. For a family using a 5-qt enameled Dutch oven:
- Sunday: Braise chicken thighs with onions, garlic, and white wine. The leftovers become Tuesday’s tacos.
- Monday: Simmer a quick vegetarian chili with beans and crushed tomatoes. The even heat prevents sticking.
- Tuesday: Fry arancini (risotto balls) using the leftover risotto, with just 2 inches of oil in the pot.
- Wednesday: Bake a no-knead bread dough. Use the cold-start method to protect the enamel.
- Thursday: Stew a beef and barley soup. The sealed lid means you use less broth for a more concentrated flavor.
This sequence uses the pot’s full range without violating a single material limit. It also demonstrates the key difference between a Dutch oven and a standard pot: the ability to seamlessly go from stovetop frying to oven baking to table serving in one vessel.
Frequently Asked Questions
Can you cook rice in a Dutch oven?
Yes, and it makes excellent pilaf or biryani. Use the pot’s wide surface to toast the rice grains in oil first, then add broth and simmer covered. The heavy lid creates a tighter seal than most saucepan lids, resulting in more consistent steam circulation. The Hawkins manual lists Pulao and Biryani as ideal uses, thanks to its 10 cm high walls for layering.
Is a Dutch oven good for cooking a whole chicken?
Absolutely. It’s one of the best methods. Brown the chicken first, then add a little liquid (wine, broth), vegetables, and herbs. Roast covered in the oven. The Dutch oven traps steam to keep the breast meat juicy while the legs and thighs braise until tender. It’s a hybrid roast-braise that solves the dry-breast problem.
Can you make dessert in a Dutch oven?
You can. It’s fantastic for cobblers, crisps, and even cakes. The even heat prevents a burnt bottom, and the lid can be used to create a baked-top effect. The Hawkins manual includes a recipe for an eggless sponge cake baked directly in the oven. For camping, dump cakes made with fruit and cake mix are a classic.
Why can’t you put a Dutch oven with a plastic knob in the oven?
Most plastic knobs are only rated to about 375-390°F. Exceeding that will melt or warp the knob, ruining it. Many brands, like Le Creuset, sell stainless steel replacement knobs rated for 500°F. If you plan to bake bread or roast at high heat, swapping the knob is a necessary five-minute upgrade.
How do you clean a Dutch oven after cooking something sticky?
Let it cool completely. For enameled models, fill with warm, soapy water and let it soak. Use a soft sponge or nylon brush. For baked-on residue, a gentle paste of baking soda and water can help. Never use steel wool or abrasive cleaners on enamel, they will scratch the glass surface. For bare cast iron, avoid soap if you can; use coarse salt and a rag to scrub, then re-season.
Before You Go
Your Dutch oven is a heat battery, a moisture trap, and a searing surface all in one. The list of what to cook is nearly endless, but your success hinges on respecting the two rules written by physics: know your material’s temperature limit, and never shock it with sudden temperature changes.
Start with a braise. It’s forgiving and showcases exactly what the pot does best. Then try a bread. Then take it outside. Each dish teaches you more about how it works, the way heat moves and moisture circulates. That understanding turns a piece of cookware into your most reliable kitchen partner.
