
Why Does My Frying Pan Stick | The 3 Real Culprits & Fixes
This post contains affiliate links. As an Amazon Associate, we earn from qualifying purchases.
Your frying pan sticks because of three specific issues: heat, surface, and technique. The common “microscopic pores” story is incomplete. Food sticks when the pan is too cold, the surface is contaminated, or you move the food too soon. Each pan type, stainless steel, non-stick, ceramic, has its own failure mode and a precise temperature window where it releases food cleanly.
That temperature window is the whole game. Miss it by 50 degrees and proteins weld themselves to the metal. Hit it, and even a lean chicken breast will lift free with a gentle nudge. The difference isn’t a mystery; it’s a set of physical reactions you can see, hear, and time.
What follows: the three real culprits, the exact preheat test manufacturers use, and the step-by-step corrections for stainless steel, non-stick, and ceramic pans. You’ll also get the one cleaning mistake that guarantees your next meal will stick.
Key Takeaways
- Preheat is non-negotiable. For stainless steel, the pan surface must reach 375°F–400°F before adding oil. Use the water ball test: droplets should form beads and glide.
- Cold, wet food is a sticking guarantee. Moisture on food or a chilled item straight from the fridge displaces hot oil. Pat proteins dry and let them sit out for 10-15 minutes.
- Clean means no residue. Invisible grease or polymer spray left on a pan creates sticky nucleation points. Scrub with Bar Keepers Friend or a nylon brush after every use.
- Let the pan work. Constant flipping or stirring tears the sear. Food releases when it’s ready, listen for the sizzle to stop before worrying.
- Your spatula matters. A thin, rigid metal spatula gets under the sear without scraping. Flexible plastic tools fold and leave food behind.
The Real Culprits: Heat, Surface, and Technique
Forget the idea of food getting trapped in tiny holes. Sticking is a chemistry and physics problem with three clear variables.
First, heat. Metal expands when hot. On a microscopic level, this expansion actually smooths the surface. Add food to a cold pan, and the contracting metal grips it like a thousand tiny claws. The IKEA instruction for their uncoated pans spells it out: heat on high first, then lower the temperature by half when you add food. The food may stick at first but releases as soon as the surface reaches the right temperature.
Second, surface condition. A pan isn’t clean just because it looks clean. Invisible polymer residues from non-stick cooking sprays or a thin film of old oil carbonizes on the next heat-up. This gunk becomes a glue. The Scanpan care guide is blunt: leaving any visible or physical food/fat residue after cleaning causes sticking during the next use. Re-clean it.
Third, technique. This covers everything from your choice of oil to your patience. A high-smoke-point oil like grapeseed or canola needs to be hot before the food hits it. LloydPans notes that browning won’t occur, and sticking is likely, until the surface water on the food cooks off and the temperature approaches 300°F. If you hear a strong sizzle, there’s still water at the interface. Wait.
Common mistake: Adding oil to a cold pan. The oil soaks into the microscopic texture of the cold metal instead of laying on top of a hot, expanded surface. When you add food, it fuses to the pan through the oil.
The consequence is immediate. You’ll see it when you try to flip a piece of fish or an egg and it tears, leaving a layer behind. That’s the sign you missed one of the three variables.
The Manufacturer-Approved Preheat Test (The Water Ball Method)
You don’t need a thermometer. Every major manufacturer points to the same simple, free test.
The steps are specific. Heat your dry pan over medium to medium-high heat for 60 to 90 seconds. Then, flick a few drops of water onto the surface. * If the water sizzles and evaporates instantly, the pan is too cold. The surface is still below 300°F. * If the water splits into smaller beads that skitter around rapidly before vanishing, you’re almost there. * If the water forms a single, cohesive ball or several large beads that glide around the pan like mercury for several seconds, the pan is ready. This happens between 375°F and 400°F.
At this temperature, the steel has expanded sufficiently. Now add your oil, it should shimmer and thin out almost immediately. Swirl it to coat the surface. Some guides, like those from SITRAM, suggest letting the oil heat for another 15-20 seconds so it can flow into the surface texture.
This test works because of the Leidenfrost effect. The hot surface vaporizes the water on contact, creating a thin insulating layer of steam that lets the droplet ride. It’s a direct, visual signal that you’ve hit the correct thermal window.
Pan-Specific Fixes: Stainless Steel vs. Non-Stick vs. Ceramic
The universal rules apply, but each material has a unique failure point. Treating them all the same is how you ruin a good non-stick pan or swear off stainless steel for life.
| Pan Type | Primary Stick Cause | The Fix | Tool to Use |
|---|---|---|---|
| Stainless Steel | Too cold, or moving food too soon. | Nail the water ball test. Add oil after preheat. Don’t touch the food for at least 60-90 seconds. | Rigid metal spatula. |
| Traditional Non-Stick (PTFE) | Overheating, or using abrasive cleaners. | Never preheat empty. Use low to medium heat only. Cool completely before washing with soft sponge. | Silicone or wood utensils. |
| Ceramic Non-Stick | Polymer spray residue, or high-heat degradation. | Avoid all cooking sprays. Hand-wash only. Never exceed medium heat. | Nylon or wood utensils. |
The Stainless Steel Protocol
Stainless steel rewards precision. The Scanpan guide explicitly states that food added too soon will stick, and release only after the surface reaches the right temperature. After your successful water test, add a high-smoke-point oil. Let the oil get hot, flick a tiny water droplet into it; it should crackle violently.
Place your room-temperature, patted-dry food in the pan. It will likely stick initially. This is normal. Leave it alone. The food will release from the surface once a proper sear (the Maillard reaction) forms, which acts as its own non-stick layer. If you try to force it early, you tear that layer. For a delicate protein like fish, wait until you can see the cooked opacity creep about halfway up the side before attempting to move it.
Where this goes sideways: Using a flimsy spatula. A thin, stiff metal blade slides under the sear cleanly. A thick or flexible one pushes the food down, increasing contact and encouraging sticking.
The Non-Stick (PTFE) Reality Check
A PTFE-coated pan like a T-fal or Scanpan Stratanium is designed for easy release at lower temperatures. Its enemy is heat. Exceeding 500°F can begin to break down the coating and release fumes. The other enemy is contamination from aerosolized cooking sprays, whose propellants can embed in the coating and create sticky spots.
The fix is gentle discipline. Preheat on low for just a minute with a bit of oil or butter in the pan. You should never see smoke. If you do, you’ve damaged the coating’s integrity in that spot, and food will increasingly stick there. For cleaning, use a soft sponge. Abrasive scrubs or steel wool (as warned against in the IKEA PDF) will scratch the coating, creating texture for food to grip.
The Ceramic Coating Caveat
Ceramic pans, like those from GreenPan, use a silica-based layer. They stick for two main reasons: residue and heat. Polymer cooking sprays are public enemy number one, they bake onto the porous ceramic and cannot be fully removed. The other killer is high heat, which can crack the coating.
Stick to butter, olive oil, or coconut oil applied directly to the pan. Use medium heat or lower. Let the pan cool completely before washing. Even a warm pan hit with cold water can thermally shock the coating, leading to microscopic cracks. If your ceramic pan sticking problem starts suddenly, check your spray bottle.
The Silent Saboteurs: Cold Food and Invisible Residue
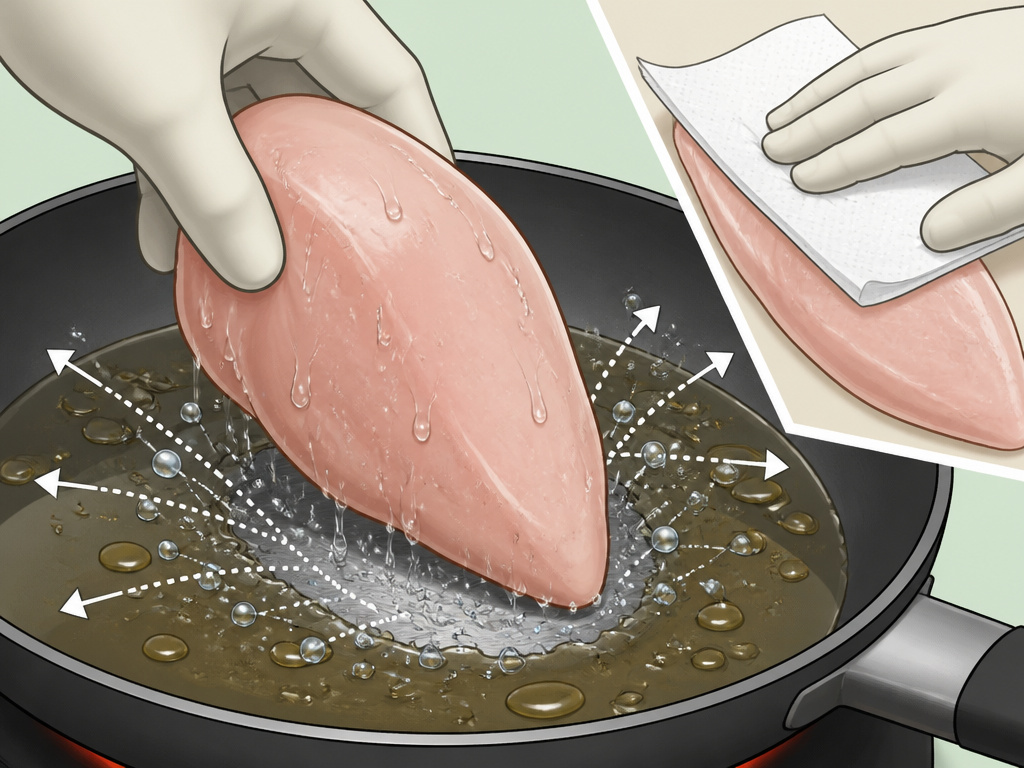 You can do everything right with heat and still fail. These two factors undermine the process at a molecular level.
Cold, Wet Food: The LloydPans care manual is direct: “If the food surface has water it will cause displacement of the release aids and promote sticking. Basically, water pushes oil away.” A cold chicken breast straight from the fridge is covered in condensation. When it hits hot oil, the water violently boils, pushing the oil aside and letting the protein make direct, sticky contact with the metal. The fix is simple. Pat the surface bone-dry with paper towels. For thicker items, let them sit on a plate for 10-15 minutes to take the chill off.
Invisible Residue: This is the most common cause of recurring sticking, especially on non-stick surfaces. It’s not about burnt-on chunks; it’s about a thin, polished film of old oil or spray. When reheated, this film becomes a tacky glue. The solution is a periodic deep clean. For stainless steel, a paste of Bar Keepers Friend and water will dissolve the film. For non-stick or ceramic, a baking soda paste and a gentle nylon brush will lift it without scratching. Make sure your stainless steel pan care routine includes this step.
Your Next Steps: A Diagnostic Checklist
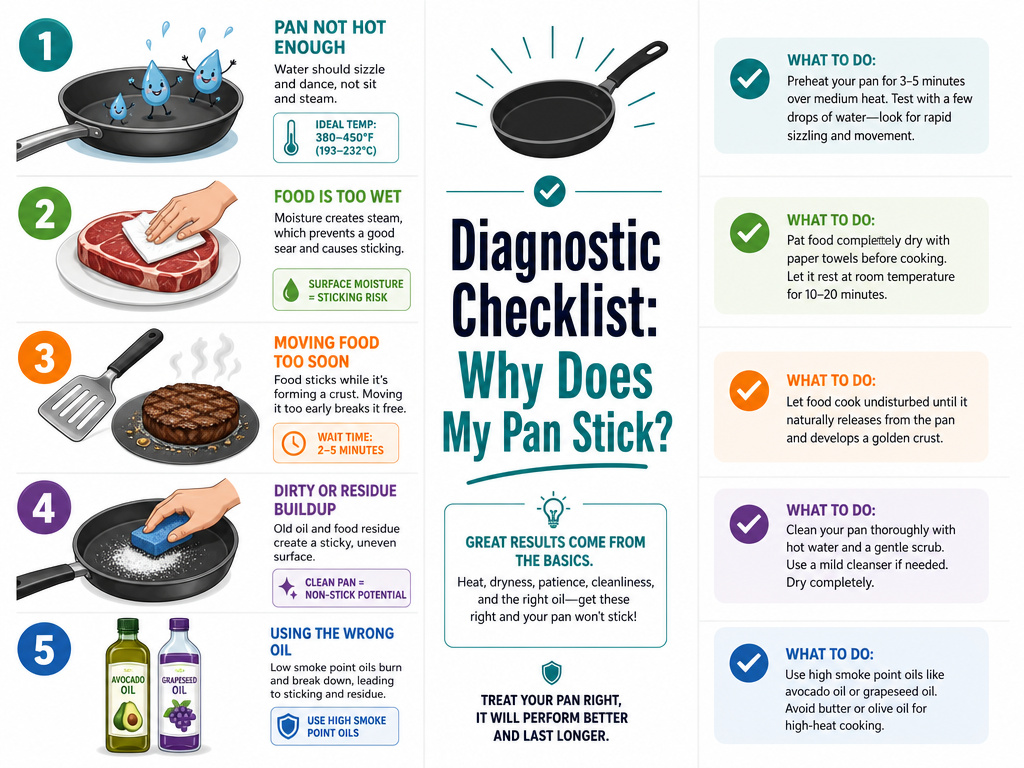 When food sticks, don’t guess. Run down this list in order. It isolates the variable you missed.
- Did I preheat correctly? Confirm with the water ball test. If the droplets didn’t glide, the pan was too cold. Start over.
- Was the food dry and room-temp? If it was wet or cold, moisture displaced the oil. Pat dry next time.
- Did I let the food release on its own? If you forced a flip early, you broke the sear. Wait longer; listen for the sizzle to soften.
- Is my pan truly clean? Scrub it with a cleanser like Bar Keepers Friend right now, rinse, and dry. Old residue is likely the culprit.
- Am I using the right fat? Butter burns. Olive oil smokes at medium-high. Use avocado, grapeseed, or refined coconut oil for high-heat searing.
If you check all these boxes and sticking persists, the pan’s surface may be compromised. A scratched non-stick coating or a stainless steel pan with a warped bottom (which creates uneven contact) won’t perform. This is when knowing your frying pan types matters, a warped pan is often a lost cause.
Frequently Asked Questions
Why do my eggs stick even in a non-stick pan?
Eggs sticking in a non-stick pan almost always means the pan was too hot or you used cooking spray. Non-stick coatings work best at low to medium heat. High heat damages the coating. Spray oils leave a sticky polymer residue. Use real butter or oil on a gently preheated pan.
Does a more expensive pan stick less?
Not necessarily. A high-quality pan heats more evenly, which helps, but sticking is about technique. A cheap pan that’s preheated correctly will outperform a $200 pan used cold. The investment buys durability and even heating, not magic.
How do I fix a pan that already sticks?
First, give it a thorough scrub with an appropriate cleanser to remove invisible residue. For stainless steel, this might mean a burnt pan cleanup session. For a seasoned cast iron or carbon steel pan, you may need to season a pan again. For a scratched PTFE non-stick pan, it’s time to replace it.
Is sticking worse on an induction hob?
Induction can heat a pan very quickly and intensely. This makes it easier to overshoot the correct temperature, especially with thin pans. Use a lower power setting and preheat for a shorter time. Always use a pan with a thick, magnetic base to ensure even heat distribution.
Why does food stick only sometimes?
Inconsistency points to technique, not the pan. You’re likely varying your preheat time, the dryness of your food, or the amount of oil. The process is repeatable. When it works, note exactly what you did, heat level, preheat duration, oil type, and replicate it.
The Bottom Line
Sticking isn’t a character flaw in your pan or your cooking. It’s a physical reaction with a direct cause. The fix is always in your control: heat the pan properly, ensure the surface is clean and dry, and then have the patience to let the food cook.
Stop chasing the perfect non-stick unicorn. A well-maintained stainless steel pan, used correctly, will release food as reliably as any coated surface, and it will last a lifetime. Your goal isn’t to find a pan that never sticks. It’s to understand the three rules so well that you can make any pan in your kitchen perform.
Start with the water test tonight. Heat your pan dry, flick in the water, and wait for the glide. That’s the moment your pan tells you it’s ready. Everything after that is just dinner.
