
Can You Broil in an Instant Pot? How & Which Models Can Do It
This post contains affiliate links. As an Amazon Associate, we earn from qualifying purchases.
You can broil in an Instant Pot, but only if you own a specific model: the Instant Pot Duo Crisp with Ultimate Lid. This unit has a dedicated Broil smart program that runs at a default 400°F for 6 minutes. It requires the Air Fry/Cooking Rack and demands you remove the pressure cooking lid first.
That distinction between a true broil function and just a hot oven matters. The Duo Crisp’s top heating element delivers direct, radiant heat like a traditional oven broiler. Other Instant Pot models, including the popular Pro and Duo series, lack this element entirely. They can bake, roast, or air fry, but they cannot broil.
What follows is a breakdown of the one model that broils, the exact process to follow from the manual, what you can realistically cook with it, and the common mistakes that trigger safety shut-offs.
Key Takeaways
- Only the Instant Pot Duo Crisp with Ultimate Lid (Model SLCO65000) has a true broil function. No other standard Instant Pot pressure cooker can broil.
- Broiling requires the Air Fry/Cooking Rack placed inside the inner pot. The pressure cooking lid must be removed before you start.
- The default broil setting is 400°F for 6 minutes, adjustable between 1 and 40 minutes.
- Placing food directly on the inner pot’s bottom during broil will likely trigger a “food burn” error and stop the cooking cycle.
- This function is best for finishing and browning small items like garlic bread, cheese-topped dishes, or thin cuts of meat, not for cooking large roasts from raw.
Which Instant Pot Models Can Actually Broil?
The answer is exactly one. According to the Instant Pot Duo Crisp user manual, the Instant Pot Duo Crisp with Ultimate Lid (Model SLCO65000) is the only multi-cooker in the lineup equipped with a Broil smart program.
The Broil smart program uses the heating element in the lid to apply direct, high heat to the top of food. The default temperature is 400°F (204°C) and the default time is 6 minutes, adjustable from 1 to 40 minutes. The Pressure Cooking Inner Cover must NOT be installed when using the Broil, Air Fry, Bake, Roast, or Dehydrate programs.
This is a non-negotiable spec. If your cooker isn’t a Duo Crisp with the Ultimate Lid, the one that has an integrated air fryer and broiler lid, you do not have a broil function. Models like the Instant Pot Pro, the Instant Pot Duo Plus, and the standard Instant Pot Duo are purely pressure-centric. They are brilliant pressure cookers and capable slow cookers, but their lids contain no heating element.
The confusion often comes from the “Crisp” lid, which is a separate purchase for some older models. Even then, that lid typically only offers air frying, baking, and roasting cycles. The dedicated Broil program is exclusive to the all-in-one Duo Crisp unit.
| Instant Pot Model | Has a Broil Function? | Primary Alternative for Browning |
|---|---|---|
| Duo Crisp with Ultimate Lid | Yes (400°F default) | Built-in. |
| Pro, Duo, Duo Plus | No | Use the Sauté function before or after pressure cooking. |
| Models with separate “Crisp” Lid | No (Air Fry only) | Air Fry setting at high temperature. |
The takeaway is simple. Check your lid. If it doesn’t have heating elements and a digital control panel for broil, you can’t broil. You’re using a different type of multi-cooker.
The Instant Pot Broil Process Step-by-Step
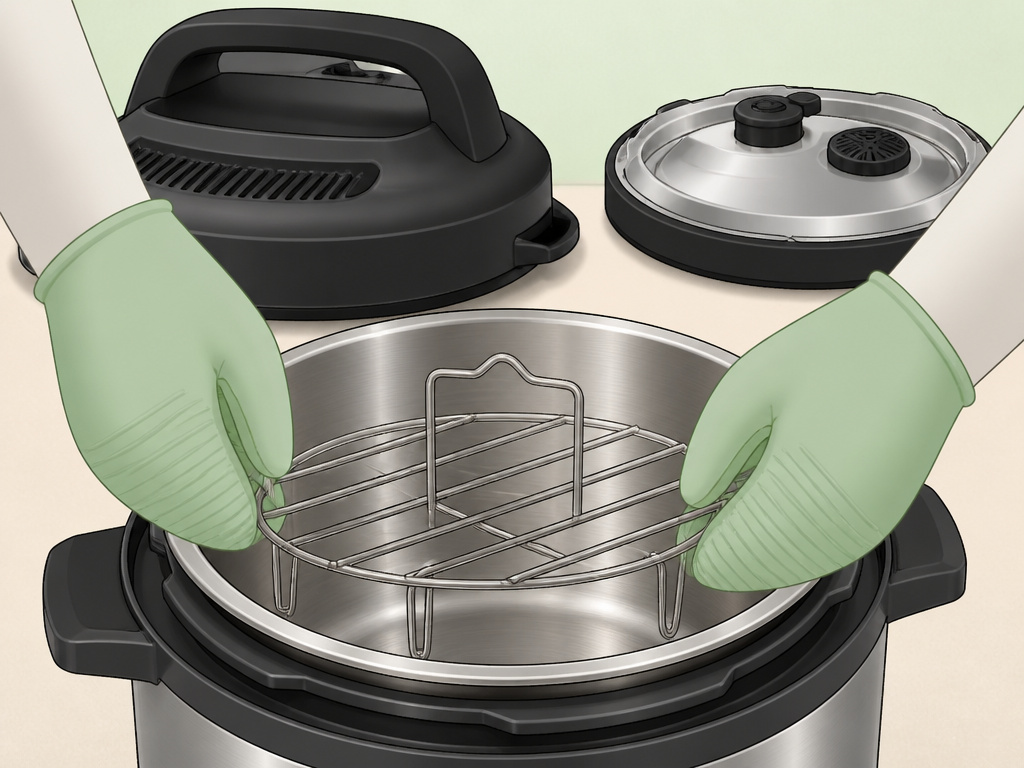
Broiling in the Duo Crisp isn’t like using the pressure cook function. It’s a dry-heat method that follows a strict setup to work and to avoid the cooker’s safety sensors from shutting it down.
Before you start: The inner pot and the Air Fry/Cooking Rack will get extremely hot. Use silicone mitts. Never add water or liquid to the pot for broiling. Ensure the appliance is on a stable, heat-resistant countertop.
- Insert the Inner Pot. Place the stainless steel inner cooking pot into the cooker base. This seems obvious, but it’s the foundation. The pot must be seated correctly for even heat transfer.
- Install the Air Fry/Cooking Rack. This is mandatory. The rack must be placed inside the inner pot with the short handle side facing up. This elevates the food, allowing hot air to circulate underneath and preventing the “food burn” error that occurs when the bottom sensor overheats.
- Remove the Pressure Lid. This is the critical step everyone misses. The pressure cooking inner cover must be removed from the Ultimate Lid. The broiling element is in the lid itself, and the pressure seal would trap steam and heat, creating a dangerous situation. Your lid should be in its “air frying” configuration.
- Close the Lid. Lower the Ultimate Lid onto the cooker base. It will click into place but will not lock like it does for pressure cooking.
- Select Broil. Press the “Broil” button on the control panel. The indicator light will blink.
- Set Time and Temperature. The display will show the default or last-used settings. Press “Time” and use the control dial to adjust the duration (1-40 minutes). Press “Temp” to adjust the temperature if desired. For most browning tasks, 400°F for 4-6 minutes is sufficient.
- Press Start. The heating element in the lid will ignite, and the timer will begin counting down. You won’t hear the familiar pressurization sound; it will be silent except for the fan.
- Monitor and Finish. Because the cavity is small, broiling happens fast. It’s wise to check at the halfway mark. When the cycle ends, the unit beeps. Carefully open the lid (heat and steam rush out upward) and remove the rack with mitts.
Skipping the rack and placing food directly on the inner pot is the most common error. The bottom temperature sensor will detect excessive heat from the reflected broiler element and trigger a shutdown with a “food burn” error on the display. The meal stops, and you have to start over.
Broil vs. Bake vs. Air Fry: What’s the Actual Difference?
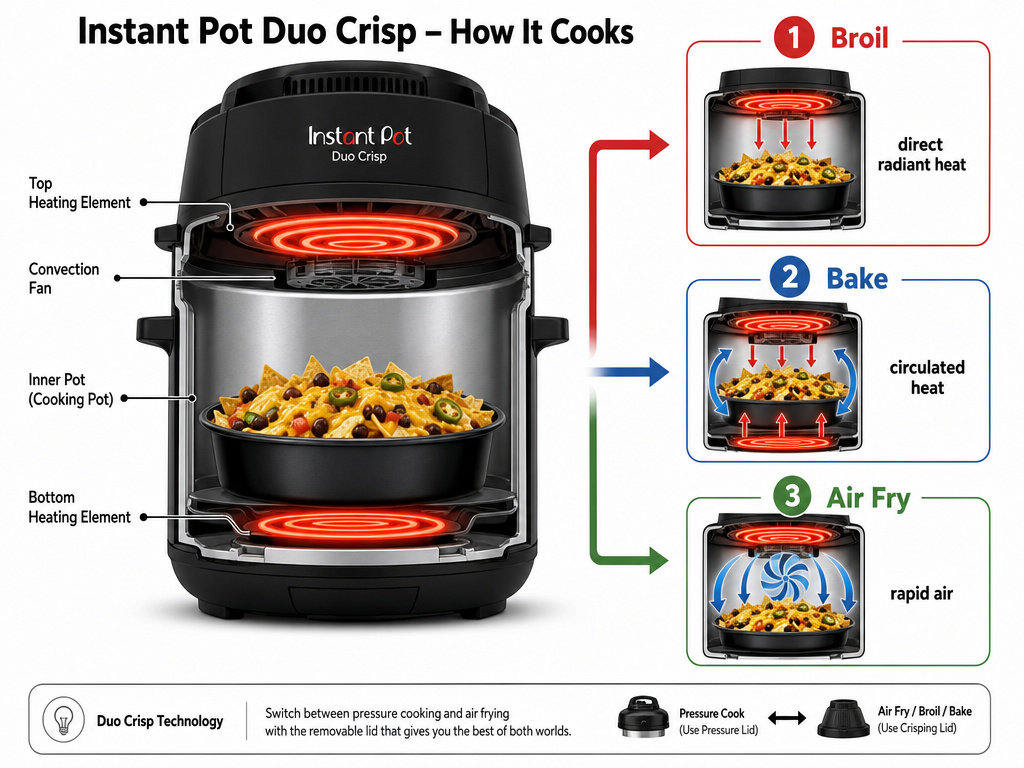
The Duo Crisp lid has multiple functions, but they are not interchangeable. Each uses the heating element and fan in a distinct way to achieve different results.
Broil uses only the top heating element at its maximum temperature, with the fan off or at a very low setting. The goal is direct radiant heat to brown and crisp the top surface of food. It is not for cooking through.
Bake uses both the top and bottom heating elements (the bottom element is in the base unit) to create an all-around, convective oven environment. The fan circulates the air. This is for cooking food through evenly, like muffins or casseroles.
Air Fry uses rapid, super-heated air circulation from a powerful fan and the top heating element. It mimics deep frying by crisping all sides of small, oil-coated foods like fries or wings.
Where this goes sideways: Using the Air Fry setting to “broil” a casserole. The intense, all-around circulation will dry out the top before it properly browns and melts, leaving you with a crusty, over-cooked edge and a soggy middle.
For the finishing touch, melting cheese on nachos, browning the breadcrumb topping on mac and cheese, or giving a quick sear to a thin steak. Broil is the only correct setting. For cooking something from start to finish, use Bake or Air Fry depending on the texture you want. Understanding these distinctions is key to using this versatile multi-cooker to its full potential.
What Can You Actually Cook Under the Broiler?
Manage your expectations. The broiling area in a Duo Crisp is roughly the size of the 6.5-quart inner pot, about 10 inches in diameter. The element is powerful but close to the food. This makes it ideal for specific finishing tasks, not for cooking large volumes or thick cuts from raw.
Here are the tasks it excels at: * Melting and Browning Toppings: Cheese on nachos, French onion soup, or enchiladas. Breadcrumbs on baked pasta or cauliflower gratin. * Quick-Searing Thin Proteins: Pork chops, chicken thighs, or salmon fillets that have been mostly cooked through via pressure cooking or the slow cook function. Two to three minutes per side. * Toasting and Crisping: Garlic bread, open-faced sandwiches, or the top of a refrigerated pizza. * Finishing Roasted Vegetables: Give asparagus or broccoli florets a final blast for deeper color and crisp edges.
The part nobody mentions: The broiler’s small size means hotspots. The center directly under the element will brown much faster than the edges. You will need to rotate the rack 180 degrees halfway through for even results, something you don’t typically do in a full-sized oven.
For a “set and forget” meal, the broiler is the wrong tool. It is a hands-on, finishing tool. Its best use is in a multi-stage cook: pressure cook a stew, thicken it with the Sauté function, then ladle it into bowls, top with cheese and bread, and broil for three minutes. That sequence leverages the true power of a multi-cooker.
Safety, Errors, and Troubleshooting
Broiling is a high-heat, dry cooking method. The Instant Pot’s sensors are designed to prevent damage, which means they can be tripped by incorrect broiling technique.
The “Food Burn” Error. This is the most likely message you’ll see. The cooker has a temperature sensor at the bottom of the inner pot. If it detects overheating, which happens instantly if food or drippings are sitting directly on the metal, it will stop the cycle and display the error. The fix is always the same: ensure the Air Fry/Cooking Rack is used and that no large amounts of grease or marinade are dripping onto the pot floor.
Excessive Smoke. Broiling fatty foods like bacon or marinated chicken thighs will cause splatter and smoke. This is normal to a degree but can set off smoke alarms. The manual suggests patting proteins dry and trimming excess fat. The smoke is not a malfunction; it’s a byproduct of high-heat rendering.
The Lid Won’t Start. If you press Broil and nothing happens, confirm the pressure cooking inner cover is removed. The unit will not activate the broil element if it detects the pressure lid is installed, as that would trap heat dangerously.
Uneven or Weak Browning. This usually indicates an overcrowded rack. Food needs space for the radiant heat to reach all surfaces. Cook in batches if necessary. Also, confirm you are using the Broil program and not a similar-looking Bake or Roast setting.
These safety features exist because the appliance is managing extreme heat in a sealed plastic housing. Respecting the setup steps isn’t just about results; it’s about preventing a shutdown mid-cook. This is a different beast from the steam-focused mechanics of pressure cooking.
Frequently Asked Questions
Can I broil in my regular Instant Pot if I buy a different lid?
No. The standard Instant Pot base unit does not have the electrical connections or control programming to operate a broiling lid. Lids like the “CrispLid” add air frying, baking, and roasting, but not a true broil function. Broiling requires specific integration only found in the all-in-one Duo Crisp model.
Is broiling the same as using the Air Fry setting on high?
They are fundamentally different. Air frying uses rapid air circulation to crisp all sides of food. Broiling uses direct, stationary radiant heat from above to brown only the top surface. Using air fry on high will dry out the top without achieving the same focused, melting browning that broiling provides.
Why does my Instant Pot keep stopping when I try to broil?
You are almost certainly triggering the “food burn” safeguard. This happens when the bottom of the inner pot gets too hot. The only reliable fix is to always use the Air Fry/Cooking Rack to elevate food and catch drips. Never place food or a baking dish directly on the bottom of the pot during the broil cycle.
Can I put a baking dish or pan inside to broil?
Yes, but with a major caveat. The dish must be placed on top of the Air Fry/Cooking Rack, not directly on the inner pot. The dish should also be oven-safe and not so tall that it sits too close to the heating element (leave at least 2 inches of space). A small ceramic or metal dish works fine.
Before You Go
Broiling in an Instant Pot is a niche capability reserved for a single model. If you own the Duo Crisp with Ultimate Lid, you have a powerful finishing tool that operates at 400°F. Remember the three rules: use the rack, remove the pressure lid, and keep a close eye on the clock.
For everyone else, your Instant Pot remains a phenomenal pressure cooker and slow cooker. Use the Sauté function for browning and seek out an oven or a toaster oven for true broiling tasks. The right tool for the job always wins.
