
The Right Way to Season Ceramic Cookware for Non-Stick
This post contains affiliate links. As an Amazon Associate, we earn from qualifying purchases.
Season ceramic cookware by applying a thin layer of high-smoke-point vegetable oil to a clean, dry pan and heating it on low to medium heat for two to five minutes, then wiping away excess oil after it cools. This bonds a microscopic layer to the ceramic, filling pores and creating a temporary barrier that improves food release and protects the underlying coating from direct carbonization.
That bonding step is the whole game. It’s not about making the pan non-stick forever—ceramic doesn’t hold seasoning like cast iron. It’s about managing the interface between your food’s fats and the coating’s microscopic texture. Skip it, and every sear and sauté directly carbonizes the ceramic’s top layer. Do it right, and you push that wear-and-tear timeline out by months.
What follows: the exact temperature and timing specs from five major manufacturer manuals, the one oil mistake that voids warranties, and the simple field test to know when your pan needs a refresh.
Key Takeaways
- Seasoning is a protective maintenance step, not a requirement for first use. Brands like MASTERPAN explicitly state skipping it doesn’t affect your warranty.
- Use only liquid vegetable oil (canola, grapeseed) applied with a paper towel. Nonstick aerosol sprays leave a gummy residue that promotes sticking and can void warranties.
- Keep heat low. Target 300°F (149°C) for oven seasoning or low stovetop heat for 1–5 minutes. Exceeding 250°C (482°F) on an empty pan, per ILAG’s XERADUR 5 spec, risks damaging the coating.
- Re-season when water no longer beads on the surface. This signals the coating’s natural release properties have faded and the ceramic is exposed to direct carbonization.
- Seasoning does not fix physical damage. Scratches, chips, or a visibly degraded surface mean the pan needs replacing, not re-seasoning.
Why Seasoning Ceramic Isn’t What You Think
Seasoning ceramic cookware does not create a permanent polymerized layer. It deposits a temporary, oil-based barrier that fills microscopic pores in the ceramic coating, reducing the surface area where food proteins can bond and carbonize during cooking.
This is the critical misunderstanding. Cast iron seasoning is a chemical change—oil polymerizes into a hard, semi-permanent coating. Ceramic seasoning is a physical one. You’re adding a sacrificial layer that takes the initial thermal and chemical hit instead of the ceramic itself.
The ceramic coating is a hard, inorganic layer sprayed and baked onto an aluminum or steel core. Even the best ones, like the ILAG Group’s XERADUR 5, have a micro-texture. Under high heat, fats and proteins seep into those tiny pores and carbonize. That carbonized gunk is what you eventually call “sticking.” A thin layer of oil sits in those pores first. It burns off instead of your dinner.
Some manufacturers are surprisingly blunt about this being optional. The MASTERPAN guide states seasoning “will not affect the use or the warranty coverage of your pan.” It’s a recommendation for performance, not a gate to using the pan. This separates it from the absolute requirement of seasoning cast iron.
The need becomes clear after a few dishwasher cycles or high-heat sears. As the GreenPan manual notes, “High heat can carbonize oil and fat, which may accelerate the loss of non-stick performance.” Your seasoning is that first line of defense against that carbonization.
The Tools & Oil You Actually Need

You need three things: the right oil, a clean pan, and controlled heat. Getting any one wrong makes the process useless.
The Oil: Use a neutral, high-smoke-point liquid vegetable oil. Grapeseed, canola, or sunflower oil are ideal. Their molecular size allows them to flow into the ceramic’s micro-pores before they begin to smoke and burn off.
Common mistake: Using aerosol non-stick spray. The Forged Aluminum Ceramic Cookware manual is explicit: “Do not use nonstick aerosol cooking sprays… They will leave a residue, which may be difficult to remove, and will cause foods to stick.” The propellants and additives create a gummy film that actually promotes sticking.
The Pan: It must be impeccably clean. Any existing food carbon or detergent film will seal under the new oil layer. Hand wash with warm soapy water and dry thoroughly. If your pan has stubborn residue, consult our guide on cleaning ceramic cookware for methods that won’t scratch the surface.
The Cloth: A lint-free paper towel or a dedicated, clean cotton cloth. Avoid shop towels that may have chemical residues.
| Do Use | Why It Works | Do NOT Use | Why It Fails |
|---|---|---|---|
| Canola oil | Neutral flavor, high smoke point (~400°F/204°C), thin viscosity | Extra virgin olive oil | Low smoke point (~325°F/163°C), burns and creates sticky carbon |
| Grapeseed oil | Very high smoke point (~420°F/216°C), clean finish | Butter or animal fat | Contains milk solids that burn and stick irreversibly |
| Paper towel | Applies a thin, even, controlled layer | Aerosol cooking spray | Leaves propellant and additive residue that gums up |
| Low/Medium heat | Allows oil to bond without smoking instantly | High heat | Causes oil to smoke and burn, depositing sticky carbon |
The 5-Minute Stovetop Seasoning Method
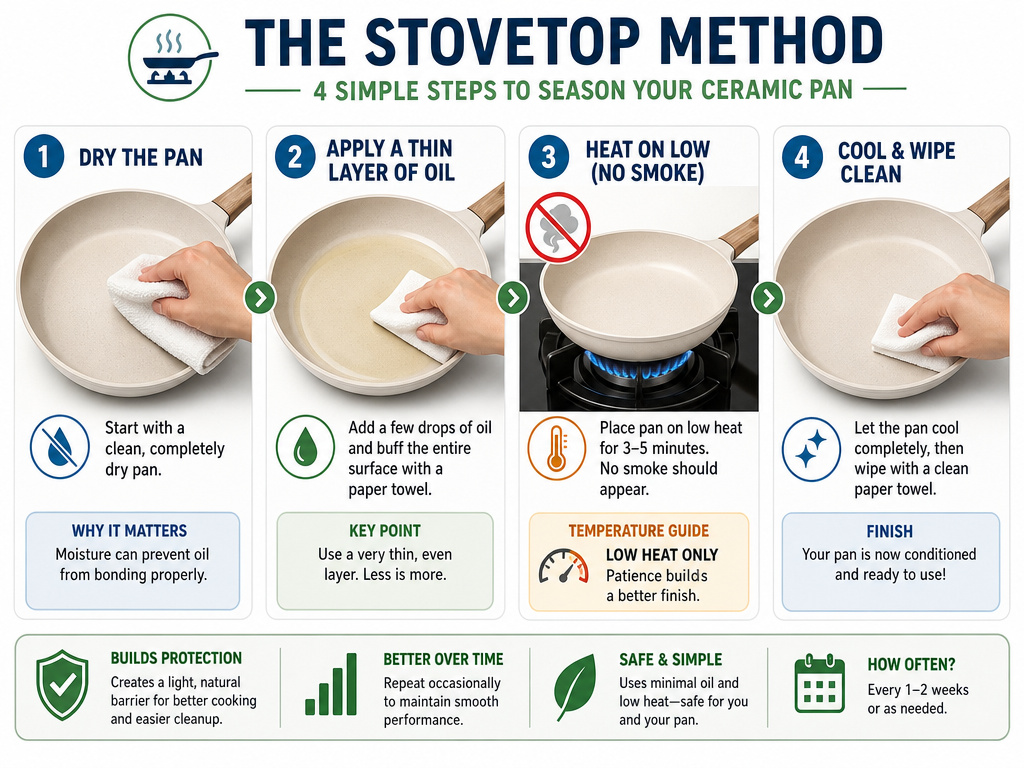
This is the fastest, most controlled method, directly adapted from the Copper Chef and Emeril Everyday manuals. It takes less than five minutes of active time.
Step 1: Clean & Dry. Wash the pan with warm, soapy water and dry it completely with a towel. Any moisture will cause the oil to splatter and prevent even bonding.
Step 2: Apply a Micro-Thin Oil Coat. Pour a teaspoon of your chosen oil onto a folded paper towel. Rub it over the entire interior cooking surface. Then, take a clean, dry paper towel and buff aggressively. Your goal is to make the pan look almost dry—you should see only a faint sheen, not any pooled or streaky oil.
Step 3: Heat on Low. Place the pan on a cold burner. Turn the heat to the lowest setting. According to the Copper Chef manual, heat it for 30 seconds to 1 minute. The Emeril Everyday guide specifies the same. The key instruction: “removing the pan if the oil starts to smoke.”
Step 4: Cool & Wipe. Remove the pan from the heat. Let it cool completely on the stovetop or a trivet. Once cool, take another clean paper towel and wipe out any residual oil. This removes any oil that did not bond, leaving only the thin, adhered layer.
What happens if you skip the cool-down wipe? That excess oil turns sticky at room temperature. Your next egg will fuse to it. The final wipe is non-negotiable.
Where this goes sideways: Walking away during the low-heat phase. On a gas stove, even a low flame can hotspot. If you see smoke, you’ve burned the oil. The fix is to let the pan cool, wash it with soap to remove the burned layer, and start over at a lower heat setting.
This method is ideal for a quick refresh. For a more durable treatment, or for seasoning a brand-new pan, the oven method provides more even heat.
The Oven Seasoning Method for New Pans
The oven method is best for new pans or when you want to treat the entire pan body evenly. The MASTERPAN guide provides the clearest spec: “place in a preheated oven at 300°F for 5 minutes.”
Step 1: Preheat & Prep. Preheat your oven to 300°F (149°C). While it heats, wash and dry your new pan thoroughly. Apply the same micro-thin coat of oil as in the stovetop method.
Step 2: Bake. Place the oiled pan upside-down on the middle rack. You can put a sheet of aluminum foil on the rack below to catch any potential drips. Bake for 5 minutes.
Step 3: Cool Completely. Turn off the oven and leave the pan inside to cool all the way to room temperature. This gradual cooling helps the oil layer set. Once cool, wipe out any unbonded oil with a paper towel.
| Aspect | Stovetop Method | Oven Method |
|---|---|---|
| Best For | Quick maintenance, re-seasoning | New pans, even overall treatment |
| Time | ~5 minutes active | ~1 hour (including preheat/cool) |
| Heat Control | Requires vigilance | Set-and-forget, even heat |
| Manufacturer Source | Copper Chef, Emeril Everyday | MASTERPAN |
| Risk | Hotspot burning if unattended | Overheating if oven is set too high |
Why 300°F? It’s hot enough to encourage the oil to bond to the ceramic surface but stays well below the critical 250°C (482°F) threshold identified by ILAG Group for empty pan heating. Exceeding that temperature on an empty pan can cause irreversible damage to the ceramic matrix.
When to Re-Season Your Ceramic Pans
Ceramic doesn’t announce its needs with rust. The trigger is performance. You need to re-season when the pan’s inherent food-release starts to fade.
The Water Bead Test: Sprinkle a few drops of water onto the clean, dry, room-temperature cooking surface. If the water beads up and rolls around, the coating’s hydrophobic properties are still strong. If the water spreads out into a flat puddle or soaks in slightly, it’s time.
The Visual Cue: A pan that needs re-seasoning often looks a little dull or has a patchy, matte appearance, especially in the center where heat concentration is highest. This is the ceramic’s top layer wearing thin.
The Performance Signal: Foods that previously released easily start to leave a faint residue or require more oil to prevent sticking. This is the carbonized layer building up.
Re-season your pan after a few uses or after cleaning it in a dishwasher. This direct quote from the Copper Chef manual links the two main causes of coating fade: use abrasion and the aggressive detergents and heat of a dishwasher-safe ceramic cycle. Consider handwashing your best ceramic pans to extend the time between seasoning sessions.
Re-seasoning follows the same stovetop or oven process. It does not fix physical damage. Deep scratches, chips, or a coating that is visibly peeling cannot be rescued with oil.
What Seasoning Will Not Fix
Understanding the limits saves you time and frustration. Seasoning is preventive and restorative maintenance, not a repair.
It will not fix scratches. A deep gouge from metal utensils exposes the aluminum base. Oil cannot bridge that gap. This is why using the correct utensils for ceramic is a foundational care step.
It will not restore a chemically damaged coating. Using abrasive cleaners like steel wool or oven cleaner can etch the ceramic surface. This damage is permanent.
It will not compensate for chronic high heat. If you routinely overheat your empty pan, the ceramic coating itself can break down. The Tefal (RE)NEW guarantee is clear: damage caused by “overheating” is not covered. Seasoning is a bandage, not a cure for thermal abuse.
It will not make a low-quality pan perform like a high-quality one. The underlying ceramic coating quality dictates base performance. A thin, cheap coating will degrade faster regardless of your seasoning routine. Investing in best ceramic cookware from reputable brands gives you a more durable canvas to work with.
If your pan is scratched, visibly warped, or the coating is flaking, it’s time to replace it. No amount of oil can reverse that.
Frequently Asked Questions
Does ceramic cookware need to be seasoned before first use?
Manufacturers recommend it, but it’s not a strict requirement for the pan to work. Guides from KYOCERA and MASTERPAN suggest seasoning to “condition” the pan and optimize initial performance, but they confirm you can cook without it. For the longest life and best non-stick results, take the five minutes to do it.
What is the best oil for seasoning ceramic cookware?
Neutral, high-smoke-point vegetable oil like grapeseed, canola, or sunflower oil. Avoid olive oil (smokes too low) and butter (burns and sticks). Never use aerosol non-stick sprays, as their residues cause sticking.
How often should I re-season my ceramic pans?
There’s no fixed schedule. Re-season when you notice a decrease in performance—when food starts to stick more, or when water fails to bead on the clean surface. For most home cooks using low to medium heat and handwashing, this might be every 2-3 months. If you use the dishwasher frequently, it may be needed monthly.
Can I use the same seasoning method for all ceramic cookware?
The core principle is the same, but always check your pan’s specific care guide for temperature limits. Most brands align with the low-heat, short-duration methods described. However, always verify its oven-safe ceramic temperature limit before using the oven method.
The Bottom Line
Seasoning ceramic cookware is a simple, five-minute insurance policy. It doesn’t transform the pan; it preserves what’s already there. The rule is thin oil, low heat, and a final wipe.
Skip the fancy techniques and specialty products. A bottle of canola oil and a paper towel are the only tools that matter. Heat it gently until the oil just begins to bond, let it cool, and wipe it clean. That’s the entire process.
When your eggs slide again and your sautéed vegetables release without a fight, you’ll know it worked. It’s not magic. It’s just giving the pan a fresh start.
