
The Correct Way to Preheat a Griddle: What the Light Means
This post contains affiliate links. As an Amazon Associate, we earn from qualifying purchases.
Preheating a griddle means bringing its entire cooking surface to your target temperature before food touches it. For most home electric models, that takes 5 to 15 minutes, signaled by an indicator light turning off. Commercial gas griddles need 15 to 20 minutes. The goal is a uniformly hot surface that sears food instantly, prevents sticking, and cooks evenly.
That light going out is your cue, not a suggestion. It marks the moment the thermostat under the plate senses the set temperature. The metal is still distributing that heat, which is why the first pancake often looks different, the surface hasn’t equalized.
What follows: the exact preheat times pulled from a dozen manufacturer manuals, why that clicking sound is normal, the critical difference between home and commercial units, and the one mistake that guarantees your food will stick every time.
Key Takeaways
- The indicator light turning off is your official signal that the griddle’s thermostat has reached the set temperature, but the surface may still need a minute or two to equalize.
- Home electric griddles like the Presto 07061 preheat in 5-10 minutes, while larger models like the Presto 72441B need 10-15. Always plug the cord into the griddle first, then the wall outlet.
- Commercial-style gas griddles require a full 15-20 minutes of preheating on high to bring their thick steel plates up to temperature.
- Under-preheating is the primary cause of sticking. A surface that isn’t hot enough lets food proteins bond to it instead of instantly searing.
- You can test readiness with the water droplet test: a few drops of water should sizzle, dance, and evaporate in 1-2 seconds on a properly preheated surface.
The Indicator Light Is Your Timer
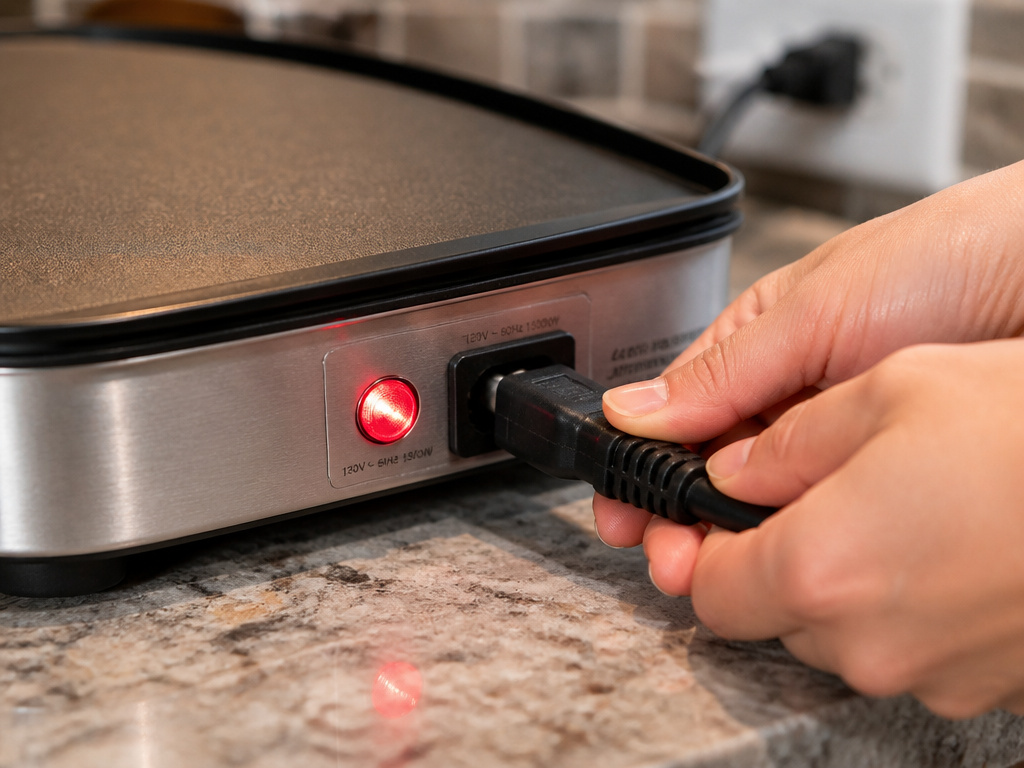
Don’t guess. The red light on the control panel is a direct wire to the griddle’s thermostat. When you turn the dial, the light comes on and the heating element fires. The thermostat measures the temperature of the metal plate right beneath it.
When the sensor reaches the set temperature, the thermostat cuts power to the element and the indicator light turns off. This cycle repeats to maintain heat, so the light will flick on and off during cooking. On a Presto 22-inch griddle, this first cycle takes 5 to 10 minutes.
That’s your baseline. The light going off means the thermostat is satisfied. The far edges of the cooking surface might still be catching up. Give it another 60 to 90 seconds after the light goes out for the first time. This equalization step is what most instruction manuals omit.
What if your griddle doesn’t have a light? Some basic models only have a dial. For these, you must use a timer and the water test. Set a timer for the maximum preheat time suggested for your type of griddle (10 minutes for electric, 20 for gas), then test.
Electric vs. Gas: Two Different Timelines
 The energy source changes everything. An electric coil or element heats a relatively thin aluminum or steel plate. A gas flame heats a thick, often cast iron or heavy steel plate designed to hold massive heat for a commercial kitchen. Their preheat clocks run at different speeds.
Home Electric Griddles: The 5–15 Minute Window
These are the plug-in models for your kitchen counter. Their manuals are specific.
| Model | Preheat Time | Key Signal |
|---|---|---|
| Presto 22-inch (07061) | 5–10 minutes | Indicator light turns off |
| Presto Slimline (07072) | 5–10 minutes | Indicator light turns off |
| Presto 72441B | 10–15 minutes | Pilot light goes off |
| Crux 22″ Electric Griddle | ~10 minutes | Indicator light goes out |
| Dash GR225 | ~10 minutes | Indicator light remains on (power indicator) |
The takeaway is consistency. Most fall into that 5-15 minute range. The variation often comes down to wattage and mass. A 1200-watt element heats faster than a 1000-watt one; a larger griddle surface takes longer.
Plugging in matters. Every manual states the same safety protocol: always connect the detachable power cord to the griddle unit first, then plug it into the 120V AC wall outlet. Reverse the order when disconnecting. This prevents any chance of the live pins on the griddle being exposed.
Commercial & Gas Griddles: The 15–20 Minute Rule
These are a different beast. A Globe Gas Countertop Griddle manual explicitly says to turn burners on “about 15-20 minutes before cooking.” A Hobart CG Electric Griddle (a heavy-duty commercial electric model) also calls for a 20-minute preheat. The Weber Slate gas griddle guide is firm: “Preheating the griddle for 10-15 minutes is critical.”
Before you start: The griddle surface will exceed 400°F. Keep loose clothing, hair, and towels clear. Use long-handled tools. Never leave the unit unattended while preheating, and ensure the area is well-ventilated for gas models.
Why so long? Mass and safety. These plates are thick to avoid warping and to provide consistent, zone-able heat. Rushing it means a cold spot in the center where grease pools and food steams instead of sears. That’s how you get a disappointing, stuck-on mess.
The Step-By-Step Preheat (And What to Do While You Wait)
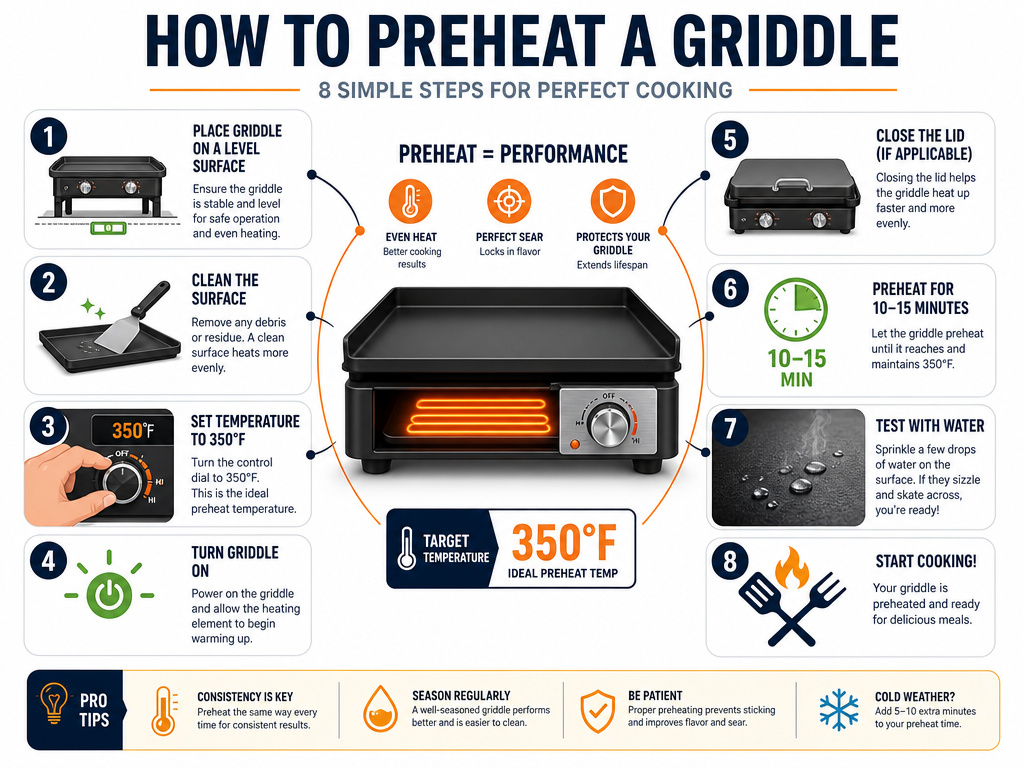 Follow this sequence for perfect results every time. The waiting time is for prep, not distraction.
- Position the Griddle. Place it on a dry, level, heat-resistant surface. Keep it away from walls and overhead cabinets. If you’re concerned about your countertop, slide a sheet of aluminum foil underneath, but keep it clear of the rubber feet so the unit stays stable.
- Make the Connections. For electric: insert the heat control probe fully into the griddle. Then plug the cord into the wall. For gas: ensure the gas valve is on and the drip tray is in place.
- Set the Temperature and Start. Turn the dial to your target setting. For initial preheat, most foods do best at medium heat (around 350°F). For searing meats or cooking pancakes, you might go to medium-high (375-400°F). Turn it on. The light will glow.
- Prepare Your Food. This is your 5-20 minute window. Portion your meats, chop vegetables, mix batters. This is also the time to lightly oil the griddle if your recipe calls for it, applying it just before cooking.
- Listen for the Click. A popping or clicking sound as it heats is normal. It’s the metal expanding. Don’t mistake it for a problem.
- Watch for the Signal. The indicator light will turn off. When it does, wait one more minute.
- Perform the Water Test. Flick a few droplets of water onto the surface. They should sizzle violently, break into smaller beads, and skate around before vanishing within 2 seconds. If they just sit and boil slowly, it’s not hot enough. If they instantly vanish in a puff of steam, it might be too hot.
- Begin Cooking. You’re ready. Add your food confidently.
Where this goes sideways: Adding food the second the light goes off. The thermostat is at the edge of the plate. The center might still be a few degrees cooler. That sixty-second wait lets the entire surface normalize. Skip it, and your first burger will stick in the middle.
Why Preheat? The Science of the Sear
This isn’t about warming the pan. It’s about creating a physical barrier between your food and the metal.
A properly preheated griddle surface is energetically unstable. When cold food hits it, the surface instantly transfers its energy, causing the proteins on the outside of the food to coagulate and form a crust. This crust lifts the food slightly on a layer of its own steam. It never truly bonds to the metal.
An under-heated surface lacks that energy. Proteins slowly denature and bond directly to the microscopic pores in the metal. This is sticking. No amount of oil will save it if the temperature is wrong. This is also why seasoning a griddle, baking a layer of polymerized oil into those pores, is so important for cast iron or carbon steel models. It smooths the surface.
Common mistake: Trying to cook on a griddle that’s merely “warm.” Sticking, uneven cooking, and steamed-out foods are the guaranteed results. If your bacon is swimming in white fat instead of sizzling in clear fat, the griddle was too cold.
Troubleshooting a Griddle That Won’t Get Hot
Sometimes the process stalls. Here’s how to diagnose it.
| Symptom | Likely Cause | Fix |
|---|---|---|
| Indicator light never turns on | Unit not plugged in / power outage | Check connections and outlet with another appliance. |
| Light stays on indefinitely, surface stays cool | Faulty thermostat or heating element | Unplug, let cool, contact manufacturer. |
| One side heats, the other doesn’t (electric) | Loose or damaged internal connection | Unplug, check probe seating. May require service. |
| Uneven heating (gas) | Clogged burner ports or uneven gas flow | Turn off gas, cool, clean ports with a needle. |
| Clicking sound but no heat | Normal expansion/contraction | This is fine. If no heat accompanies it, see “faulty thermostat.” |
For electric models, a dedicated circuit is often the hidden issue. If your griddle shares a circuit with a microwave or toaster oven, it may not draw enough power. Plug it into an outlet on its own breaker.
If you encounter a sticky griddle surface after cooking, it’s often a residue from sugary sauces or commercial non-stick sprays. This isn’t a preheat issue, but a cleaning one. It requires a specific cleaning a griddle routine to remove without damage.
Frequently Asked Questions
How hot should a griddle be for pancakes?
Griddle should be at about 375°F for pancakes. The surface is ready when a few drops of water sizzle and dance before disappearing. At this griddle temperature, the batter will set quickly, forming bubbles that pop and leave tiny holes, without burning the bottom.
Can you preheat a griddle with oil on it?
No. You should preheat the dry griddle, then add oil just before the food. Adding oil at the start means it heats for the entire 10+ minutes. Most oils will smoke, break down, and become sticky. This is a common cause of a sticky surface. Add your fat in the last 30 seconds of preheating.
Do you need to preheat a non-stick griddle?
Yes. Even ceramic or advanced non-stick surfaces need preheating for even cooking. The non-stick coating prevents bonding, but heat transfer is still physics. A cold non-stick surface will yield soggy, uneven results. Preheat it on medium heat, just as you would a regular model.
Why does my griddle smoke during preheating?
Smoke during the first-ever preheat is usually factory oils burning off, this is normal. Smoke during subsequent preheats means there’s old food residue or carbonized oil on the surface. You need a thorough cleaning and seasoning session. Excessive smoke can also mean the temperature is set too high for the oil you used previously.
How long does a cast iron griddle take to preheat?
Cast iron griddle takes longer due to its incredible heat retention, about 10-15 minutes on a stovetop burner, or 15-20 minutes in an oven if you’re using that method. Its mass is its advantage, but patience is required. Always preheat it slowly to avoid cracking.
Before You Go
Preheating is the non-negotiable first act of good griddle cooking. Set a timer for your model’s range, watch for the light, and always do the water test. Remember that electric home units are fast (5-15 min), while gas or commercial units are slow (15-20 min). That waiting time is for prepping your ingredients, not for multitasking.
The goal is a sear, not a steam. A properly hot surface gives you that restaurant-quality release and even browning. Now that you know how the thermostat and indicator light work, you can stop guessing and start cooking.
