
Why Does the Bottom of My Dutch Oven Burn? | Heat Mismatch
This post contains affiliate links. As an Amazon Associate, we earn from qualifying purchases.
The bottom of your Dutch oven burns because the pot’s material and your oven’s temperature are mismatched. Enameled Dutch ovens are typically rated for 400°F, but bread baking demands 450–500°F. That excess heat transfers directly to the dough’s base, charring it before the loaf’s interior reaches 204°F. Dark enamel interiors and a low oven rack position accelerate the burn.
That temperature gap isn’t a small spec difference. It’s the line between a manufacturer’s warranty and a recipe’s demand. Exceed it, and the enamel itself starts to change.
This guide walks through the material mismatch first, then the three specific fixes that work: shielding, positioning, and a direct swap. You’ll know which method matches your pot by the end.
Key Takeaways
- Enameled Dutch ovens have a 400°F manufacturer rating, but bread recipes often call for 450–500°F. This over-temperature burns the enamel and your bread.
- A dark enamel interior absorbs and conducts heat faster than a light one, making burning almost guaranteed with standard preheating.
- Shield the dough with a 1/4-inch thick foil disk or a layer of cornmeal placed in the cold pot, adding it to a preheated pot will scorch it.
- If burns persist with a bare cast iron pot, your oven’s lower heating element is too close. Move the rack to the middle position and use a baking sheet on the rack below as a heat shield.
- For a permanent fix, switch to a bare cast iron Dutch oven. It has no temperature ceiling and distributes heat more evenly for bread.
The Core Problem: Material vs. Temperature
Your oven’s temperature and your pot’s rating are fighting. Bread baking needs extreme heat, often 450°F to 500°F, to force a rapid rise and create a crisp crust. Most enameled Dutch ovens, however, are manufacturer-rated for about 400°F.
Enameled Dutch ovens typically only have manufacturer ratings for around 400°F. Dutch oven bread recipes commonly suggest turning up your home oven to 450°F or more, or even its highest setting.
That 50–100 degree gap doesn’t just risk your bread. It damages the pot. The glass-based enamel coating can craze, darken, and lose its non-stick properties when subjected to sustained heat beyond its rating. Once the enamel darkens, it absorbs even more heat, creating a vicious cycle where every loaf burns worse than the last. This isn’t theoretical. Bakers report enamel turning dark brown or black after just a few weeks of high-heat bread baking.
The problem is compounded by your oven’s design. If you’re baking on the lowest rack, the bottom heating element is blasting the base of your Dutch oven with direct, radiant heat. The pot’s thick cast iron core holds that heat and delivers it relentlessly to your dough’s bottom crust. The interior of the loaf might still be raw at 190°F, but the base is already carbonizing at 500°F.
Why Dark Interiors Burn Faster
Physics isn’t fair. A Dutch oven with a black or dark enamel interior absorbs radiant heat more efficiently than one with a light-colored or sand-colored interior. Think of a black car in the sun versus a white one. The dark pot becomes a more effective heat conductor, transferring that energy to your bread’s bottom faster. A Staub black-enameled pot will often produce a darker bottom crust than a light Le Creuset under identical conditions, even if both are rated for the same temperature.
Your 3 Actionable Fixes (Ranked by Effectiveness)
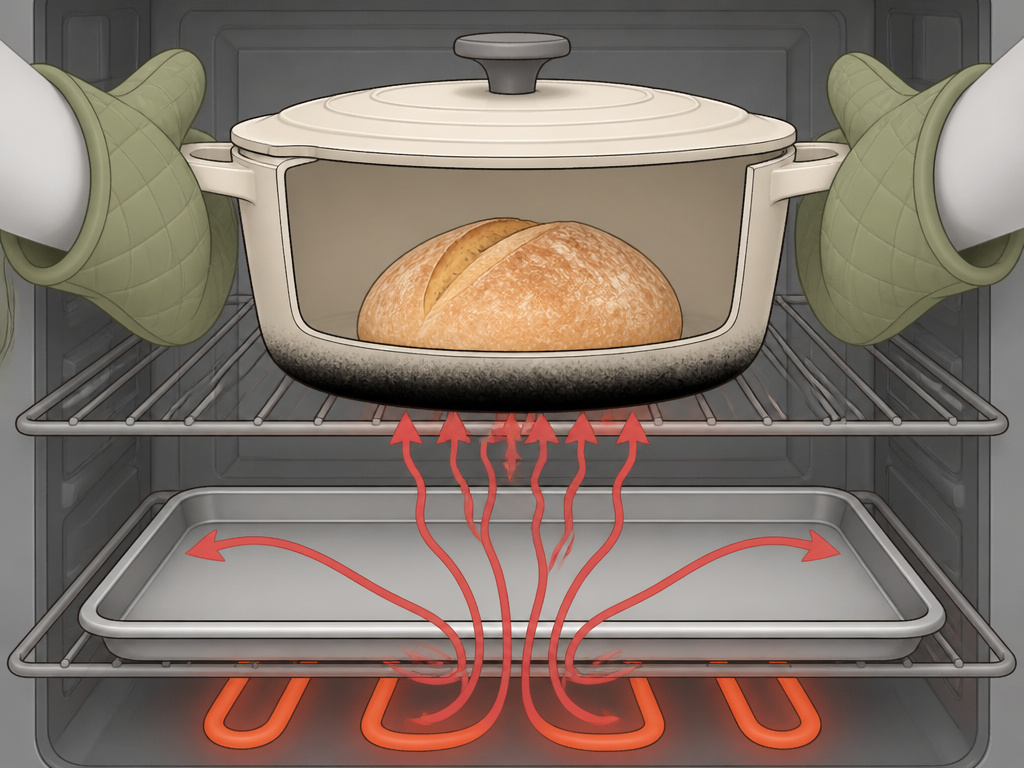
You can work around a problematic pot, or you can solve the problem. These fixes start with the simplest intervention and move to the most permanent solution.
Fix 1: Insulate and Shield
This is the field repair. It doesn’t fix the enamel, but it can save your next loaf. The goal is to create a buffer between the scorching-hot pot bottom and your dough.
The 4-Step Shield Method:
- Create a foil disk. For a standard 7-inch bottom, take about 30 inches of 12-inch wide heavy-duty aluminum foil. Flatten and fold it into a 1/4-inch thick disk roughly the size of your pot’s bottom.
- Place it cold. Set the foil disk in the bottom of your cold, un-preheated Dutch oven. If you add it to a preheated pot, the foil can fuse to the enamel.
- Add a secondary buffer (optional). Sprinkle a tablespoon of cornmeal or semolina over the foil. This creates an air gap and adds a flavor layer.
- Load and bake as usual. Lower your baking temperature by 25°F (e.g., from 475°F to 450°F) since the insulation will slightly extend baking time.
Common mistake: Shielding with a preheated pot. The thermal shock can warp thin foil and fuse it to the enamel, creating a cleaning burnt-on food nightmare.
This method is effective but fiddly. It also doesn’t address the root cause, your pot is still overheating.
Fix 2: Adjust Oven Geography
Sometimes the burn is about location, not material. If you’re using a bare cast iron Dutch oven and still getting burns, your oven’s heat is too concentrated.
| Adjustment | Action | Why It Works |
|---|---|---|
| Rack Position | Move the oven rack to the center position. | Gets the pot farther from the intense bottom heating element. |
| Baking Sheet Shield | Place an empty rimmed baking sheet on the rack directly below your Dutch oven. | The sheet deflects and diffuses direct radiant heat from the bottom element. |
| Temperature Reduction | After 20 minutes of lidded baking, reduce oven temp by 50°F (e.g., 475°F to 425°F) for the remainder of the bake. | Lowers the ambient heat attacking the bottom once the crust has set. |
This approach is crucial for understanding how a Dutch oven works with your specific oven. Electric ovens with exposed bottom elements are the biggest offenders. Gas ovens with less direct bottom heat may not need this.
Fix 3: The Permanent Swap (Bare Cast Iron)
The most effective fix is to use the right tool for the job. A bare cast iron Dutch oven, like a Lodge Dutch Oven, has no enamel coating to degrade and no artificial temperature ceiling. It can handle 500°F or higher indefinitely. The iron itself distributes heat slightly less aggressively than super-heated enamel, giving the bread’s interior more time to catch up to the crust.
I won’t recommend an enameled pot for weekly bread baking. The visual feedback is honest: a bare Lodge blackens evenly with seasoning and use, but it doesn’t transfer that scorching energy to your food the way damaged enamel does. Found that out after retiring a scorched Le Creuset.
The trade-off is maintenance. A bare cast iron pot requires seasoning and specific cleaning methods to prevent rust. But for high-heat baking, it’s the durable, permanent solution. Your bread stops burning, and you stop worrying about diagnosing problems with a cracked or browned enamel surface.
When to Skip Preheating Entirely
 The standard bread-baking dogma says to preheat your Dutch oven empty for 30-45 minutes. For enameled pots, this dogma is destructive. Preheating an empty enameled vessel to 500°F is the fastest way to thermally shock the coating.
Consider a hybrid approach: 1. Start preheating your oven with the empty Dutch oven inside. 2. When the oven temperature reaches 300°F, use oven mitts to remove the pot. 3. Quickly load your dough, cover, and return it to the now-continuing-to-heat oven.
The pot will be hot enough to give you oven spring, but the enamel won’t endure the prolonged peak-temperature stress. This method is a concession, but it can prolong the life of a pot you’re not ready to replace. It directly contradicts the “never heat empty” warning in manuals like the All-Clad SD922D51 Electric Dutch Oven guide, which exists to prevent damage to electrical components, but the principle of reducing thermal stress is the same.
Troubleshooting Persistent Burning
What if you’ve tried shielding and rack adjustments and the bottom is still black? Your diagnosis moves from technique to equipment.
- Inspect the Enamel. Is the interior dark brown or black? Hold it under a bright light. If the once-light surface is now a matte, dark shade, the enamel is carbonized. This damaged layer is now a superior heat conductor. No shield will fully compensate. This is a primary reason for enamel discoloration.
- Check Your Oven Calibration. An oven running 25°F hot turns a 450°F recipe into a 475°F reality. Use a standalone oven thermometer to verify.
- Evaluate the Dough. Dense, whole-grain loaves or those with high hydration need longer bake times. A longer bake inherently risks a darker bottom. For these, the foil shield + temperature reduction method (Fix 1 & 2 combined) is non-negotiable.
- Consider the Pot’s Base. An older pot with a warped or pitted bottom doesn’t sit flat. This creates micro-air gaps that cause uneven heating and hot spots, which burn. Run your hand across the bottom. Any rocking means it’s time for a new pot.
Frequently Asked Questions
Can I use parchment paper instead of foil?
Parchment paper helps with sticking, but it’s a poor heat shield. It’s thin and can burn through at temperatures above 400°F. Use it with a foil disk for easy loaf removal, not instead of one.
My bread is done inside (204°F) but the bottom is pale. What now?
You have the opposite problem, not enough bottom heat. Skip the shield. Ensure you’re preheating fully (for bare iron) and that the pot is on the lower rack. A pale bottom often means the lid was left on too long, trapping steam and preventing browning. Try removing the lid 5-10 minutes earlier.
Is a Dutch oven with a light interior really better?
Yes, for bread baking. A light sand or white enamel interior reflects more radiant heat than it absorbs, leading to a more gentle and even bake on the bottom. It’s still subject to the 400°F rating limit, but it gives you more margin for error.
Can I fix already-burned enamel?
You can’t restore enamel that has carbonized and darkened. You can clean off surface stains, but the changed thermal properties are permanent. This is a key sign of a damaged Dutch oven. The pot is still usable for stews and braises under 400°F, but its high-heat baking days are over.
Are all enameled Dutch ovens rated for 400°F?
Most are. Always check the manufacturer’s manual. Some premium brands may rate theirs for 450°F or 500°F. This rating is about the enamel’s durability, not the underlying iron’s, which can handle much more. Knowing the materials used in Dutch ovens helps you understand this limit.
The Bottom Line
A burnt bottom is a symptom, not a random event. The disease is a material mismatch: enamel can’t take the heat bread demands. You can treat the symptom with foil and oven adjustments, or you can cure the disease by switching to bare cast iron.
For the next loaf, make a foil disk. For the next decade, get a Lodge. That pot won’t care about 500 degrees, and your bread will never see a blackened base again.
