
Is a Pressure Cooker the Same as a Pressure Canner? Safety Guide
This post contains affiliate links. As an Amazon Associate, we earn from qualifying purchases.
A pressure cooker is not the same as a pressure canner for home food preservation. The USDA defines a pressure canner as a device that can hold at least four quart jars upright. This size requirement ensures the “come-up” and “cool-down” phases, critical parts of the total heat process, are long enough to destroy botulism spores. Using a smaller pressure cooker or an electric multi-cooker for canning low-acid foods creates an inconsistent, unsafe environment.
That four-quart-jar rule is the line between a kitchen tool and a preservation device. It isn’t about convenience; it’s about thermal mass. A smaller pot heats and cools too fast, which can leave the center of your jars underprocessed even if the gauge reads the right pressure.
What follows is a breakdown of the three physical specs that separate these tools, the science behind the “botulism cook,” and why trusting a manufacturer’s canning button over decades of USDA research is a gamble with your health.
Key Takeaways
- The USDA’s non-negotiable rule: a pressure canner must hold at least four quart jars upright. Most pressure cookers cannot.
- “Come-up” and “cool-down” time is built into safe processing. Smaller devices shorten this heat, risking underprocessing.
- Electric pressure cookers (Instant Pots, etc.) are inconsistent, they might hit temperature once but fail the next time, even with the same settings.
- Look for the Underwriters Laboratories (UL) safety approval mark on any pressure canner you consider.
- For canning, buy a dedicated pressure canner like a Presto or All-American. Use your pressure cooker for what it’s great at: fast weeknight meals.
The 3 Physical Differences That Change Everything
You cannot see the difference in a product photo. The distinction is in the metal, the volume, and the gauges. These aren’t marketing points; they are engineering requirements for reaching and holding 240–250°F for up to 90 minutes straight.
A pressure canner is defined by its ability to hold at least four quart-size jars standing upright on the rack with the lid secured. This capacity, typically 16 quarts or more, provides the thermal mass necessary for the prolonged, stable heat required to destroy Clostridium botulinum spores in low-acid foods.
First, look at capacity. A standard stovetop pressure cooker like a Fissler or Kuhn Rikon holds 4 to 8 quarts of total volume, barely enough for a couple of pint jars submerged in water. A pressure canner starts at 16 quarts and goes to 23 quarts or more. That extra metal isn’t for show. It acts as a heat battery, smoothing out temperature fluctuations and ensuring the entire chamber, and every jar inside, heats and cools slowly and evenly.
Second, check the pressure regulation. Many pressure cookers have simple, fixed 15-pound regulators or high/medium/low switches. A true pressure canner will have either a precise dial gauge or a weighted gauge that jiggles at specific pressures (5, 10, or 15 psi). This accuracy is non-negotiable. At higher altitudes, you must adjust pressure to achieve the same temperature. A vague “high” setting won’t cut it.
Third, examine the design for venting. Before pressurizing, a canner must vent steam for a full 10 minutes to drive all air out of the chamber. Air pockets create cool spots. A proper canner has a dedicated vent port (petcock). Most pressure cookers have a simple pressure release valve not designed for this prolonged, critical purge.
The short version: If it can’t hold four quart jars, it’s not a canner. That’s the USDA’s line, and it’s based on physics, not opinion.
Why “Come-Up” and “Cool-Down” Time Is the Whole Game
Processing time isn’t just the minutes spent at 10 or 15 pounds of pressure. USDA research-based times include the entire thermal cycle: heating the canner, venting it, processing at pressure, and letting it cool down naturally to zero pressure. Cut any part short, and you risk an underprocessed jar.
Think of it like baking a cake. If you crank the oven to 350°F, put the cake in, and turn the oven off 28 minutes later, the center will be raw. The oven and the cake itself need time to come up to temperature and then to cool down while finishing the bake. Pressure canning works the same way.
| Phase | Role in Safety | What Shortening It Does |
|---|---|---|
| Come-Up Time | Heats the jars, food, and canner evenly to processing temperature. | Creates hot spots and cold spots. The jar’s center may never reach lethal temperatures. |
| Venting Time | Evacuates all air from the canner. Air is an insulator and lowers temperature. | Leaves insulating air pockets. Temperature can be 10–15°F lower in those spots. |
| Processing Time | Holds the food at a temperature high enough to destroy bacterial spores (240–250°F). | The core safety step. This duration is specific to each food and jar size. |
| Cool-Down Time | Allows processing heat to continue penetrating the food as pressure drops. | Stops the thermal process early. The food’s center may not receive the full “botulism cook.” |
A small-diameter pressure cooker has less water and less metal. It screams up to pressure and plunges down fast when the heat is off. That rapid cool-down steals the finishing heat the food needs. This is why you can’t just “add 10 minutes” to a standard canning time for a small cooker. The heat profile is fundamentally different.
Where this goes sideways: Assuming the timer starts when the gauge hits pressure. If you do that in a small pot, the come-up was too fast and the cool-down will be faster. The total heat delivered can be half of what a 16-quart canner provides, even with the same “90-minute” process time.
The Electric Pressure Cooker Trap
The “Keep Warm” button and digital display are seductive. They promise set-it-and-forget-it safety. The research says otherwise. Studies from university extensions have shown electric pressure cookers do not consistently reach or maintain the temperatures required for a safe botulism cook.
The commercial standard for destroying C. Botulinum spores is 250°F held for 2.5 minutes in the food’s center. Even the best electric multi-cookers struggle with this in a jar of dense food like meat or pumpkin.
The inconsistency is the real killer. Your Instant Pot might hit 240°F on a Tuesday with a jar of green beans. On Thursday, with the same model, same settings, and same beans, it might peak at 235°F. That 5-degree gap is the difference between safety and a jar that can poison you. The heating elements and sensors in these appliances are designed for cooking, not for the rigorous, stable output required for laboratory-grade sterilization.
Easy to miss: Altitude wrecks electric pressure cookers for canning. The programming can’t always compensate for lower atmospheric pressure, which changes the boiling point. At 3,000 feet, water boils at 206°F, not 212°F. If the cooker’s sensor is calibrated for sea level, your food may never get hot enough, period.
This is why no USDA or university extension service, including the National Center for Home Food Preservation, recommends using electric multi-cookers for pressure canning. The “canning” button is a marketing feature, not a safety certification.
Pressure Canner vs. Pressure Cooker: A Direct Comparison
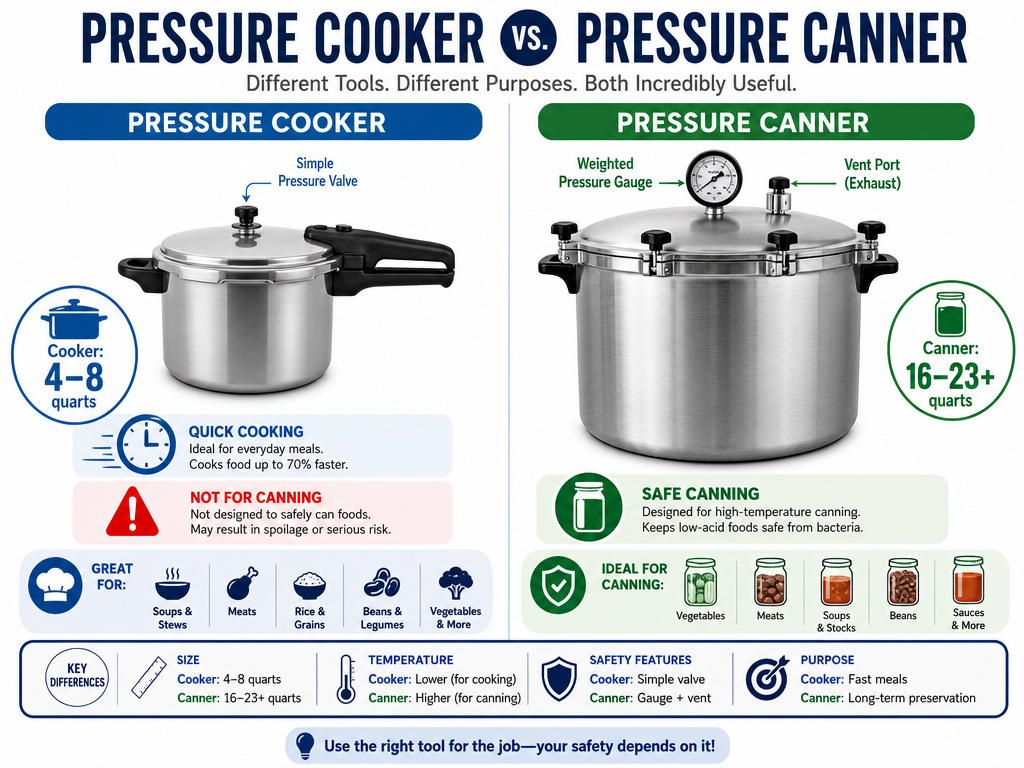 This isn’t about good versus bad. It’s about the right tool for a lethal job. Here’s what each one is built to do.
| Aspect | Pressure Cooker | Pressure Canner |
|---|---|---|
| Primary Job | Cook food quickly. | Sterilize and preserve low-acid foods safely. |
| Typical Size | 4–8 quarts total volume. | 16–23+ quarts total volume. |
| Jar Capacity | 1–2 pint jars (not recommended). | Minimum 4 quart jars, often 7 quart or 9 pint jars. |
| Pressure Regulation | Often a simple fixed weight or high/med/low switch. | Accurate weighted gauge (5/10/15 psi) or calibrated dial gauge. |
| Venting Design | Quick-release valve for cooking. | Dedicated vent port (petcock) for a mandatory 10-minute air-removal purge before pressurizing. |
| Safety Standard | Underwriters Laboratories (UL) approval for cooking. | UL approval specifically for pressure canning. |
| Best For | Tenderizing stew meat in 45 minutes, cooking dried beans fast. | Canning green beans, meat, stock, and any vegetable or protein without added acid. |
Your standard pressure cooker excels at its job. It uses pressure to raise the boiling point of water, so food cooks faster. The physics of how pressure cookers work is brilliant for getting dinner on the table.
A dedicated pressure canner is a different class of device. It’s built thicker, with more precise controls, to act as a miniature autoclave. Brands like Presto and All-American engineer their canners to meet the exacting specifications laid out by the USDA’s decades of research. When you use a real pressure canner, you’re plugging into a proven, tested system.
Choosing and Using a Real Pressure Canner
If you’re going to can, buy the right tool. It’s a one-time purchase that lasts decades. Here’s what to look for and the one step you cannot rush.
- Verify the capacity. The box must state it holds at least 4 quart jars. Most new models are 16-quart or 22-quart. A 16-quart Presto is the default starting point for most households.
- Check for the UL safety mark. This indicates the device has been tested and approved for pressure canning. Don’t buy used, older models without this mark, especially discontinued brands where replacement parts like gaskets and over-pressure plugs are unavailable.
- Pick your gauge type. A weighted gauge is simpler and never needs calibration, it jiggles at the set pressure. A dial gauge is more precise but must be tested for accuracy before each canning season (your local county extension office often does this for free).
- Follow the manual’s venting procedure to the letter. This is the step every beginner wants to shorten. Don’t. Place the canner on high heat with the vent port open. Once a full, roaring cone of steam shoots out for a full 10 minutes, then place the weighted gauge or close the petcock to bring it to pressure.
- Start your process timer only after reaching target pressure. For a weighted gauge, this is when it begins rocking steadily. For a dial, it’s when the needle settles at the correct PSI.
- Let the canner cool down naturally. After processing, turn off the heat and walk away. Do not move the canner. Do not run cold water over it. Do not use the quick-release. Let the pressure drop to zero on its own. This can take 45 minutes to an hour. Removing the lid before pressure is fully released is dangerous and ruins the cool-down phase of processing.
- Wait another 10 minutes after the lid unlocks. Then, remove the lid, tilting it away from you to avoid the residual steam blast. Use a jar lifter to remove the jars, and place them on a towel, not a cold countertop.
Before you start: The steam from a venting pressure canner is over 212°F and will cause instant, severe burns. Keep children and pets out of the kitchen. Always use dry potholders, wet ones transmit steam heat instantly. Never force the lid open if it’s stuck; it means pressure remains inside.
The brand you choose matters less than following these steps. A Presto 16-quart is a reliable, affordable workhorse. The All-American, with its metal-to-metal seal and no gasket to replace, is a favorite for high-volume canners. Both do the job when you respect the procedure.
Frequently Asked Questions
Can I use my Instant Pot as a pressure canner?
No. Instant Pots and other electric multi-cookers are not approved for pressure canning by the USDA or any university extension service. Research shows they cannot consistently reach or maintain the high temperatures (240–250°F) required to destroy botulism spores in low-acid foods. The “canning” button is not a safety guarantee.
What happens if I pressure can in a regular pressure cooker?
You risk underprocessing the food. The smaller size leads to shorter come-up and cool-down times, which are critical parts of the total heat process. This can leave the center of the jar underheated, allowing Clostridium botulinum spores to survive. Consuming this food can lead to botulism poisoning, a severe and potentially fatal illness.
How many jars do I need to hold for it to be a pressure canner?
The USDA standard is clear: a pressure canner must be able to hold at least four quart-size jars upright on the rack with the lid closed. This capacity ensures sufficient thermal mass for safe processing. Most pressure canners hold 7 quart jars or 8 to 9 pint jars.
Are old pressure canners safe to use?
Maybe, but proceed with extreme caution. It must have a working weighted or accurate dial gauge, a clean vent port, and an intact rubber gasket (if it uses one). Most importantly, it should bear the Underwriters Laboratories (UL) approval mark. If it’s a discontinued brand, finding safe replacement parts may be impossible. When in doubt, replace it.
Can I pressure can high-acid foods like fruit?
High-acid foods (most fruits, pickles, jams) are safely processed in a boiling-water bath, not a pressure canner. The acid prevents botulism growth. Pressure canning is specifically for low-acid foods (vegetables, meat, fish, poultry, soup) where the only way to achieve safety is through high-temperature sterilization.
Do I need to adjust for altitude when pressure canning?
Yes. As altitude increases, atmospheric pressure decreases, and water boils at a lower temperature. To compensate, you must increase the pressure (PSI) setting on your canner. Consult a reliable altitude chart from the National Center for Home Food Preservation or your local extension office. This adjustment is critical for safety.
The Bottom Line
This isn’t a matter of preference. The difference between a pressure cooker and a pressure canner is a matter of documented food science and public health. The four-quart-jar rule exists because smaller pots cannot deliver the total, prolonged heat required to make low-acid foods shelf-stable and safe.
Use your pressure cooker for brilliant, fast cooking. For putting food by, invest in a dedicated, USDA-compliant pressure canner from a trusted brand. Follow the venting and cooling rules without shortcuts. That’s how you fill a pantry with confidence, not with risk.
