
The Right Way: How Do You Cure a Cast Iron Skillet Properly
This post contains affiliate links. As an Amazon Associate, we earn from qualifying purchases.
To cure a cast iron skillet, you clean it, apply a microscopically thin layer of high-smoke-point oil, and bake it upside down in a hot oven. The exact temperature varies by brand: Lodge specifies 450–500°F for one hour, while Vollrath advises 350°F. This process, called polymerization, bonds the oil to the iron, creating a hard, non-stick, rust-resistant layer. Repeat 2-3 times for a durable base coat.
That temperature split is a manufacturer spec. Using 500°F on a Vollrath pan or 350°F on a Lodge can leave the finish tacky or brittle.The rest of the job is managing that heat and the single drop of oil that decides between a glassy finish and a gummy mess.
What follows: the two cleaning steps you can’t skip, the oil layer thinner than you think, the oven setup that catches drips, and the three most common reasons a cure fails right out of the oven.
Key Takeaways
- Manufacturer temperature is law. Lodge cures at 450–500°F; Vollrath cures at 350°F. Using the wrong one damages the polymer bond.
- Oil thickness is everything. The pan should look almost dry after you wipe it. Any visible oil pools will bake into sticky spots.
- Rust removal requires a timer. Soak heavily rusted pans in a 1:1 vinegar-water solution, but check every 15 minutes. Over-soaking etches the iron.
- Sticky pans are fixable. A sticky skillet means too much oil was used. Re-bake it upside down at the correct temperature for an hour to harden the excess.
- Cooking is the best maintenance. After the initial cure, regular cooking with fats builds seasoning better than repeated oven sessions.
What “Curing” Actually Means
Curing, or seasoning, is the process of bonding oil to raw cast iron through heat. This process involves a chemical change called polymerization. When oil is heated past its smoke point, its molecules break down and reorganize into a hard, plastic-like layer that fuses to the metal’s porous surface.
This polymer layer has two jobs. First, it seals the iron from air and moisture, which is what stops rust. Second, it creates a semi-nonstick cooking surface that improves over time. A new cast iron skillet straight from the factory has a very thin, basic version of this layer. A home cure builds it up for better performance and durability.
Polymerization is the chemical reaction where fat molecules, heated beyond their smoke point, cross-link into a hard, stable coating bonded to the cast iron surface. This coating is hydrophobic and provides the skillet’s non-stick properties.
The goal is to establish a durable base layer that you can strengthen through regular use. Trying to rush a deep black color often leads to the common mistakes that leave a pan sticky or flaky.
Pre-Cure Prep: Cleaning and Rust Removal
You cannot cure over dirt, old food, or rust. The oil needs a clean, bare metal surface to bond to. Skipping this step traps contaminants under the new seasoning, guaranteeing a weak spot that will flake off during cooking.
Start with a clean, dry pan. If the skillet is new and pre-seasoned, wash it with warm, soapy water and a non-abrasive sponge. This removes the factory shipping protectants. For a used pan with built-up grime or old, flaky seasoning, a more aggressive scrub is needed. Use coarse kosher salt as a gentle abrasive with a damp cloth, or a dedicated chainmail scrubber for stuck-on carbon.
Rust is the enemy. If you see orange spots, you must remove all of it before curing. For light surface rust, a Lodge Rust Eraser or a scouring pad with soap works. For extensive rust, the NC Cooperative Extension cast iron guide recommends a controlled soak.
Where this goes sideways: Soaking a rusty pan in pure vinegar or for too long. The acid can etch the iron, pitting the surface. Submerge the pan in a 1:1 solution of white vinegar and water. Set a timer for 15 minutes, check it, and scrub. Never leave it for more than an hour total. The rust will soften and flake off.
After rust removal, you must immediately wash, dry, and begin the curing process. Iron will flash-rust in minutes when exposed to air after an acid bath. Dry the pan thoroughly on the stovetop over low heat until all moisture evaporates.
Choosing Your Curing Oil

The oil’s job is to polymerize, not to flavor your pan. You need a fat with a high smoke point, higher than your target oven temperature. This ensures the oil breaks down and bonds properly without burning away.
Canola, vegetable, grapeseed, and sunflower oil are all excellent, neutral choices. Avoid low-smoke-point oils like extra virgin olive oil or flaxseed oil (despite its old-school reputation). Flaxseed polymerizes very hard but is brittle and prone to cracking. Avoid butter or bacon fat; their milk solids and sugars will carbonize into a sticky, smelly mess.
| Oil Type | Smoke Point | Good for Curing? | Why |
|---|---|---|---|
| Canola/Vegetable | 400-450°F | Yes | Neutral, high smoke point, accessible, polymerizes evenly. |
| Grapeseed | 420°F | Yes | Very high smoke point, clean polymer layer. |
| Sunflower | 440°F | Yes | Similar to vegetable oil, reliable results. |
| Flaxseed | 225°F | No | Smoke point too low; creates a brittle layer that flakes. |
| Olive Oil | 375°F | No | Smoke point is often too low for 450°F+ cures; can leave residue. |
The best oil is the one you have that meets the smoke point test. The myth that certain oils create a “better” seasoning is overblown. Consistency and proper technique matter far more.
The Core Oven-Curing Process
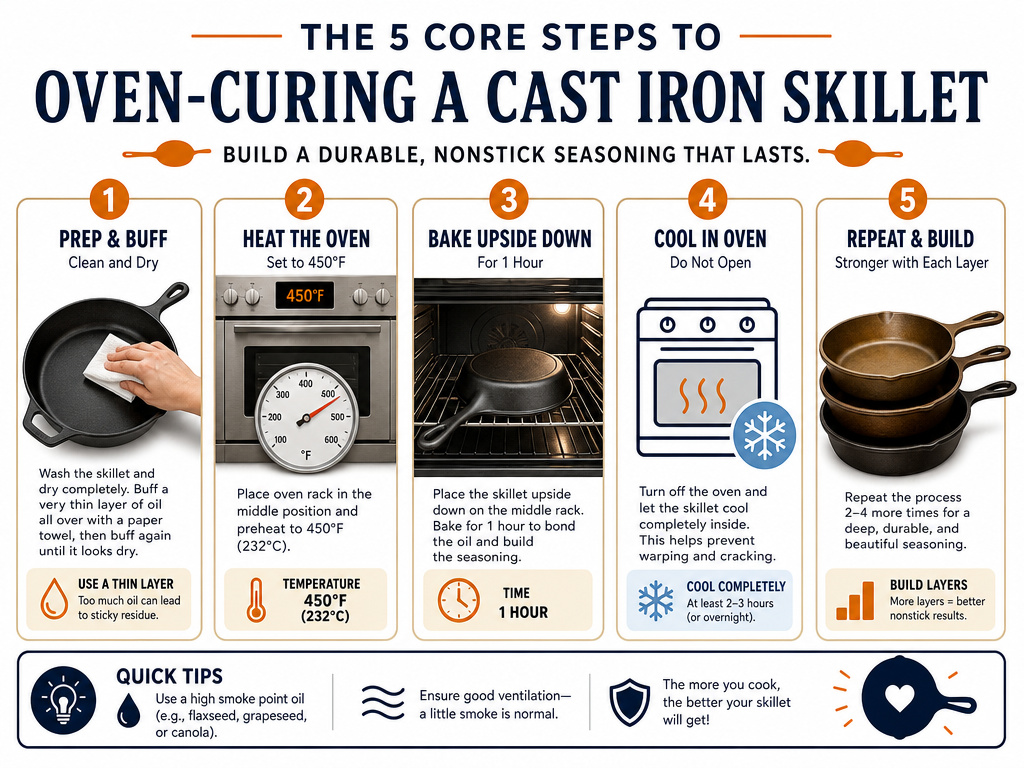
This is the standard, most reliable method for building a strong, even base layer of seasoning. It uses your oven’s consistent, all-around heat.
1. Apply a vanishingly thin layer of oil. Pour about a teaspoon of your seasoning oil onto the cool, dry pan. Use a folded paper towel or lint-free cloth to spread it over every surface: inside, outside, bottom, and handle. Then, take a clean paper towel and buff the pan aggressively. Your goal is to wipe off almost all the oil. The skillet should look slightly damp, not shiny or greasy. If you see any droplets or streaks, you used too much. This is the single most important step.
2. Preheat and prepare the oven. Place a large sheet of aluminum foil or a baking sheet on the bottom rack to catch any potential drips. Now, preheat your oven to the correct temperature for your pan. * For Lodge and most common brands: 450–500°F. * For Vollrath commercial cookware: 350°F (176°C).
3. Bake upside down for one hour. Place the skillet upside down on the middle oven rack, above the foil. Baking it upside down prevents any microscopic excess oil from pooling in the cooking surface. Close the door and set a timer for one full hour.
4. Cool completely in the oven. When the hour is up, turn the oven off. Do not open the door. Let the pan cool all the way down inside the turned-off oven, this can take several hours. This slow cooling helps the polymer layer set and adhere firmly.
5. Repeat. One cycle gives you a thin, amber-colored layer. For a more robust base seasoning, repeat steps 1 through 4 two or three more times. You’ll see the color deepen with each cycle.
Common Curing Problems and Fixes
Even when you follow the steps, things can go wrong. Here are the typical failures and how to correct them.
Sticky or Gummy Surface
This is overwhelmingly caused by using too much oil. The excess can’t fully polymerize and remains in a viscous state. * Fix: Don’t strip it. Simply put the sticky pan back in the oven, upside down, at the correct temperature for another hour. The extended heat will often harden the excess. After it cools, wipe it down. If it’s still tacky, you may need to wash it with soap to remove the gunk and start the cure over. This is a core part of learning how to maintain your skillet.
Spotty, Uneven Coloring
The pan looks blotchy, dark in some spots, light or metallic in others. This is normal, especially after the first cure. It does not affect performance. * Fix: Keep cooking. As you clean your skillet after use and apply thin layers of oil from cooking, these patches will fill in and darken over time. The seasoning layers interlock like puzzle pieces.
Black Flakes in Food
You see small, black, carbonized bits coming off during cooking. This is old, brittle seasoning flaking off, often because layers were built too thickly. * Fix: Scrub the pan well to remove any loose flakes. Give it a good stovetop maintenance seasoning: apply a whisper-thin layer of oil, heat it on medium until it just starts to smoke, then let it cool. This smooths the surface. If flaking persists, you might need to remove rust and completely re-cure.
| Problem | Likely Cause | Immediate Fix |
|---|---|---|
| Sticky/Gummy | Too much oil applied. | Re-bake upside down for 1+ hour. Wash and re-cure if still sticky. |
| Rust Spots | Moisture left on pan. | Scrub off rust immediately, dry on stovetop, apply a thin oil coat and heat. |
| Flaky Seasoning | Thick, uneven oil layers. | Scrub off loose flakes, perform a stovetop seasoning, cook fatty foods. |
| Smoke Alarm | Oil pooled under rim or handle. | Always bake upside down, wipe excess oil from all crevices before baking. |
Stovetop Curing and Maintenance
The oven method is for building base layers. The stovetop method is for quick touch-ups and maintenance after cooking.
After you wash and dry your skillet, place it on a burner over medium heat. Add a few drops of oil and spread it with a paper towel held by tongs. Heat the pan until the oil just begins to smoke, then immediately turn off the heat. Let it cool on the burner. This takes 5-10 minutes and adds a micro-layer of seasoning.
This is not a substitute for a full oven cure on a bare or rusty pan. The stovetop’s direct heat is uneven, so it can lead to patchy seasoning if used for initial curing. Its best use is for the quick oil-and-heat step after cleaning your pan to keep it protected.
Frequently Asked Questions
Can I use soap on a cured cast iron skillet?
Yes, absolutely. Modern dish soaps are mild and won’t strip the hardened, polymerized seasoning layer. Avoid soaps with added lotions or abrasives, but standard dish soap is safe for proper cleaning. The old “no soap” rule applied to lye-based soaps, which haven’t been common for decades.
Why did my new pre-seasoned skillet rust?
Pre-seasoning is a thin, industrial layer. If it’s scratched during shipping or storage, or if the pan is left wet, the exposed iron will rust. This doesn’t mean the pan is ruined. Just scrub off the rust and give it a proper home cure as outlined above.
How many times do I need to cure a new skillet?
For a brand-new, pre-seasoned pan, one to three oven cycles is sufficient to establish a strong personal base layer. After that, the best way to build seasoning is to maintain your pan and cook with it regularly, especially with fats like oils, butter, or bacon.
What’s the difference between curing and re-seasoning?
Curing typically refers to the initial process of building the first base layers on new or stripped iron. Re-seasoning is the act of repairing or adding layers to an existing, but damaged, seasoned surface, like fixing a sticky skillet or spots where the seasoning has worn thin.
Can I ruin my cast iron skillet by curing it wrong?
It’s very hard to permanently ruin a skillet through curing mistakes. The worst common outcomes, stickiness, flakiness, rust, are all fixable. The only ways to truly destroy it are cracking it with extreme thermal shock (like plunging a red-hot pan into water) or letting it rust completely through.
The Bottom Line
Curing a cast iron skillet is a simple chemical process complicated by overthinking. Clean the iron, apply less oil than you think possible, and bake it at the manufacturer’s specified temperature. Lodge’s 450–500°F and Vollrath’s 350°F aren’t interchangeable, that’s the spec that ensures the oil polymerizes correctly. A sticky pan means too much oil; a blotchy pan just needs more cooking. The cure is just the foundation. The real seasoning, the deep black glassy finish, comes from the proper maintenance of regular use, not the oven.
