
What to Cook in a Steamer for Perfect Veggies, Rice & Fish
This post contains affiliate links. As an Amazon Associate, we earn from qualifying purchases.
You can cook almost anything in a steamer, but four categories work best: vegetables (broccoli, carrots, green beans), proteins (fish fillets, shrimp, chicken breasts), grains (rice, quinoa), and dumplings or eggs. The key is matching the food’s density to the steamer’s tier and following the manufacturer’s cold-start rule for even cooking.
That rule changes everything. Most guides treat steaming as a single technique. Your steamer’s manual likely specifies two distinct procedures: a cold start for most vegetables and a hot start for delicate items like fish. Ignoring that distinction is why one basket turns to mush while another stays raw in the middle.
What follows: the exact cold-start timings from a major brand’s manual, the one mistake that damages the heating element, a tier-by-tier strategy for multi-level cooking, and the simple test to know when your shrimp are done. This isn’t about lists of foods. It’s about the mechanics that make them turn out right.
Key Takeaways
- Follow the cold-start rule in your manual. For vegetables like broccoli and carrots, add food to a cold steamer with cold water. This allows the food to heat gradually with the rising steam, cooking it evenly without exterior mush.
- Never add salt, herbs, or broth to the water reservoir. Seasonings won’t circulate with the steam; they’ll concentrate and corrode the heating element and reservoir surfaces over time. Season the food directly.
- Place the densest, slowest-cooking items in the lowest basket. Steam rises, so the bottom tier gets the hottest, most consistent heat. Put root vegetables or chicken there, and move quicker-cooking greens like spinach to the top.
- Check your water level every 20 minutes for long cooks. If the steamer boils dry, the boil-dry protection will shut off the heat, but the timer may keep running, leaving your food undercooked and risking element damage.
- Use the dedicated rice bowl with its own water, not the steaming water. Adding water directly to rice in its bowl prevents it from becoming a soggy, flavor-absorbing sponge for drips from above.
The Cold-Start Rule Most Manuals Push (and Why It Works)
Your instinct is to wait for steam before adding food. For many vegetables, that’s wrong.
The Russell Hobbs 26530-56 manual states: “These foods are best cooked using your steamer from cold. Fill the reservoir with cold water, add the ingredients and set the timer.” It then lists times for broccoli (13-15 min), green beans (13-15 min), and sliced carrots (17-19 min).
This isn’t a suggestion. It’s a thermal prescription. A cold start lets the food and the water heat up together. The temperature ramp is gentle. The vegetable’s cell walls have time to soften without the violent burst of 100°C steam hitting a cold surface, which can cause the outside to overcook before the center is warm.
Hot-start foods are the exception. The same manual notes that some items, often delicate proteins like fish, “should be cooked once steam is being produced.” Why? Because fish cooks in minutes. Dropping it into already-rolling steam gives you precise control—you’re essentially timing from the moment it hits the heat, not from the moment you turn the machine on. The window between perfect and overdone is about 90 seconds.
Here is the practical breakdown from common manuals:
| Food Type | Start Method | Reason & Outcome |
|---|---|---|
| Dense Vegetables (Carrots, Broccoli, Potatoes) | Cold | Even cooking from core to surface. Prevents a mushy exterior with a hard, raw center. |
| Leafy Greens (Spinach, Cabbage) | Hot or Cold | Cooks so fast it matters less. A cold start is safer to avoid wilting them instantly. |
| Fish Fillets & Scallops | Hot | Precise, short cook time (4-8 min). Cold start risks uneven, rubbery texture. |
| Shrimp & Dumplings | Hot | Cooks in 5-7 minutes. Needs immediate steam to set shape and cook through quickly. |
The mistake is applying one rule to everything. Your steamer basket doesn’t care, but your dinner will. Check your manual. If it’s lost, default to cold for hard veggies and hot for soft, quick-cooking proteins.
What to Cook in a Steamer: The Four Best Categories
Steaming is about gentle, moist heat. It excels where boiling washes away flavor and roasting dries things out. These four categories leverage that strength.
1. Vegetables (The No-Brainer)
This is why most people buy a steamer pot. Beyond the cold-start rule, cut for consistency. A 2cm broccoli floret and a ½cm carrot slice need different times. Jumble them together in one basket, and you’ll have chalky carrots or soggy broccoli.
Common mistake: Overfilling the basket. If vegetables are stacked more than a single layer deep, the steam can’t circulate. The ones on the bottom steam; the ones on top essentially sweat. Stir halfway through if you must pack it, but a loose, single layer always wins.
Best performers: Broccoli, green beans, asparagus, carrots, cauliflower, snap peas, zucchini slices.
Skip these: Large, whole potatoes or beets unless diced. They’ll take forever and drain your reservoir dry.
2. Proteins (Fish, Chicken, Shrimp)
Steam is a gentle protein cooker. It’s almost impossible to get the violent, protein-tightening heat surge that makes fish tough in a pan.
- Fish fillets (like salmon, cod): Place on a plate or lettuce leaf in the basket to prevent sticking. Steam over high heat for 4-8 minutes per inch of thickness. The flesh will turn opaque and flake easily.
- Chicken breasts: Pound to even thickness first. Steam for 10-12 minutes. The juices will run clear, not pink.
- Shrimp: The test is visual, not temporal. Steam until they curl into a tight “C” shape and turn pink. That’s about 5-7 minutes for large shrimp. An “O” shape means they’re overcooked and will be rubbery.
The principle here is indirect heat. The steam transfers energy without direct contact, so proteins cook evenly without a crust. It’s the opposite of searing.
3. Grains & Eggs
This is where your steamer’s rice bowl earns its keep.
Where this goes sideways: Putting rice directly in a steamer basket. Without its own container, rice grains fall through the holes, and any drippings from food above will make it soggy and strange. Always use the bowl.
The Russell Hobbs RHSTM3 manual is clear: “Add the dry rice and water to the rice bowl… Rice should take 15 to 20 minutes.” The water goes in the bowl with the rice, not in the main reservoir. The steam from below cooks the rice in its own contained environment. The same method works for quinoa.
For eggs, skip the boiling water gamble. Place eggs directly in a steamer basket. Steam for 6 minutes for a runny yolk, 12 minutes for fully set. The steam heats them more evenly than boiling water, leading to easier peeling.
4. Dumplings, Buns, and Tamales
If you understand how steamers work, this makes perfect sense. The constant, moist heat re-heats pre-cooked dumplings without drying them out and cooks raw ones evenly. The steam keeps the dough supple.
Line the basket with parchment paper or cabbage leaves to prevent sticking. For delicate items like soup dumplings (xiao long bao), a cover a steamer is non-negotiable to trap the heat. Without the lid, the top won’t cook through.
The Tier Strategy: How to Use a Multi-Level Steamer
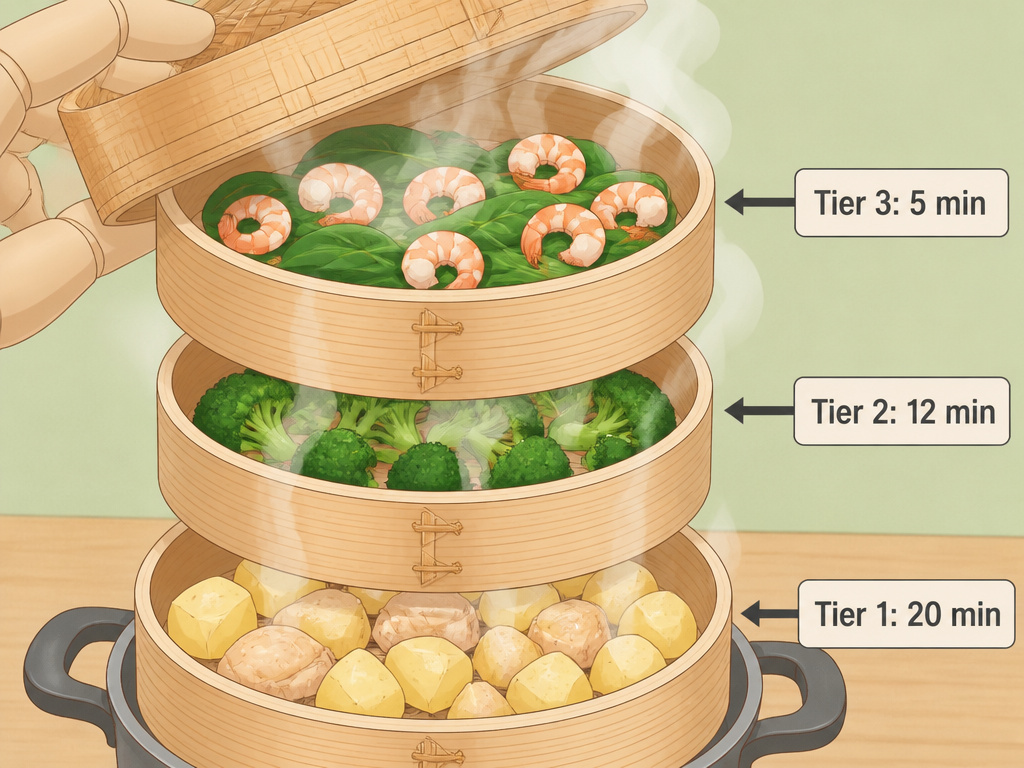
A three-tier unit like the Ovente FS53 or Tefal VC102316 isn’t just for volume. It’s for cooking a whole meal at once. The rule is simple: heat rises, so time descends.
Put the food that needs the longest cook time in the lowest basket (Tier 1). This tier gets the first and hottest steam. Think potato chunks, chicken pieces, or thick carrot coins.
The middle basket (Tier 2) gets items with a medium cook time—broccoli florets, cauliflower, thicker fish fillets.
The top basket (Tier 3) is for the quickest-cooking items: leafy greens like spinach, snow peas, or shrimp you’ll add in the last 5 minutes.
| Steamer Tier | Heat Intensity | Best For (Examples) | Typical Time |
|---|---|---|---|
| Bottom (1) | Highest, most direct | Dense roots (potatoes, carrots), chicken, hard squash | 15-25 minutes |
| Middle (2) | Moderate | Cruciferous veggies (broccoli, cauliflower), fish fillets | 10-15 minutes |
| Top (3) | Gentle, residual | Leafy greens (spinach, cabbage), shelled peas, shrimp | 3-8 minutes |
The Tefal VC102316 manual confirms the logic: “If the cooking times are different… Start cooking the food that requires the most time in the lower bowl and then add the upper bowl(s) while cooking is in progress.”
You can stagger the start. Load the bottom tier, set the timer for 10 minutes, then add the middle tier. Five minutes later, add the top tier. Everything finishes together. This is the secret to a one-pot steamed dinner.
What Not to Do: The Mistakes That Break Your Steamer or Your Food

Steamers are simple. The failures are predictable.
1. Adding anything but water to the reservoir. The Russell Hobbs 26530-56 manual is blunt: “Don’t add anything to the water. Seasonings, marinades… Will possibly [damage] the surfaces of the reservoir and element.” The salt or acids won’t vaporize and season your food. They’ll concentrate in the boiling water, accelerating corrosion. Season the food directly.
2. Letting it boil dry. Most models, like the Kogan KACMPFDSTMA, have boil-dry protection. It shuts off the heat. But the timer often keeps counting down. Your food stops cooking, and the empty, hot element can be damaged. For any cook over 20 minutes, check the water level halfway through.
3. Using frozen meat or poultry without defrosting. This is a food safety call-out repeated in every manual. A frozen block will have a cold center long after the outside is in the “danger zone” temperature range where bacteria thrive. Defrost fully in the fridge first.
4. Expecting a crispy texture. Steaming is a moist-heat method. It will never create a crust or sear. Don’t try to “steam-sear” a steak. It will be gray and soft. Use it for what it’s good at: tenderness and flavor preservation.
If you find yourself without the proper gear, there are solid steamer alternatives. A colander set over a pot of simmering water, tightly covered, works in a pinch. But for regular use, investing in one of the best steamer baskets or a dedicated unit like a vegetable steamer basket from our reviews saves time and delivers consistent results.
Maintenance: The 3-Month Rule Everyone Forgets
Steamers are low-maintenance, but they aren’t no-maintenance. Mineral deposits from hard water (limescale) build up on the heating element.
The Russell Hobbs RHSTM3 manual recommends descaling every 3 months. Scale acts as an insulator. The element has to work harder and get hotter to boil the water, which shortens its life and can lead to premature failure.
The process is simple. Fill the reservoir with a 50/50 mix of white vinegar and water. Run the steamer for 15-20 minutes to let it boil and steam. Then, unplug it, let it cool completely, empty the reservoir, and rinse everything thoroughly. The vinegar dissolves the mineral deposits.
After every use, proper clean a steamer routine involves washing the baskets, lid, and rice bowl with warm soapy water. Never immerse the base unit in water. Wipe it down with a damp cloth. Let all parts dry completely before storing to prevent mildew. This basic care prevents flavors from transferring between cooks and keeps your appliance running for years.
Frequently Asked Questions
Can you steam frozen vegetables?
Yes, and you should use a cold start. Place the frozen vegetables in the basket, add cold water to the reservoir, and set the timer. You may need to add 2-4 minutes to the usual fresh vegetable time. Stir halfway through to break up any clumps.
How much water do I put in a steamer?
Check your manual. For the Russell Hobbs 26530-56, filling to the MAX mark (500ml) provides about 60 minutes of steam. For short cooks under 15 minutes, the Kogan manual says to fill only to the MINIMUM mark. A good rule: for every 15 minutes of cook time, ensure you have at least 1 cup (250ml) of water in the reservoir.
Can you steam multiple things at once?
Absolutely—that’s the point of a multi-tier steamer. Use the tier strategy: longest-cooking items on the bottom, shortest on top. Just be mindful that adding more baskets and food will slightly increase the time needed for the steam to penetrate everything. Add 2-3 minutes to your total timer.
Is it better to steam or boil vegetables?
Steaming is almost always better for nutrient retention and flavor. Boiling leaches water-soluble vitamins (like vitamin C and many B vitamins) into the water, which you then pour down the drain. Steaming cooks the vegetables with the vapor, so those nutrients largely stay in the food. The texture is also firmer and less waterlogged.
Can I make soup in a steamer?
Not directly. A steamer doesn’t hold liquid in a way you can eat from. However, you can use it to cook soup components—like vegetables and proteins—before adding them to your broth. The collected juices in the drip tray can also be added to your soup stock for extra flavor.
The Bottom Line
A steamer isn’t a niche gadget. It’s a weekly workhorse for vegetables, proteins, and grains. Master the cold-start rule for even vegetables. Never season the water. Use the tiers logically, with the longest-cooking food on the bottom. And every three months, run some vinegar through it.
For most home cooks, a simple two-tier model with a rice bowl is enough. The Russell Hobbs 26530-56 series gets the fundamentals right. If you cook for a family often, a three-tier unit like the Ovente FS53 gives you the space to make a whole meal at once. The goal is tender, flavorful food with minimal fuss and maximum nutrition. Your steamer delivers that, one basket at a time.
