
Why Is My Copper Frying Pan Sticking | The 3 Heat Mistakes
This post contains affiliate links. As an Amazon Associate, we earn from qualifying purchases.
Your copper frying pan sticks because you’re hitting it with too much heat, too fast. Copper conducts heat five times better than stainless steel. That speed works against you. The surface spikes past the Leidenfrost point before your oil can polymerize, and food bonds directly to the metal. The fix is a slower preheat on medium, verified by the water droplet test, and treating acidic ingredients as a separate problem.
That conductivity is the whole game. It’s why a $300 copper pan can feel like a failure next to a $30 non-stick skillet on the first scramble. The manual for the Chantal Copper Fusion pan says it directly: “COOKING WITH HIGH HEAT CAUSES FOOD TO STICK.” They printed it in all caps because people ignore it every day.
What follows is the breakdown of three mistakes: the preheat race, the oil timing gamble, and the acidic food blind spot. You’ll get the manufacturer-specified temperatures, the physics of why food bonds, and the cleaning method that doesn’t make the problem worse.
Key Takeaways
- Copper pans demand medium heat. The GGM Gastro Copper Frying Pan manual warns against exceeding high temperatures to prevent warping and sticking.
- Preheat dry for 90 seconds on medium, then add fat. If the oil smokes on contact, the pan is already too hot.
- Acidic foods like tomatoes or wine react with bare copper, creating a chemical bond that feels like sticking. Use a clad pan with a stainless steel interior for those.
- Stuck-on food is often a polymerized oil film, not burned food. Scrub with baking soda paste, not steel wool.
- Copper darkens with heat and use. That patina doesn’t affect performance, but trying to polish it off after every use will.
The Science of Copper Sticking (It’s Not the Pan)
Copper doesn’t have a non-stick coating. Its performance comes from even, responsive heat. That’s also its weakness. When you crank the burner to high, the entire pan, base and sides, reaches searing temperature in under a minute. Oil doesn’t get a chance to heat gradually and form a stable layer.
Heating a copper pan too quickly bypasses the Leidenfrost effect. A water droplet should skitter across the surface, not instantly vaporize. If it vanishes in a violent sizzle, the metal is over 200°C and any protein will seize on contact.
The Eva Trio Copper manual states the correct test: place a bit of fat in the bottom, and when it starts sizzling, the pan is ready. If the fat smokes, the temperature is too high. That sizzle point for butter or oil is between 150°C and 180°C. Your burner’s “medium” setting should hit that range in about two minutes, not thirty seconds.
Sticking is a temperature mismatch. Eggs and fish proteins set around 65°C. If your pan surface is 250°C, they glue themselves to the microscopic pores in the metal before they even cook through. You’re not cooking food; you’re welding it.
Here’s what that failure looks like across common tasks:
| What You’re Cooking | Sticking Symptom | The Real Temperature Problem |
|---|---|---|
| Eggs | White fuses to pan, yolk breaks | Pan over 175°C. Proteins polymerize instantly. |
| Chicken breast | Skin tears off when flipped | Not enough fat at 160°C. Skin bonds before rendering. |
| Pancakes | Surface rips, leaves a doughy layer | Pan too cold (<150°C). Batter soaks in and adheres. |
| Onions | Caramelized bits cement to the base | Heat too high after sugar release. Sugar carbonizes. |
This is why reading a manual matters. The consensus web advice says “preheat until shimmering.” For copper, that’s often too late.
The 3 Heat Mistakes That Cause Sticking
You can trace every sticking incident back to one of these three errors. They compound, so fixing one without the others might not solve it.
1. The High-Heat Preheat
This is the universal first mistake. You want a sear, so you blast the burner. Copper complies too well. The GGM Gastro Copper Frying Pan specification sheet lists a maximum temperature resistance of 250 °C. A gas burner on high can push a thin pan past 300 °C in spots, risking warp and guaranteeing stick.
The fix is counterintuitive: start with a cold, dry pan on medium-low. Give it ninety seconds. Add a tablespoon of water. If it beads and dances, you’re in the zone. If it explodes into steam, the pan’s too hot, take it off the heat for sixty seconds. This test is faster and more reliable than watching oil.
2. Adding Oil to a Cold Pan
The other classic error is dumping oil into a cold pan, then heating them together. This seems logical, but it changes the oil’s chemistry. As the pan heats slowly, the oil breaks down, gets gummy, and leaves a residue. When you add food, it sticks to that residue, not the metal.
Where this goes sideways: Adding butter to a cold copper pan. The milk solids sink and burn before the pan hits cooking temp, creating instant sticky spots. Your eggs will find every one.
The right sequence: dry preheat first (as above), then add your fat. Let the oil heat for 15-20 seconds until it shimmers slightly, then add your food. For the Chantal Copper Fusion, the manual explicitly recommends spray oil, margarine, or butter applied to a pan that’s already warm.
3. Ignoring the “Acid Test”
Copper is a reactive metal. The Samsung cooktop guide notes it clearly: “This is also reactive cookware, and may affect the taste of certain foods, especially acidic food.” This isn’t just about taste. The acid in tomatoes, wine, vinegar, or lemon juice can chemically etch the interior surface of a pure copper or poorly clad pan. That microscopic etching gives food thousands more anchor points to grip.
If your tomato sauce sticks where your grilled cheese didn’t, reactivity is the culprit. For a long-simmered ragù, you want a pan with a fully inert lining like stainless steel. This is a fundamental limit of the material, not a flaw in your technique.
The Right Preheating Sequence for Copper
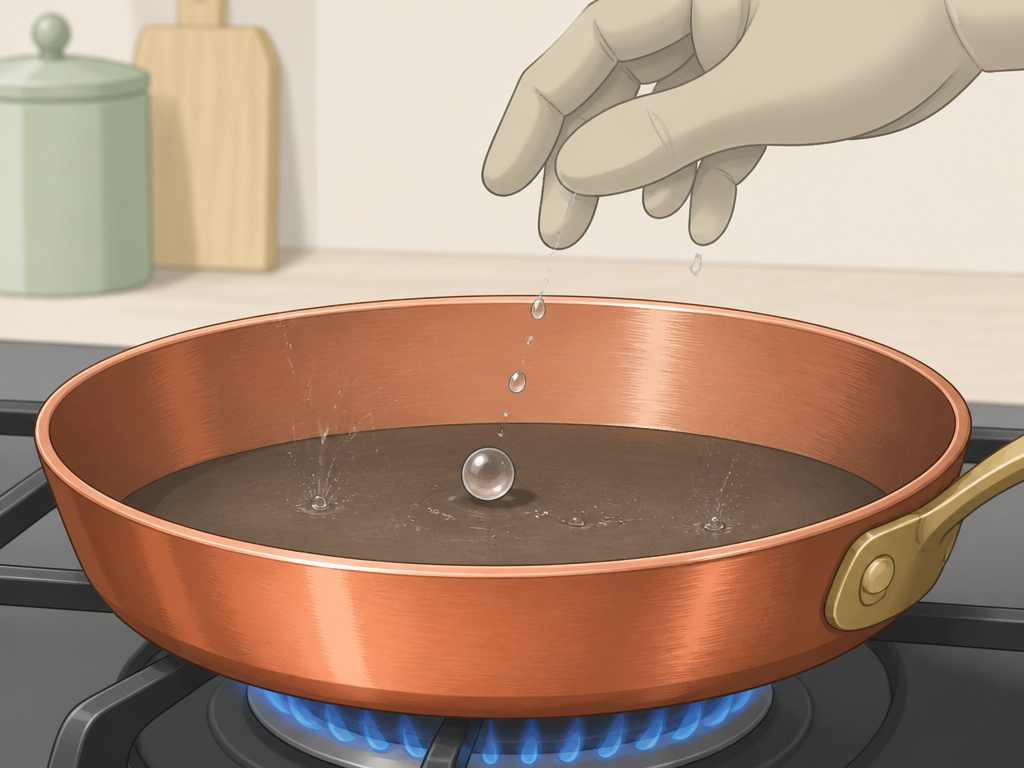
Forget everything you know about other pans. Copper has its own rhythm. Follow these steps exactly.
- Start dry, start cold. Place your empty copper pan on a burner set to medium. Not medium-high. Medium. For induction, use a setting between 4 and 6 out of 10. The Eva Trio manual warns never to heat an empty pan on induction, the climb is too fast.
- Wait for the water bead. After 90 seconds, flick a few drops of water into the pan. You want the Leidenfrost effect: the water forms a ball and skates around. If it sizzles violently and disappears, the pan is too hot. Pull it off the heat for a full minute to cool.
- Add your fat. Pour in your oil or add your butter. Let it heat for 15-30 seconds. You’re looking for a gentle shimmer in oil, or for butter to foam but not brown. If it smokes immediately, abort. Your pan is still too hot.
- Swirl and add food. Swirl the fat to coat the base, then immediately add your food. It should sizzle politely, not scream.
Skipping the water test means guessing. After two or three uses, you’ll learn how your specific stove and pan behave together. Until then, trust the bead.
What to Cook (And What to Avoid) in Copper
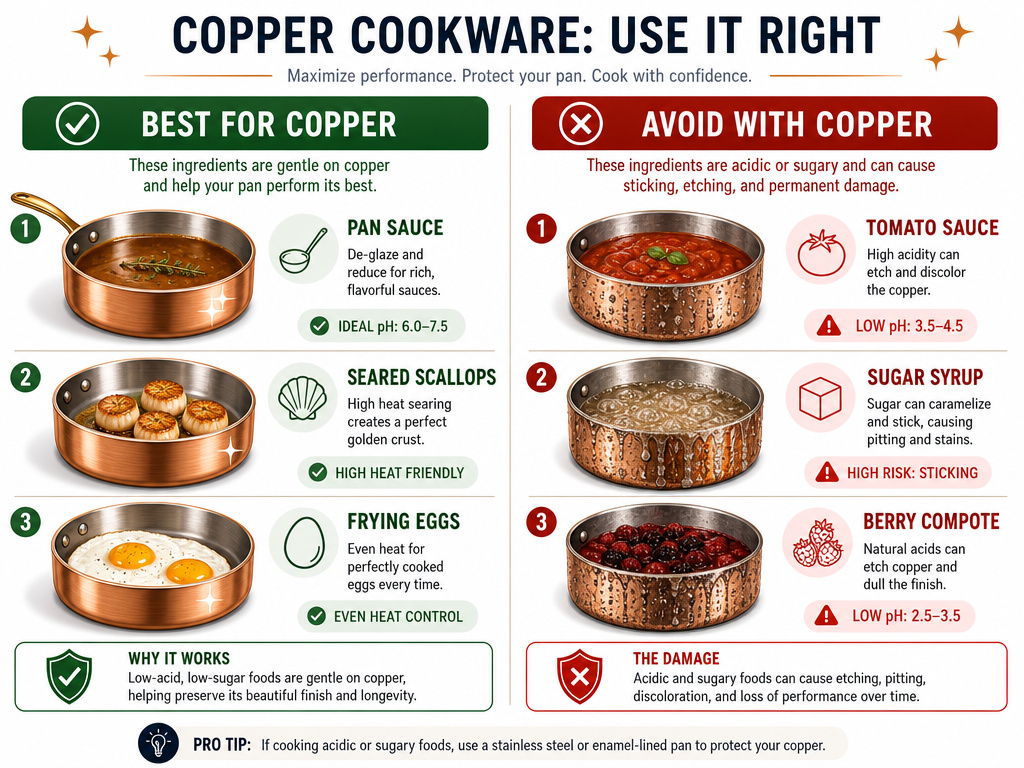
Not every recipe belongs in a copper pan. Its superpower is precise, even heat for tasks that benefit from quick temperature adjustments, like sauces, delicate proteins, and shallow frying. Its kryptonite is long-cooked acids and sticky sugars.
| Best Uses for Copper | Avoid or Use a Different Pan | Why |
|---|---|---|
| Pan sauces & deglazing | Long-simmered tomato sauce | Acid reacts with copper, causing off-flavors and etching. |
| Searing scallops or fish | Caramelizing a sugar syrup | Sugar bonds to copper at high heat and is nearly impossible to remove. |
| Sautéing vegetables | Cooking rhubarb or berry compotes | High fruit acid content will react aggressively. |
| Frying eggs (with practiced heat) | Slow-cooked braises with wine | Extended contact with wine vinegar promotes reactivity. |
| Browning butter for baking | Making candy or toffee | Sugar will seize and create a ruined, sticky layer. |
This table isn’t a restriction; it’s a tool. Knowing a copper pan’s limits keeps you from blaming the tool for a job it was never meant to do. For those avoid tasks, a well-maintained cast iron or a clad stainless steel pan is the better choice. Understanding frying pan materials helps you match the pan to the recipe.
How to Clean Stuck-On Food Without Damaging the Pan
That stubborn layer isn’t always food. Often, it’s polymerized oil, oil that has baked onto the surface from repeated high-heat use. Scrubbing with steel wool, as the IKEA care guide warns against, will scratch the copper and make future sticking worse.
Here’s the safe removal method:
- Cool completely. Never shock a hot pan with cold water. Let it sit until it’s warm to the touch, not scalding.
- Deglaze with water. Add an inch of warm water to the pan and return it to low heat. Simmer for 3-5 minutes. This loosens most bonded bits.
- Make a baking soda paste. For persistent spots, sprinkle baking soda over the area and add just enough water to form a thick paste. Let it sit for 15 minutes.
- Gently scrub. Use a soft sponge or a dedicated nylon pan scrubber. The paste will lift the residue without abrasion.
- Wash and dry. Hand wash with mild soap, dry immediately with a soft cloth to prevent water spots.
Common mistake: Soaking a copper pan for hours. Prolonged water exposure accelerates tarnishing and can weaken soldered seams on some models. Clean it within an hour of cooking.
For routine cleaning after successful, non-stick cooking, hand washing is non-negotiable. The GGM Gastro manual is explicit: “Hand wash only, do not place in dishwasher.” Dishwasher detergent is too alkaline and will dull the finish permanently. If you own a Copper Chef pan, the same rule applies despite the name.
Frequently Asked Questions
Does a copper frying pan need to be seasoned?
No, not in the way cast iron does. Copper doesn’t develop a polymerized oil layer for non-stick properties. Some chefs build up a very light patina of polymerized oil from regular use, which can help, but it’s not a required seasoning process. The primary non-stick agent in copper is correct heat management.
Why did my new copper pan stick immediately?
New pans often have a thin protective coating from the factory to prevent tarnishing. If you didn’t wash the pan thoroughly with warm soapy water before first use, that coating can melt and bake onto the surface, creating an instant sticky layer. Always wash a new pan first.
Can I use metal utensils on a copper frying pan?
It depends on the interior. If the cooking surface is bare copper or tin-lined, metal utensils will scratch and gouge it. If it’s a modern clad pan with a stainless steel interior (like the Eva Trio), stainless steel utensils are generally fine. When in doubt, use wood, silicone, or nylon.
Is the discoloration on the bottom of my pan bad?
The rainbow-colored tarnish or dark spots on the bottom are normal. They’re caused by oxidation from high heat, especially on gas burners. The Eva Trio manual confirms this discoloration doesn’t damage the product. You can polish it off with a dedicated copper cleaner if you want the shine back, but it’s purely cosmetic.
My copper pan worked great at first, now everything sticks. What changed?
You’ve likely built up a layer of carbonized oil and food residue. This rough, porous layer is stickier than the original metal. Follow the baking soda paste cleaning method outlined above to strip it back to the bare surface. Then, re-commit to the medium-heat preheat protocol.
The Bottom Line
A sticking copper pan is a temperature control problem, not a defective product. The metal is unforgiving but honest. It rewards a slow, medium preheat and punishes high-heat impatience every time.
Remember the three rules: preheat dry on medium, add fat to a warm pan, and keep tomatoes and wine for your stainless steel. When food does stick, reach for baking soda, not steel wool. Your pan will develop a darker patina with use, that’s its history, not its failure.
For most home cooks who master the heat, a clad copper pan like the Eva Trio provides that legendary control. If you’re still searching for the right model, our deep dive on the best copper frying pans compares the cladding, weight, and handles that make the difference. Copper isn’t the easiest material, but for the right tasks, nothing else responds quite like it.
