
Can You Sand Your Blackstone Griddle? Yes – Here’s the Right Way
This post contains affiliate links. As an Amazon Associate, we earn from qualifying purchases.
Yes, you can sand a Blackstone griddle. Blackstone’s official owner manuals for models like the 2149 and 1554 explicitly instruct owners to use “low grit sandpaper” or steel wool to scour off rust or heavy residue, followed by mandatory re-seasoning. This isn’t a hack; it’s the manufacturer’s prescribed repair for surface corrosion.
That authorization from the manual is the whole answer. The real question is when you should sand, what you use, and what you absolutely must do next to avoid making the problem worse. Sanding opens bare metal to air and moisture. If you don’t re-season within minutes, you’re guaranteeing more rust, and faster.
What follows: the exact OEM instructions, the one grit specification that clarifies “low grit,” the seven-step sand-and-reseason process, and the two scenarios where sanding is your only move.
Key Takeaways
- Blackstone’s own manuals authorize sanding with low-grit sandpaper, steel wool, or a Blackstone pumice stone specifically for rust removal.
- Always sand with the grain of the rolled steel to avoid creating deep, cross-hatched scratches that hold food and moisture.
- The immediate next step is not cooking—it’s a full re-seasoning process to seal the bare metal. Skip this and rust returns within days.
- In humid or coastal climates, Blackstone notes griddles may need more frequent seasoning, making post-sand seasoning even more critical.
- Aggressive sanding can void the 90-day finish warranty. Light scouring for maintenance is fine; grinding down to shiny metal is not.
The Official Blackstone Stance on Sanding
Forget forum speculation. The definitive answer is printed in Blackstone’s owner’s manuals. For models like the 36-inch 2149 and the Cooking Station 1554, the instruction is identical: if rust appears, “scour it off with steel wool or sandpaper, and re-season.”
The manufacturer’s guidance for rust removal is clear: “rub it off with steel wool, low grit sandpaper or the Blackstone Pumice Stone and re-season the surface.” This is a third-person, procedural directive from the OEM.
This turns sanding from a last-ditch repair into a standard maintenance step. The manual treats rust as a predictable event, not a product failure. Your job is to remove it and restore the protective seasoning layer. The critical clause is “and re-season.” Sanding without resealing the metal is pointless and destructive.
When Sanding Is the Right Call (And When It Isn’t)
You sand for two reasons: to eliminate active rust or to strip a damaged, flaking seasoning layer to start fresh. A few superficial rust spots after a rainy week? That’s a sanding job. A griddle that’s rusting consistently because you skipped seasoning is telling you to sand and rebuild the foundation.
Do not sand for routine cleaning. Stuck-on grease or carbonized food should be addressed with a proper scraping tool and dedicated griddle cleaners. Sanding is an abrasive reset button, not a daily scrubber.
| Scenario | Should You Sand? | Immediate Next Step |
|---|---|---|
| Surface rust spots | Yes | Light sanding, then full re-seasoning |
| Flaking, uneven seasoning | Yes | Sand to uniform surface, then full re-seasoning |
| Sticky residue or grease | No | Use a scraper and cleaner, then apply a light oil coat |
| General discoloration | No | Continue cooking and routine oiling after use |
Tools and Grit: What “Low Grit” Actually Means
Blackstone’s manuals say “low grit sandpaper.” That’s technically correct but vague. In abrasives, lower grit numbers mean larger, more aggressive particles. Grit around 60-80 would be low, but it’s also harsh enough to leave deep scratches you’ll never polish out.
The consensus from experienced users and third-party guides lands on 120-grit sandpaper as the effective medium. It’s aggressive enough to remove rust and old seasoning without gouging the steel. Pair it with a sanding block to keep pressure even.
Your other OEM-approved options are standard steel wool (grade 0 or 00) or a Blackstone-branded pumice stone. Steel wool is good for spot treatment. The pumice stone offers more control for larger areas. All three methods work on the same principle: abrasive removal of the top oxidized layer.
Common mistake: Using random orbital sanders or power tools. The vibration and speed generate too much heat, which can warp the thin steel plate. This is hand-work. Every manual assumes you’re using your hands.
Your toolkit for a proper sanding process is simple: 120-grit sandpaper, a sanding block, clean rags, and your chosen oil for seasoning. Wear gloves. The fresh metal edges after sanding can be sharp.
Step-by-Step: How to Sand Your Griddle Correctly
This is a reset procedure. Plan for at least an hour from cold griddle to first layer of new seasoning.
1. Cool and Clear. Ensure the griddle is completely cold. Disconnect the propane tank and move it away. Clear all utensils, condiments, and the grease tray.
2. Initial Clean (The One-Time Soap Exception). For a rusty surface, it’s acceptable to wash with a bit of mild dish soap and water this one time to remove grease film so you can see the rust clearly. Dry it thoroughly with towels and then heat it on low for 5 minutes to evaporate any residual moisture. This is the only time soap touches the cook surface.
3. Sand With the Grain. Look closely at your griddle top. You’ll see a faint, directional grain from the manufacturing rolling process. Always sand in the direction of this grain. Sanding across it creates microscopic cross-hatch grooves that will trap food and water, becoming future rust pockets. Apply moderate, even pressure with your sanding block.
4. Target the Rust. Focus on the orange or red spots. You don’t need to sand the entire griddle to bare metal unless the whole seasoned surface is failing. Sand until the rust is gone and you have uniform, dull gray metal.
5. Vacuum and Wipe. Use a shop vacuum to remove all sanding dust. Follow with a damp rag to pick up fine particles. Dry immediately. Any leftover grit will embed in your new seasoning layer.
6. The Non-Negotiable Next Step: Re-Season. This is the entire point. You must now perform a complete seasoning process. The bare metal you just exposed will begin to oxidize in minutes. Apply a thin coat of your chosen griddle oil, heat to smoking, let cool, and repeat at least three times.
7. Post-Sand First Cook. For your first meal, cook something fatty like bacon or burgers. This initial layer of cooking fat further polymerizes and hardens the fresh seasoning. Avoid acidic foods like lemon or tomatoes for the first few cooks.
Skipping step 6 is the failure. The consequences of not seasoning after sanding are absolute: flash rust within 24 hours, followed by deeper pitting.
Climate, Warranty, and Edge Cases
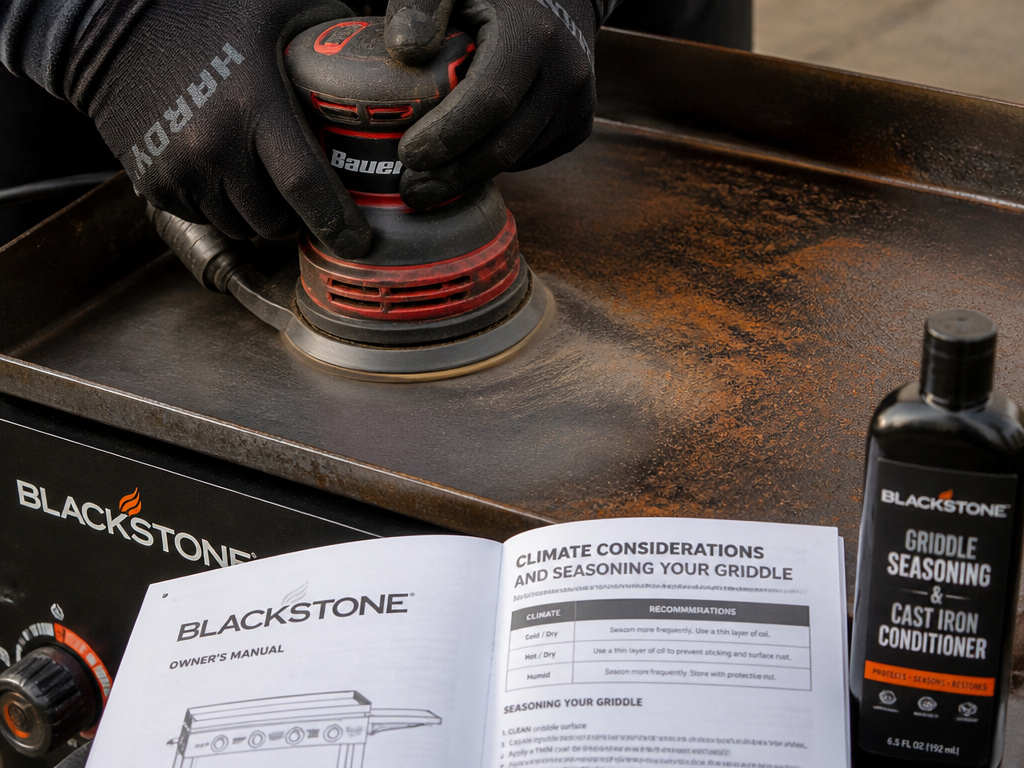
The manual for Blackstone models 2149, 1933, and 1650 includes a specific note: griddles in humid or coastal climates “may require more frequent seasonings between uses.” If you live near the ocean or in a damp region, the clock starts ticking faster the moment you finish sanding. Your re-seasoning needs to be flawless and you should apply a protective oil coat after every use, without exception.
Does Sanding Void the Warranty?
It can, but context matters. Blackstone’s 36″ Griddle Cooking Station (Model #1554) has a 12-month warranty on the griddle part for defects. More relevant is the 90-day warranty from the manufacturer, North Atlantic, covering “all parts, workmanship, and finishes (against rust).”
If you sand down to metal because of a manufacturing defect in the steel, you’ve potentially destroyed the evidence. If you’re sanding to correct surface rust that appeared due to your own storage neglect, that’s not a warranty claim anyway. Light scouring for maintenance as described in the manual is expected. Grinding the surface thin with power tools is not.
Sanding vs. Alternatives for Rust Removal

Sanding is the most direct mechanical method. How does it stack up against other rust removal methods?
Vinegar Soak: Effective for light rust, especially on removable parts like the grease tray. For the cook surface, it requires soaking rags and plastic wrap, which is messy. It also etches the metal, requiring a very thorough rinse and dry before seasoning, or you risk vinegar-flavored food.
Commercial Rust Removers: Potent chemicals like phosphoric acid converters. They work quickly but introduce harsh chemicals into a food-prep environment. If not neutralized and rinsed completely, residues can be hazardous. They also often leave a phosphate coating that must be scrubbed off before seasoning.
Electrolysis: The gold standard for vintage cast iron restoration. Overkill and impractical for a large, fixed outdoor griddle. It requires a power supply, a tank, and washing soda.
For the griddle top itself, sanding is the controlled, manual method the manufacturer anticipates. It’s physical, immediate, and leaves the surface ready for oil.
Frequently Asked Questions
Can I use an electric sander on my Blackstone?
No. Blackstone’s manuals specify hand-sanding with sandpaper or steel wool. Electric sanders generate excessive heat and friction, which can warp the thin steel cooking surface. They also remove material too quickly, making it easy to gouge the metal. This is a hand-finishing job.
What if I see rust again right after I season?
This is flash rust, and it means the metal wasn’t completely dry before you applied oil, or the oil layer was too thin. The thin water layer oxidizes the iron instantly. Wipe it off with a dry cloth, heat the griddle gently to drive off any moisture, and apply another very thin coat of oil. It should smoke and polymerize, sealing the metal.
Is it okay to sand the entire griddle down to shiny metal?
Only if the entire seasoning layer is failing—flaking off in patches, for example. Sanding the whole thing is a major project. You must be prepared to perform 4-6 meticulous seasoning cycles immediately after to build a new protective layer from scratch. If you have isolated rust, spot-sand.
Can I use sandpaper to clean burnt-on food?
Don’t. Sandpaper is for oxide removal (rust), not carbon removal (burnt food). Use a proper metal scraper or grill brick for cleaning. Sandpaper used for cleaning will unevenly wear your seasoning and create a rough surface that sticks more next time.
Will sanding make my griddle non-stick again?
Not directly. Sanding removes the problem (rust, old seasoning). The re-seasoning you do after sanding is what creates the non-stick surface. The fresh, polymerized oil layers are the slick barrier. Sanding just gives you a clean canvas to build that barrier on.
The Bottom Line
Sanding a Blackstone griddle isn’t just permissible; it’s the manufacturer’s instructed fix for rust. The procedure is straightforward: remove the corrosion with 120-grit sandpaper or steel wool, clean the dust, and immediately re-season. The failure point is always the “immediately.” New bare steel rusts in humid air before your eyes.
Keep the sanding for the two scenarios that need it—spot rust and total seasoning failure. For everything else, use a scraper. And if you live where the air is thick with salt or moisture, that post-sand seasoning isn’t a suggestion. It’s the only thing standing between your griddle and the rust you just worked to remove.
